Tuesday, April 23, 2024

Lamb Chops and Gigantes Plaki

Spring is starting to arrive in fits and starts here in Bend although one day will be warm and sunny and the next brisk and cool. There's likely to be more snow to come but the grass is starting to green. And this is more than enough to get my grilling juices going after a winter of seeing the grill out by the patio under a mantle of snow.

Ann invited Michelle and Andreas over for dinner this past weekend, and Michelle's mom Jean was in town, so of course she was welcome too. I no longer remember the thought process behind the menu for the night, but I am pretty sure it was built around a bag of huge Royal Corona beans from Rancho Gordo.

Grilled Lamb Chops, Spinach with Onions and Dill on Gigantes
I decided to make these huge beans into the classic Greek gigantes plaki, baked beans in tomato sauce. I'm pretty sure that grilled lamb chops followed from this thought. After a sunny day that was great for cleaning up the grill after a winter of disuse, the sky turned partly cloudy and spit a little rain just before our guests were ready to arrive. Nonetheless, we turned on the fire pit and sat outside anyway.

Royal Corona Beans Soaking Overnight
Uncooked Huge Beans
After soaking the Corona beans overnight, I par-cooked them with a couple bay leaves, a few dried rosemary needles, and four smashed cloves of garlic. I started the beans at 2pm, knowing our guests would arrive at 6 and figuring it would probably be 7:30 before we sat down to dinner. At 5:45, I was a bit concerned about the beans. Although they had been softening constantly through the afternoon, three hours on the stovetop was insufficient to render them creamy. After another 90 minutes in the oven though, they were just fine. Whew!

Tomato Sauce for Beans
I made a simple tomato sauce for the beans by sautéing an onion, a large carrot, and two stalks of celery in olive oil with garlic, crushed red pepper flakes, a bit of fresh thyme, and a fair amount of dried oregano. I also added ground cinnamon, just what would fit on the tip of a knife blade. To me, this dish doesn't taste right without it.

Ann, however, has a different opinion. She has a pretty firm rule that anything sweet or any spice that we Americans consider a pie spice does not belong in a savory dish. So, the sauce wasn't her favorite.

Once the vegetables had started softening, I stirred in a tablespoon of really amazingly concentrated Sicilian tomato paste called estratto. Then, I deglazed the pan with the juice of a lemon and added a can of crushed tomatoes and let the sauce bubble away for 20 minutes or so, just to bring the flavors together.

At 5:45, I scooped the still-cooking beans into the sauce and mixed them well. After transferring them to an oiled half hotel pan, I drizzled a little of the bean cooking liquid over the beans and covered the pan. They baked covered at 350F until dinner time, about 90 additional minutes.
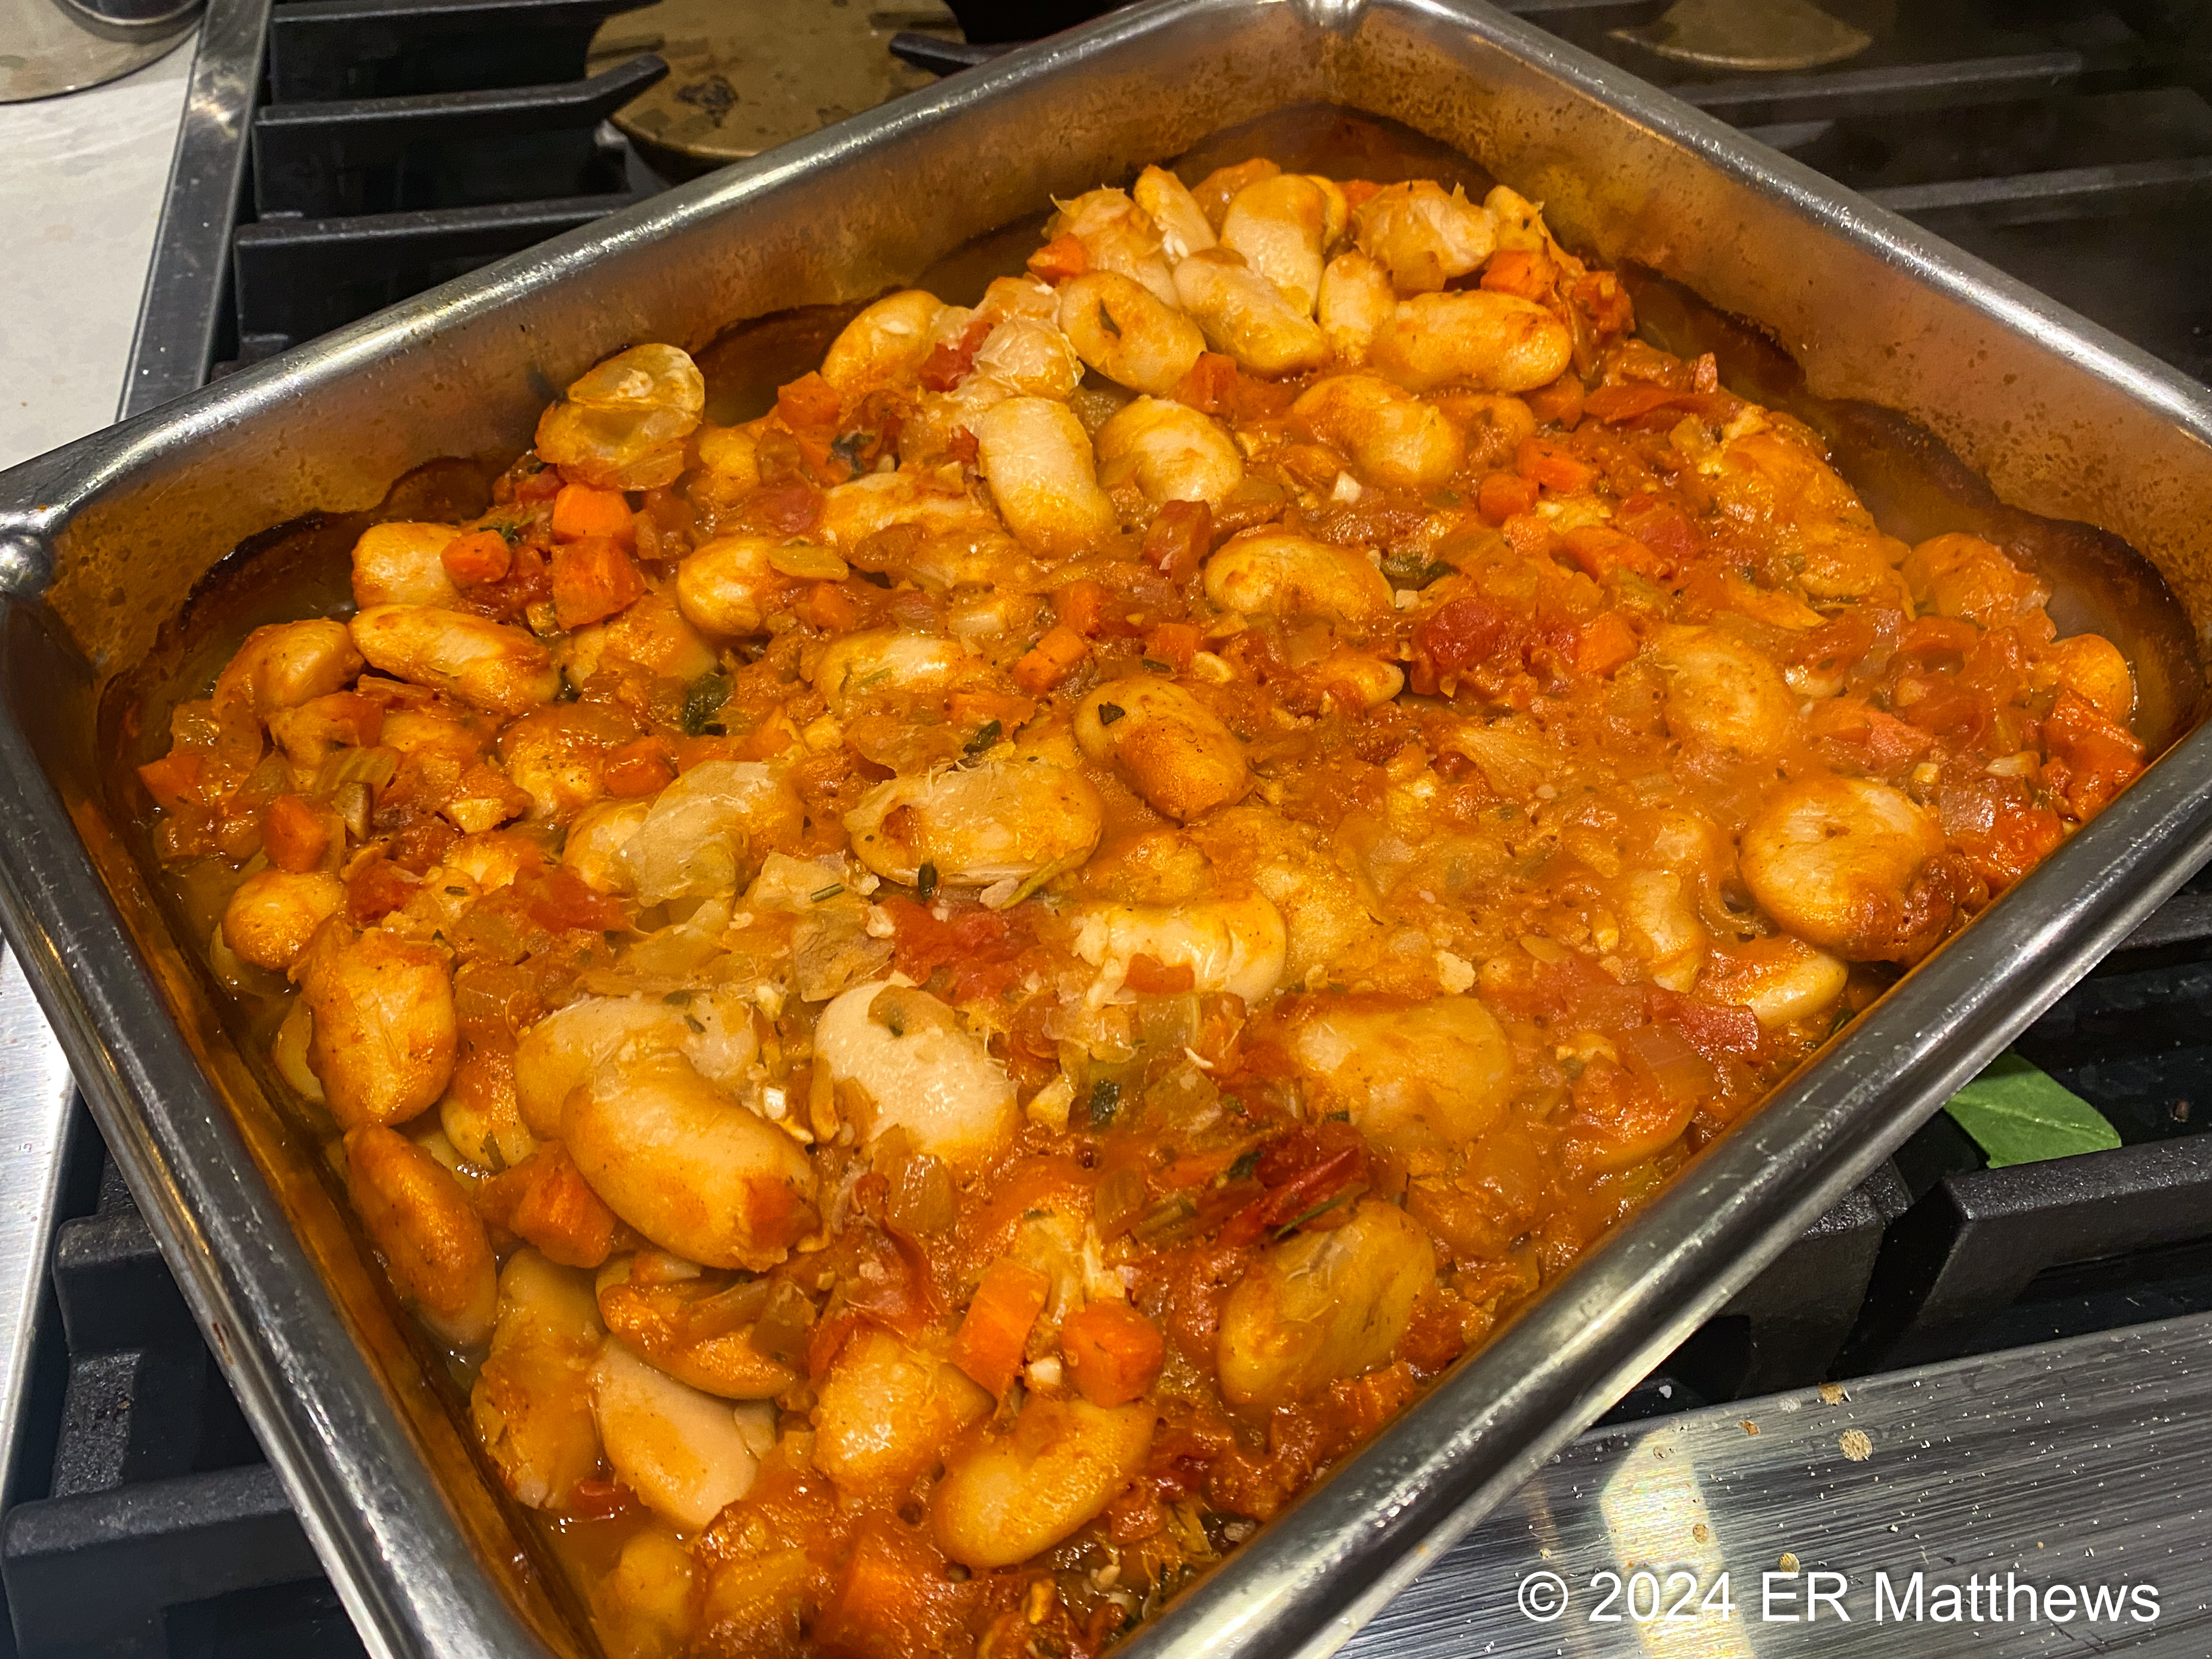
Gigantes Plaki
Our guests arrived shortly after I put the beans in the oven and Ann had poured me a glass of wine, a Semillon-Sauvignon Blanc blend from Walla Walla. We headed outside on the patio by the fire pit with a plate of risotto cakes to have for an appetizer. I like finger food for an appetizer and because Michelle is gluten intolerant, bread such as crostini is out. So, I tend to make rice cakes when she comes over.

Plain Risotto Base: Arborio, Onion, White Wine, Chicken Stock
Lemon, Dill, Feta, and Pine Nut Risotto Cakes; Tzatziki
I made a plain risotto with chicken stock, though I often use water. When the rice had cooled, I added a lot of lemon zest and fresh dill, a good sprinkle of crumbled Greek sheep's milk feta, a handful of toasted pine nuts, and two raw eggs. After mixing the rice well, I shaped it into cakes and seared the cakes.

First thing in the morning, I made tzatziki to accompany the cakes. Each time I make tzatziki, I make it slightly differently depending on what I have on hand and how I'm feeling, but I did publish a basic recipe here.

A Touch Chilly Outside Around the Fire
First thing in the morning, I put a bunch of lamb chops in the fridge to marinade. The marinade was quite simple: olive oil, a splash or two of red wine, a lot of chopped garlic, dried rosemary, and dried oregano. I turned the chops in the marinade every couple of hours.

Lamb Chops Ready to Grill
Lamb Chops, Ready to Plate
After I grilled the lamb chops, we headed inside where I cooked a couple pounds of small spinach. I chopped an onion and cooked it to tender in olive oil, then tossed in the spinach which wilted in short order. I added a big handful of fresh dill and seasoned with salt.

I decided to plate at the stove rather than serve everything family style. I put a bed of gigantes on each plate and then scattered some feta, fresh oregano, and salt over the top. After garnishing the gigantes with a healthy drizzle of olive oil, I put some spinach on top and then added the lamb chops.

All in all, it was a very simple meal and scratched my grilling itch. I'm so glad that we were able to share it with Michelle, Andreas, and Jean.

Monday, April 22, 2024

One Chicken, Three Meals

I've been wondering a lot recently about how to help people who don't have a lot of money make meals economically. What I see at the grocery store really causes me pause: almost all carts of groceries contain extremely expensive pre-prepared and probably not very nutritious foods, while very few carts actually contain items designed to be cooked into healthy meals.

I haven't really made any headway in figuring out how to help such people, but I thought I'd share how I put three dinners for two on the table for about $20. It all started with a single chicken, a 6-pound behemoth for which I paid $8.

Meal 1: Roasted Chicken and Roasted Asparagus


Roasted Chicken
This is as simple as dinner can get. I rubbed the entire chicken with olive oil and sprinkled it with salt and fresh thyme leaves. I put it on a sheet tray into the oven and cooked it until the thighs came up to 165 degrees in the thickest part, about 90 minutes in the oven at 375F.

When the chicken was done, I left it to stand on the stove while I put another sheet tray of asparagus drizzled with a little oil and salt into the oven. We ate the thighs, legs, and asparagus about 20 minutes later.

Additional cost for this meal $2.50: big bundle of asparagus: $2.50; fresh thyme, salt, olive oil: pennies

After dinner, I collected all the roasting juices from the chicken pan by adding a bit of hot water to it and then pouring it into a container. These juices were for soup later on. I sliced 3 nice slices off each breast and saved them for crunch wraps the next night. I also saved the bones from the legs and thighs as well as the chicken carcass for soup.

Meal 2: Chicken Tinga and Chipotle Refried Bean Crunch Wraps


Chicken Tinga and Chipotle Refried Bean Crunch Wraps
Using the leftover slices of chicken breast, I made crunch wraps with a layer each of chipotle refried beans, chicken breast in tinga sauce, and cheese.

To make the refried beans, I sweated an onion, finely diced, in oil until translucent. I put half the onion in the blender for the tinga sauce. To the remaining onion in the pan, I added two 14-ounce cans of drained and rinsed pinto beans. Then I added the tiniest pinch of Mexican oregano and one chipotle pepper, super finely minced. I added a touch of water to get things cooking and as everything cooked, I mashed the beans with the back of my wooden spoon. When the beans became tight, I turned of the heat.

To make the tinga sauce, I added to the onions in the blender a drained 14-ounce can of tomatoes, a chipotle, a pinch of Mexican oregano, and a pinch of salt. After blending this briefly using a couple of pulses of the blender, I added the sauce to a small pan on the stove where I heated it gently and reduced it to remove any excess water.

When I was ready to assemble the crunch wraps, I put the chicken breast slices in the warm sauce to reheat. Then I built the crunch wraps with a layer of beans, then the chicken slices, then a scant half cup of grated cheddar cheese. I mixed the leftover tinga sauce into the unused beans and had that for lunch the next day. See this post for the crunch wrap technique.

Additional cost for this meal $4.25: 2 cans pintos; $1.25, 1 can tomatoes: $1; tortillas: $0.50; onion $0.50; cheese: $1; 2 chipotles, Mexican oregano: pennies

These crunch wraps are actually massive and could stretch for two meals. After eating my entire one for dinner, I did not eat breakfast the next day, being still sated from dinner.

Meal 3: Chicken and Stars Soup


Chicken and Stars Soup
One of the primary reasons that I roast chickens is to have the carcass leftover for soup. I put into a soup pot the carcass, the leftover roasting juices, a couple sprigs of thyme, a quart of chicken stock, the ends of five carrots, the outer leaves of a leek (saved for soup from a meal earlier in the week), and the frilly leaves from a bunch of celery. After topping the carcass and vegetables with water, I put a low flame under it and went for a 90-minute walk.

When I came back, I turned the pot off and removed all the solids from the stock. After the chicken cooled, I picked all the meat from the bones (the remaining breast meat, the wings, and the oysters in the back) and saved it, pitching the bones and veggie scraps.

I cut one onion, four large carrots, and four stalks of celery into large pieces and put them in the stock and let them cook for an hour. When we were ready to eat, I brought the soup to a rolling boil and added a small 200g bag of pasta stars (estrellas, stelline) and the chicken meat and cooked the pasta for ten minutes.

Additional cost for this meal $5.25: chicken stock: $1.50; pasta: $0.75; onions, carrots, celery: $3

If I were on a budget, I would not have added the chicken stock, but soup is always better if you make a double stock from stock and bones rather than a single stock from water and bones. After two bowls of soup apiece, we had two additional bowls leftover for lunch.

Bottom Line

For these three meals for two, I spent right at $20. As a bonus, we had three lunches from the leftovers, all from a single chicken. I'm always thinking when I am shopping for groceries items that I can cook for one dinner and have leftovers to repurpose for another dinner.

Leek and Dill Mussels

Ann and I love mussels. Living in Central Oregon in the desert affords us no real opportunities for access to mussels, however. I took it upon myself to special order a bag of mussels at the store in hopes of surprising Ann.

The store notified me when they arrived and I hurried to get a 5-kilo (11-pound) sack of mussels from Puget Sound west of Tacoma. Sadly, I got no price break on the full bag and ended up paying a small fortune for them.

The mussels ended up being European mussels, no doubt farm-raised, very thin shelled and quite fragile, with extensive beards but otherwise clean, unevenly sized, almost all alive, and with tiny meats. I was disappointed and would not buy them again. Ann was happy just to have mussels and was less disappointed than I.

My disappointment comes from my experience with East Coast mussels. At my restaurant I started off serving farmed PEIs but their erratic quality and supply chain issues convinced me to switch to wild Cape Cod blues, the best mussels I've ever eaten. These Cape blues are now the gold standard by which I judge all mussels and these Puget Sound mussels sucked in comparison.

Quality issues aside, the following discussion about cleaning and preparation applies to mussels from any source. The goal is to clean the mussels of any foreign matter, to remove the so-called beards with which they attach themselves to surfaces, and to discard any broken or dead mussels.

Step One: Cover the Mussels in Water
The first thing that I do is to cover the mussels in fresh water. This will cause any live mussels to close their shells. Any mussel that floats is alive; in closing, they can trap enough air to float. You know that these mussels are good and you can start cleaning them.

Mussel with Beard
I've cleaned hundreds of thousands of mussels in my life and I believe that the best thing to use is a dishtowel, as unpopular as that may be at your house. [Hence why I buy bundles of bar mops from a restaurant supply house and discard them once I mess them up too badly.] Use the towel to get a grip on the slippery beard and pull it down towards the hinge, the pointy end of the mussel that is closest to the camera in the photo above. With a little tug, it should pull right out. Then using the towel, wipe any dirt off the mussel.

As you work your way through the mussels, you will run out of floaters. Just because mussels have sunk to the bottom of the bowl does not mean that they are bad or even dead. It may mean that they remained fully closed without any trapped air inside their shells or it may mean that they were a little slow to close on contact with the water and filled with water.

As you consider a mussel, if its shell is broken, discard it. If it is closed tightly, wiggle the shells a bit between your fingers to see if you can move the two shells apart. Sometimes the closed shells are full of mud and no mussel; these shells will separate fairly easily.

If a mussel is slightly open, you need to determine if it is alive. Give the two shells a gentle squeeze together. If the mussel is alive, this will trigger it to close. If it does not respond to this stimulus, throw it out.

Once the mussels are cleaned, they are ready for the pot. Cook them in a covered pot (or as we did at the restaurant, using two skillets, one inverted over the other as a makeshift lid). I generally start by sautéing a bit of onion, garlic, leek, or shallot in olive oil or butter.

Once that starts to smell good, I add the mussels to the pan making sure to leave head room for them to open their shells. Then I splash the wine with a small amount of cooking liquid, generally white wine. I have used and you could use just about any liquid including tomato juice, red wine, beer, broth, coconut milk, and so forth depending on how you want to sauce the mussels. You only need a little liquid because when the mussels open, they will release plenty of their own liquid.

Mussels Steaming in Sautéed Leeks and White Wine
In very short order, the mussels will open and the meats will go from translucent to solid color. At this point, I remove them to a service bowl discarding any mussels that failed to open.

At this point, I finish the sauce to pour over or enjoy on the side with the mussels. In this case, I added fresh dill to the mussel broth and whisked in some cold butter to lightly thicken the sauce. You really want to be careful with mussel broth not to reduce it no matter how great the temptation. Mussel liquid is highly briny and often tastes lightly of iodine, both flavors of the sea.

I once, as a young chef, had the bright idea to highly reduce the mussel liquid and use the resulting sauce to nap the cooked mussels, two mussel meats put into one half shell. Nice idea. But after a long time gently bringing the sauce to napping consistency, I tasted it to correct the seasoning. And I immediately spit the over salty, iodine-tasting mess in the trash. Don't be like young Ed. Learn from his lesson.

Butter and Dill for Finishing the Mussel Sauce
Steamed Mussels, Leek and Dill Broth on the Side
For me, the primary reason for cooking mussels is the resulting tasty broth. Sometimes I serve mussels in a bowl of broth; sometimes I put the broth on the side for dipping the mussel meats in. One of the joys of mussels is drinking all that great broth after you have eaten the mussels, or more hedonistically, using lots of great bread to sop up the broth. It irked me to no end to have customers at the restaurant not eat the broth after I spent all that time and effort in making it.

Leek and Mussel Soup
I'd never throw away any mussel broth and we had a lot left over after eating the mussel meats. The following evening, I put it in a soup pan, added a couple more leeks, and a splash of half and half. When the leeks were tender, I blended it to ultra-smooth and served it, still frothy from the blender, in coffee cups accompanied by slices of quesadilla for dipping.

Bottom line, I was terribly disappointed in the quality of these spendy mussels, but the two dinners from them made me very happy.

Wednesday, April 10, 2024

Oregon Badlands: Reynolds Pond

It's been about three weeks since the ice melted on the Deschutes River Trail and I've been taking advantage of that to walk through the canyon about five times a week. Today, Ann had a morning off from her workout class and agreed to walk with me. I wanted to walk some place other than along the river. That's a walk that I love, but fifteen times in the last three weeks is plenty. 

Because Ann hasn't been doing much if any walking this winter, I wanted to pick a short walk that was more or less flat. And because it's just early April, going west of town is not in play; the snow will not clear until the end of June/first of July.

I chose the Oregon Badlands Wilderness just east of town because it is close and because opportunities to hike in the badlands in reasonable temperatures are coming to a close. The Oregon Badlands are a place best hiked from fall to spring, through the winter when it is largely free of snow. Now, after the winter wet season, the sand is still relatively compacted and easier to walk on than it will be after it dries out and gets chopped up by a lot of foot traffic.

Loop Hike at Reynolds Pond Trailhead
Ann had hoped to see some wildflowers, but it's just too early here in Central Oregon. We saw none. Still, it was a beautiful day with blue skies, minimal clouds, and temperatures in the low- to mid-60s, a nearly perfect day.

There are many ways to get into the 29,000-acre (45-square mile) BLM-managed wilderness area and in the past, we have gone in on the southern edge bordering US 20, the highway out of Bend. I selected a trailhead on the opposite side, the north side just south of the town of Alfalfa, the Reynolds Pond trailhead. I selected it, I suppose, because we hadn't been there before and if I'm honest, I was curious about a pond in the middle of the desert.

Because I have not traveled these roads, I relied on Apple Maps to route us to the trailhead, a mistake as it turns out. It had us driving onto somebody's ranch where we turned the truck around at the bunkhouse. Google Maps got us from the main road to the trailhead with little issue once we departed the ranch.

From the Reynolds Pond Trailhead, we had route options for a 5-mile circuit hike, a 6-mile out-and-back, and any number of treks longer than 10 miles. I tentatively planned for a 6-mile circuit, but we ended up short-circuiting this for a 5-mile walk, thanks to no water yet in the irrigation canal letting us cross it at any location we desired, rather than on a bridge. Water will start flowing for the season at the end of this week.

Our route took us in a loop from Reynolds Pond along the Nighthawk Trail to the Tumulus Trail to the Carey Act maintenance road along the canal back to the pond.

At Trailhead, Crossing the Now-Dry Central Oregon Canal
Reynolds Pond
We circled the south side of the pond (trails go both ways), a muddy 12-acre bit of water in an ultra-dry area. Although I expected to see more birdlife around the pond, the only waterfowl were a couple hundred Canada Geese who have staked out nest sites on one of the many tiny islets in the pond. We saw several battles as the honkers squabbled over turf. The willows around the pond were crawling with tiny birds, mainly Ruby-Crowned Kinglets.

Canada Geese Nesting on an Islet
Willows Starting to Green
East Side of Pond: Snow-Capped Cascades
On the far side of the pond, we headed out into the scrub on the Nighthawk Trail. In going out into the Badlands, the primary attraction is the interplay of the Western Juniper trees with the Big Sagebrush and the ubiquitous lava rock formations. If you're looking for traditionally beautiful landscapes, you may have to rethink your expectations of the desert whose beauty lies in its harshness. The sites to see are the twisted forms of the trees and the tortured landscape born of fiery lava. There are few long vistas here in the desert; most scenes are quite intimate.


At one point on our ramble along the Nighthawk Trail, Ann spied a cleft in a lava formation and up she went. One of the best things about the Badlands is going off trail and climbing through the the lava. This particular formation is a pressure ridge, called a tumulus by volcanologists, that stands 30-40 feet above the sand. It is split down the middle with both sides of the split sloping down at about 35 degrees away from the split. An ersatz trail runs through the middle of the cleft, if you don't mind twisting through the sagebrush.

Climbing up into a Tumulus
Navigating the Tumulus
Meandering through the cleft in the tumulus meant we had to push our way at times through the sagebrush. I love the smell that the leaves give off as you brush through them. Others detest the smell. This time of year when bushwhacking, you need to keep your head on a swivel looking for rattlesnakes. The early spring and the late fall are the seasons in which they sun themselves on south-facing rock slopes just after emerging from or just before going into their burrows. We encountered no snakes.

I am always amazed at how sagebrush thrives in inhospitable climates such as this. And I am even more impressed that it can grow in even the tiniest cracks in the lava. It's a pretty amazing plant.

Big Sagebrush (Artemisia tridentata) Growing in a Lava Crack
Baby Sagebrush in Lava Crack
Still Life with Very Old Sagebrush Trunks
Last Fall's Bloom Spikes, Now Dessicated
From the top of the tumulus that we followed for about a quarter of a mile, we had the best views of the day, being elevated somewhat off the desert floor. To the south we got great views of Horse Ridge and to the west, the Cascade Peaks. At one point, we had all the snow-covered local Cascade peaks in view: Bachelor, Tumalo, Broken Top, South Sister, Middle Sister, North Sister, Washington, Black Butte, Three-Fingered Jack, and Jefferson. It was quite a spectacularly clear day and had we been up at elevation, there is no doubt that we could have seen the peaks in Washington State.

Three Sisters: South, Middle, and North
Bachelor Framed by Juniper Trunk
Broken Top and South Sister
I would be remiss if I did not mention that it is terribly easy to get off your intended route in the wilderness area. You cannot really get lost with Dry Creek to the east, Highway 20 to the south, and the Central Oregon Irrigation Canal to the west and north, but you can surely end up in seemingly the middle of nowhere if you are not careful. It might be a long, dry hike back to civilization, but it might also be very uncomfortable.

Shout Out to the Trail Maintainers
The last time we were there, we got off course despite paying careful attention to our route. With the actual track being very faint in places and myriad intersecting game trails in others, you can get yourself misplaced, especially if you are prone to bushwhacking to see the amazing lava formations, as we are. Having learned from our previous experience, I used GPS to keep tabs on our location. I highly recommend that.

This time, we did bushwhack a bit, but never got too far remote from the trail. I have to commend the trail maintainers who this winter clearly put a lot of effort into marking the Nighthawk Trail with cairns and signposts. And in places where it was easy to go wrong, they have blocked the wrong way with brush piles. Thank you, thank you, thank you!

Western Juniper (Juniperus occidentalis) is the key tree of the Oregon Badlands Wilderness. It is probably the signature species of central and eastern Oregon, the only place where it grows save for a few pockets in surrounding states. It is also a species of some controversy. While the forms of ancient trees—many in the Badlands are 1000-plus years of age—are amazing to look at, it is a species that is expanding rapidly in many areas. Some call it invasive.

Historically, wild fires had kept these highly flammable trees in check, but fire suppression policies of the last century allowed the trees to go wild. They encroach on grasslands which drives ranchers nuts and they are notoriously thirsty trees, reducing stream flows and disrupting the habitat of other plants. For land managers, the Western Juniper is a paradox: part symbol of this region and part pest.

Regardless, I enjoy looking at these trees and marveling at their forms. They are of a class of junipers that have two different forms at different ages. When they are young, they have painfully spiky needles like Common Junipers (Juniperus communis). As they age, they develop flattened, scaly foliage that resembles Arborvitae or Chamaecyparis. The tree forms also vary. Young trees are narrow and tall, resembling Eastern Red Cedars (Juniperus virginiana) in form. The older trees become much more rounded and from a distance, can look like oak trees. Fascinating.

Juniper Makes Long-Lived Fence Posts
Mature Juniper Form

While quite a few species of animals and birds make their home in the Badlands, not too many are visible in the late morning when we were there. Of four-footed animals other than dogs, I saw mainly a few mule deer tracks and then what I believe to be Pronghorn tracks, though it is hard to say because the impressions in soft sand are not all that clear. Though groups of small cloven tracks would not belong to a herd of fawns! And this is not an island in Florida where the Key Deer are tiny!

Birds were a bit more in evidence. We were never far from a raven and we saw many, many pairs, some of which were very close to us. I am always surprised when I see these birds up close how big they are, the size of a Red-Tailed Hawk. As we moved through the trails, we heard non-stop calls from Northern Flickers, Western Meadowlarks, and Mountain Bluebirds. In the sky, I happened to see a lone Prairie Falcon and a lone Kestrel. Not a lot going on animal-wise during the middle of the day.

Raven with a Grayish-Looking Chest
Mountain Bluebird
From about two miles in, Ann was complaining about her feet, the one time I rolled out of the house without my first aid kit in my day pack. Sadly, I moved it to another pack in preparation for a 5-day rafting trip on the Owyhee river and I am kicking myself for rushing out of the house without it. By the time we got back to the truck, because she opted to go without socks, she had messed her feet up terribly. At one point, she took off her shoes and made the return trip barefoot.

Wounded Paws
Her tender feet caused us to short-circuit a bit of the marked trail and cut across the irrigation canal to the maintenance road which was the shortest path back home. Although I wanted run the final mile or so to go get the truck and drive back to pick her up, the road is gated. We were able to cross the canal because they don't start diverting water from the Deschutes River for the season until April 15, letting us walk across the bare lava that forms the bottom of the canal. This also gave us the opportunity to look at some of the lava formations scrubbed bare by the water.

Central Oregon Irrigation Canal

As I sit here on an unusual rainy day here in Central Oregon typing this, I am reflecting on our gorgeous day with blue skies out in the desert. I'm really happy to have this resource just a few miles from the house. And while I am reflecting, I have learned my lesson about never leaving without my first aid kit. And I hope Ann has learned something about taking better care of her feet.

Lamb Chops and Gigantes Plaki

Spring is starting to arrive in fits and starts here in Bend although one day will be warm and sunny and the next brisk and cool. There'...