Showing posts with label pesto. Show all posts

Sunday, February 15, 2026

Valentine's 2026: Corzetti

This year for Valentine's Day, a day when we are excited to stay home away from the hordes of diners in restaurants, fresh pasta was calling to us.

When I was a young man, in my early 20s in the early 1980s, fresh egg pasta was all the rage in America. You could not claim to be a cook if you did not make fresh pasta. In those formative years, I made scads of pasta, tagliatelle and pappardelle mainly, primarily unflavored but at times with tomato paste, spinach, squid ink, saffron, and you name it.

Happy Valentine's Day to Us!
As awareness of real Italian food grew, the food cognoscenti, today called foodies, came to understand Italian cuisine as something other than practiced at red sauce joints of the type that Tony Shaloub lamented in "The Big Night." Or to quote Tucci in response to a request for spaghetti and meatballs on the same plate, "sometimes the spaghetti likes to be alone." We came to learn about antipasti, primi, and secondi and so many other things.

Demand and awareness drew more imports of good quality Italian box pasta about the same time as I was commuting three hours a day to and from DC and had two babies to feed when I got home. Dried pasta was a godsend for a quick and largely stress-free meal. I switched from fresh to dried for the longest time, decades really, loving the bronze die pastas from Gragnano.

Now that I am in my 60s, the pendulum has swung back to fresh pasta, no doubt influenced by travel to Italy and the availability in retirement of time to devote to making pasta. Early in my life, fresh pasta was synonymous with northern egg pasta. Now, I am concentrating on southern pastas of semolina remacinata and water, with no eggs. I have a goal to make my fingers speak orecchiette fluently.

For our Valentine's Day pasta, Ann chose corzetti, a classic and ancient disk-shaped pasta from Liguria (also home to trofie). Making corzetti is a two-step process. First, you cut rounds from a sheet of pasta. Then, using a wooden stamp, you press a design into both sides of the pasta. The designs vary, but were often carved representations of the family crest. Our corzetti mold is rather simpler, a cheap mold with a star on one side and a spiral on the other.

Corzetti are not a shape that I have ever seen on a restaurant menu, though I suppose they might be found in restaurants in Liguria, a province that I have not visited. The only way for us to experience them is to make our own, which we set out to do after opening a bottle of nice Champagne with which to toast ourselves.

Here's to Us!
Les Frères Mignon L'Aventure Premier Cru
Crisp Extra Brut Blanc des Blancs Champagne
The Champagne opened, Ann set about scaling out the flour for the corzetti dough while I whipped up a quick batch of artichoke pesto to serve on bruschette for an antipasto. Ordinarily, I do not serve artichokes or artichoke heavy dishes with wine; artichokes can wreck many wines. A safe bet is always a really crisp unoaked white and the Champagne held its own.

Scaling Flour for the Dough
Assembling Bruschette
Artichoke Pesto Bruschette
Artichoke pesto is a no-brainer, dead simple antipasto that takes seconds to make in a food processor when made with canned artichoke hearts. It is best made and eaten right away, though it will store for a few days in the cooler. If I were using fresh or frozen artichoke hearts, I would add lemon juice to keep the pesto from turning brown. Canned artichokes always contain citric acid, so adding an additional anti-oxidant is not necessary. I do not add much olive oil or cheese; I want this to be fresh and less caloric.

1 can (400g) artichoke hearts, drained
leaves from 3-4 sprigs fresh basil
1 ounce (30g) raw pine nuts
2 cloves garlic, finely minced
pinch of Kosher salt
grated pecorino, enough to sit in palm of hand
drizzle of extra virgin olive oil

Put all the ingredients except the olive oil in the food processor and blend to a smooth paste. Drizzle in olive oil until the pesto takes on the consistency you want. I wanted this batch to be a drier paste rather than a smoother sauce. Season to taste.

Ann continued on with putting together the dough as I was assembling the bruschette. Corzetti dough can contain eggs or not, depending on how your great grandmother made it. We followed a recipe from a Ligurian woman who uses 00 flour, eggs, and white wine. I took over kneading the dough for its final ten minutes, after which, I put it to rest on the counter under a towel. While waiting for the dough to rest, we sat at the counter and enjoyed our wine and bruschette.

After appetizers, I rolled the pasta into a fairly thick sfoglia and we tag-teamed cutting and stamping the corzetti.

Cut Rounds for Corzetti
Stamped Corzetti
Corzetti Stamp
Admittedly, we have a cheap corzetti stamp with a star or flower on one side and a spiral on the other. Some of the hand-carved pearwood Italian stamps are incredibly beautiful and are much more intricate than ours. That said, the really pedestrian looking spiral is quite amazing at trapping and holding onto the sauce.

A traditional sauce is olive oil, marjoram (maggiorana), garlic, and pine nuts. Some use walnuts instead. For our part, neither of us are big fans of marjoram, but we love sage (salvia). In fact, the very first meal Ann ever cooked for me so very long ago was a pasta in sage browned butter.

Our sauce I made quickly by heating olive oil and adding chopped fresh sage until it crisped. Then I added a handful of pine nuts and two large cloves of minced garlic. Both those additions browned in seconds after which I transferred the sauce to a cold steel bowl to keep it from cooking further. Moments later, I added the cooked pasta and tossed it.

Cooking Sage in Olive Oil
Sauce Ready: Sage, Pine Nuts, and Garlic in Olive Oil
Corzetti, like many pastas, come with a built-in timer. As they cook, they float, just like gnocchi. These floated in about two minutes, but wanted just another scant minute longer in the boiling water for a grand total of three minutes of cook time.

Cooked Corzetti Floating
Corzetti with Sage, Pine Nuts, and Garlic
Making corzetti with Ann was a lot of fun. Her take is that they are too labor intensive, but as an ex-restaurant chef, I do not mind putting in the work.

Thursday, December 25, 2025

Christmas Dinner

Ann wanted to have a small Christmas dinner on Christmas Day at our house, despite our being at Rob and Dyce's the evening before for a wonderful fondue, of which I took no photos. After a series of holiday parties with a big New Year's celebration to come within the week, it was almost too much. Next year we need to slow things down.


We thought about doing a Feast of the Seven Fishes, but consuming such a vast meal requires a small army that we are not prepared to serve in our home. Moreover, outside of the restaurant trade, finding decent seafood in this food desert is nigh on impossible.


Instead, Ann hit on the theme of three pastas, each in the color of the Italian flag: red, white, and green. In the weeks before Christmas, we set about throwing pasta dishes at the proverbial wall to see what would stick. For me, it was important that we have only one dish made at the last minute, so that I would not be chained to the stove all night. After a couple of days of kicking ideas around, we settled on three dishes.

Cookie Fairy Making Rosemary-Orange-Olive Oil Shortbreads
Ann had already decided she was making shortbreads with rosemary, orange, and olive oil for dessert. That left antipasti to figure out, one with meat and one without. The without came easily enough: a green olive olivada (tapenade less anchovies) served with crackers and a neutral double or triple cream cheese.

Olivada, Crackers, Triple Cream Cheese, Grissini
For meat, somehow we got fixated on vitello tonnato. I decided to keep the meat raw in the form of a tartare and use the tuna sauce for garnish. I thought it was a neat idea; I was alone in this thinking apparently, judging from the amount of leftovers that I turned into burgers the next day. The tonnato sauce was the best I have ever made. I think I scared people with raw meat.

Vitello Tonnato
Veal Tartare on Crostini with Tonnato Sauce and Capers
For the red pasta, I stuffed conchiglioni (large shells) with pulled short rib that I braised a couple of days before in a really intense beef stock. I mixed the short rib with ricotta to lighten it just a little and covered the whole in a quick marinara.

Here's a tip for the shells. I bought really excellent quality shells with a recommended 16- to 18-minute cook time. The day before, I boiled them for four minutes, then chilled them immediately in cold water. After tossing them in a little olive oil to keep them from sticking together, I put them in a seal top bag in the fridge overnight. The next day, they were perfect for stuffing, pliable but holding their shape rather than flopping around and closing up like fully cooked shells.

Baked Conchiglioni Stuffed with Short Rib and Ricotta
Topped with Marinara
Ann insisted on potato gnocchi which we made the day before. I rolled out and cut the gnocchi while Ann boiled them in small batches. Before people arrived, I made a speck and parmigiano cream. While the green pasta was cooking, I browned the refrigerated gnocchi and then poured the sauce over at dinner time. Everybody loved these; they were too rich for my taste.

Potato Gnocchi with Speck and Parmigiano Cream
The green pasta for me was a no-brainer, the word green sending me directly to basil for which Liguria is famous. The Ligurians serve their pesto on their traditional cut of pasta called trofie, hundreds and hundreds of pounds we rolled out at the restaurant. Not wanting to roll out trofie for this dinner, I screwed up and ordered in some dried trofie, which despite being imported from Italy, was crap. I am still kicking myself for not investing the half an hour it would have taken to make fresh trofie. Nobody but Ann and me seemed to notice; still I do not like using second rate ingredients.

Trofie al Pesto with Torn Basil and Toasted Pine Nuts
I think we were all pretty much partied out by the time Christmas Day rolled around. Unlike several prior nights, it was not a late night. I think we were all stuffed too, but fortunately, I was able to send home some of the copious leftovers.

Here's My Plate with All Three Pastas
Buon Natale!

Monday, February 3, 2025

The Boys are Back in Town

With apologies to Thin Lizzy, the boys are finally back in town, having moved back from Boulder after a short stay there. We were devastated when they decided to move while we were away in Italy in the fall and we are ecstatic that they missed Bend so much that they have decided to return.

Naturally, to celebrate their return, we had them to dinner. For this dinner, Ann wanted me to do pasta with ragù bolognese and she wanted to make garlic bread, especially because Rob loves garlic bread.

The Three Musketeers
Kitchen Elf Extraordinaire!
Spying a bin of small tomatoes on the counter where I leave them to ripen sparked an idea for a simple appetizer, mini-Capreses on skewers. Nothing could be simpler than skewering tomatoes, basil leaves, and bocconcini and drizzling them with a bit of pesto thinned with olive oil.

Caprese Skewers
We waffled on making a traditional lasagne (I should have, damn it!) but I let Ann convince me that I should just used boxed pasta rather than rolling out a sfoglia and cutting it into big sheets for lasagne. We ended up with par-cooked mezzo rigatoni (from Giuseppe Cocco) mixed with ragù and a bit of ricotta, topped with mozzarella and baked until golden brown. It was good, but not great and certainly not in the same league as lasagne.

Baked Mezzo Rigatoni and Ragù Bolognese
Ann wanted to make garlic bread as a surprise for Rob, whose predilection for this delicious carb we noticed in Santa Fe. She concocts a mixture of butter, mayonnaise, granulated garlic, fresh garlic, and a bit of Italian parsley and slathers obscene amounts on a split loaf of excellent bread. After it browns under the broiler, it is absolutely irresistible and makes the house smell amazing. I can gain weight just by looking at photos of it.

Ann's Crazy Good Garlic Bread
After kibbitzing for an hour or so and catching up with the boys and their move back to town, we relocated to the dining room and finished up the evening with a couple bottles of delicious Langhe Nebbiolo.

Thursday, June 6, 2024

Playing with Pizza

Pizzas around here in Central Oregon are expensive and, with a couple of notable exceptions, not worth trying. This is a shame because we love a great pizza. Ever since we got invited to a party where they had a gas-fired outdoor pizza oven and we fired our own pies, a little voice has been nagging in the back our minds.

Amatriciana-Style Pizza with Arugula and Olive Oil
That little voice has been saying, "If pizzas are such junk, make your own." And why not? I'm a (retired) chef, I can handle dough and a peel, and I have always been able to hack together an acceptable pie at any time. But why not put in the time and testing to really put out a great pie?

This is the year that we have decided to get serious about pizza: Ann ordered a new natural gas-fired Ooni pizza oven a couple weeks back and it has finally arrived. After two trips to the hardware store for fittings, I got it plumbed into the gas line that also supplies the fire pit out on our patio. 

Saturday, I fired it up and let all the oils burn out of it in preparation for its maiden voyage. That morning, I also made a batch of dough for an 8-hour ferment for our first run. I think I prefer a longer ferment, but I was also itching to try the oven out that day, rather than wait for an overnight ferment to complete.

The test batch was a safe 60% hydration/3% salt version made with Caputo 00 flour with the aim to make four 250g balls. The results were better than just about any pie here in Bend, but not where we are aiming. We're not looking for acceptable; we're looking for professional quality. It's going to take a lot of experimentation to determine what works the best with the flour we have available here, this oven, and our elevation. Honestly, I do not know how high elevation messes with pizza.

1000g of Dough
Four 245g Dough Balls, Ready to Proof
Proofed and Ready to Go
First Pie: Pesto, Mozzarella, Pecorino, Fresh Basil
Rosé on the Patio Waiting for Oven to Heat
First Pie!
First Pie: I Didn't Rotate it Quickly Enough
Lessons learned on day one. The crust was a bit doughy and I believe that this is a combination of too hot an oven coupled with insufficient hydration. In my mind, I have been toying with a hydration approaching 70% but I thought I'd start with a foolproof 60% which is easy to work until I hone my dough handling skills. Obviously, I need to rotate the pie a little quicker which is merely a function of being able to determine the crust color in the dark interior of the oven. And finally, 250g is the perfect size pie for us.

So for day two of testing, I decided to make another batch of dough at 65% hydration. I rejiggered my recipe accordingly and made the new batch, also a kilogram and also using Caputo 00. The idea was to do an A-B test with one pie from the new 65% batch and an 8-hour fermentation against a leftover dough ball at 60% which had re-proofed in the refrigerator for another 24 hours. Not exactly modifying a single variable, but illustrative nonetheless. Ann would be tasting blind, but I would know which pie was which.

For these pies, we decided to do an Amatriciana-style pie using Sicilian estratto di pomodoro (world's sexiest tomato paste) thinned with water and a little grease from rendering guanciale as the sauce. Then I would put some of the rendered guanciale and mozzarella on top of that.

Rendering Guanciale
Left: 60% Overnight Ferment, Right: 65% Same Day Ferment
After tasting both pies, we both had definite opinions and as it turns out, we agreed. For this test, I dialed the oven back to about 7/8 of its maximum heat to give the crust just a few seconds longer to cook. We both liked the texture of the 65% hydration dough better, so now we will move on to something higher, perhaps 67%. I am still not happy with the black charring on top of that pie though; it may be I need to cook it slightly less. Or this may have happened when I elevated the pie on the peel to quickly finish an area that looked undercooked. Time and experience will sort this out.

Pesto and Sun-Dried Tomato Pies on Day Three
Left 60% Ferment, 48-Hour Proof; Right: 65% Ferment, 24-Hour Proof
On day three, I did not make any new dough and tested one of the original 60% dough balls from two days prior against one of the 65% balls from the day before. Again, we preferred the crust of the 65% pie; however, after all this time in the refrigerator, it seems the flavor of the original 60% dough was starting to gain some character.

This is going to be a many-week process of refining the recipe. Next up, I'm going to switch flour and go back to the flour that I always used at the restaurant, King Arthur Sir Galahad. While in the minority, one of my favorite pizza joints uses this flour to great effect and if I can achieve the same thing, King Arthur is way cheaper and way more available in this part of the world.

Tuesday, December 12, 2023

Good Times: A Mutt of an Italian Meal

Ann and I, like most Americans, love Italian food, especially peasant food, cucina povere, for its simple and honest flavors. Unlike most Americans, however, we would almost never go out to eat at an Italian restaurant. Why pay for food that is so easy to make better at home? Although I don't think we necessarily set out to have an Italian-themed dinner, it turned out so and the saga follows.

What's Better Than Chianti Classico?
A Jeroboam of Chianti Classico Riserva!
Ann's a full-blooded Italian, no matter how you slice it. She's adopted. Her birth parents are both napoletani and her adoptive parents are calabrese and barese (pugliese) respectively. So she's spicy and opinionated southern Italian through and through. You would think that the menus that she comes up with would be southern-inflected, but really, she has no problem mixing and matching from the various corners of Italy, something that would be frowned upon in the old country. I don't know that she set out to have an Italian dinner, but that's where we ended up after she asked me to make braciole.

Such is our menu planning that Ann asks "Will you make this?" and I do. Sometimes I throw in an idea or two or a refinement here and there, but mostly because I can and will cook anything, more often than not, I leave the broad strokes of the menu to Ann. If it pleases her to have a dish, I am pleased to make it for her. I think I may have suggested gnocchi alla romana as a sop for the braciole braising sauce, but I no longer remember. It was a tag-team effort in both menu composition and cooking.

The menu in this cold, pre-Christmas season for our quasi-holiday dinner before our friends all get wrapped up in their own holiday travels and plans is pretty much all down to Ann. We split the cooking. For our antipasto, I whipped up a batch of bagna càuda from Piemonte via Provence in France. For dinner, Ann made a primo of baked polenta, also from the north in Lombardia and neighbors, while I made a secondo of braciole, a dish from Calabria and Sicilia (where the little meat bundles are called involtini). And for the dolce course, Ann made a ricotta cheesecake, cosmopolitan to Italy with Greek origins. So, quite naturally, the wine we selected was from Tuscany, just to further mix up the regions!

Hence the title of this post: a mutt of an Italian meal. And I mean this is the best of ways. Although there can be some pejorative meaning to the word mutt, as dog lovers, Ann and I know that the non-purebred dogs, the rescue mutts from the shelters, are often the best dogs combining the best traits of many breeds. And by extension, we hope our menu combines the best of the many regions of Italy.

Ann decided for this dinner that we should be a bit more formal than most of our meals that are consumed around the island in the kitchen, so she set a beautiful, simple, and tasteful table in the dining room. 

As guests Rob and Dyce and Michelle and Andreas were arriving, I was reheating the pot of bagna càuda on a low flame so that it would be good and hot for our appetizer course. If you speak any Romance language at all, you will recognize the term bagna càuda in the piemontese dialect means "hot bath." And indeed, bagna càuda is a hot bath into which to dip bread and/or crudités, typically bitter vegetables such as chicories (endives) and cardoons. For our little soirée, I used what I had in the refrigerator: sweet peppers, carrots, celery, and cucumbers.

Unappetizing Looking Bagna Càuda
Now on to what bagna càuda is for those of you who have not experienced this culinary delight that looks much like oily mud, nearly off-putting in appearance by all accounts. It is a mix of three ingredients: anchovies, garlic, and olive oil. The amalgam of these three ingredients is way more than the sum of the three individual ingredients, but you have to allow yourself to try it without prejudice. Only then can you decide if it is for you.

If you think a salty, funky, umami-laden oily mix of anchovies and garlic is a culinary delight, you are welcome at our table. Otherwise, maybe take a hard pass on dinner at our house where we make food for people who like to eat anything and everything.

My canonical recipe (actually, it is a ratio, not a recipe) for bagna càuda is one head of garlic to 3 tins of anchovies (90-100 grams) to one-half cup (100-125ml) of extra virgin olive oil. Step one is to soften the garlic so that you can make a paste of it. I like to do so by poaching it in milk and after the milk is drained away, I mash the garlic with a wooden spoon. Then I add the anchovies and heat them a bit over low flame to get them falling apart, then add the oil. If you like (as I like), rather than stirring and stirring, use an immersion blender to smooth out the sauce. Serve warm to hot.

Poaching Garlic in Milk
Mashed Garlic Awaiting Anchovies
While we were in the kitchen dipping our veggies in bagna càuda and washing it down with the double magnum of Chianti, the braciole and the polenta were both in the oven finishing up. At some point in the evening, I pulled them both out of the oven and we grabbed our glasses of wine and headed to the dining room to grab our plates to fill them with dinner.

Pork Braciole in Marinara, Baked Polenta
Pork Braciole in Marinara
Baked Polenta
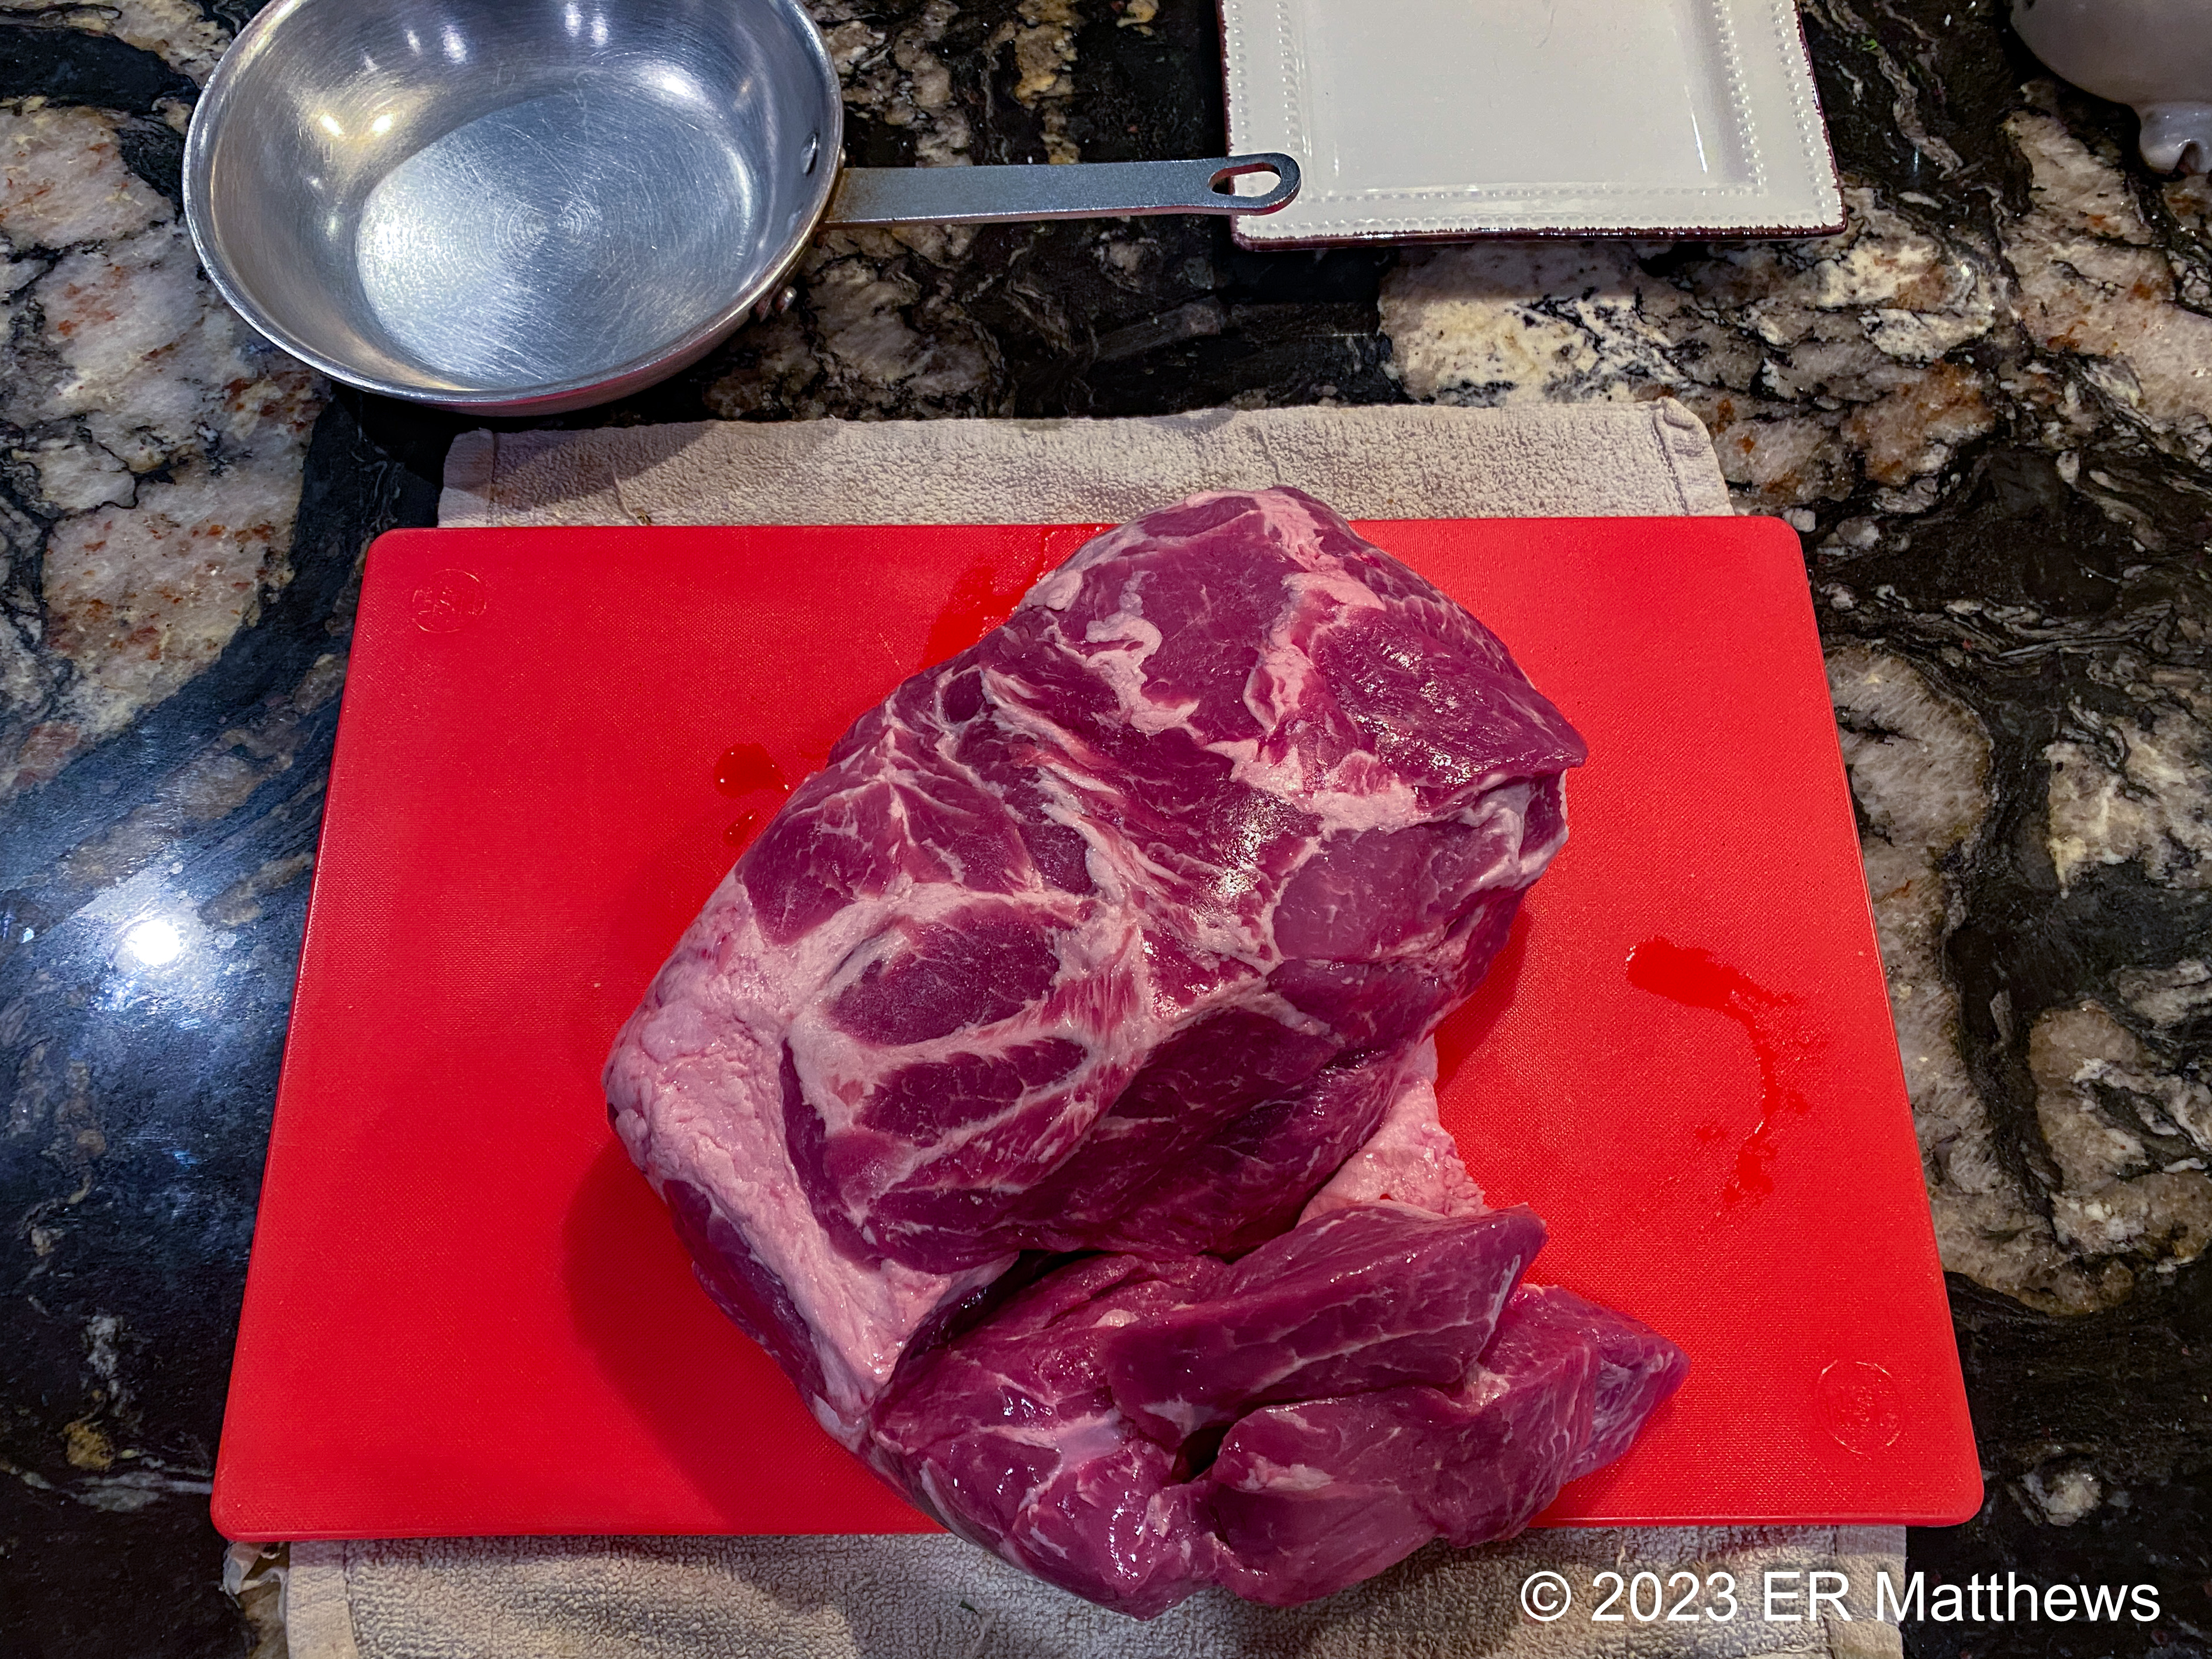
Making braciole is relatively simple, but it does take some effort and patience. While it is more traditionally made from beef, such as flank cut thin, I prefer to make it out of pork shoulder which I find more flavorful and more tender. Although you can buy in some meat markets thin slices for braciole, I prefer to buy a roast and cut and pound my own. Below, you see a deboned pork shoulder on my cutting board along with my industry-standard meat pounder, a small frying pan.

I've been in a bunch of restaurant kitchens, and by and large, every cook I've ever seen pounding out meat used the bottom of a frying pan to do so. Slice your roast into quarter-inch steaks and then flatten them to an eighth of an inch. To pound the meat, place a slice on the cutting board and cover it with a piece of film wrap, then use the flat of the frying pan to gently persuade the meat to flatten out. It doesn't generally take a lot of force.

Pork Shoulder with Ersatz Meat Pounder
Pounded Pieces of Pork Shoulder, Trim Cut for Carnitas or Ragù
Braciole are quite often stuffed with a bread crumb mixture. For this dinner, we needed to keep the filling gluten-free, so Ann and I kicked about ideas, landing ultimately on white beans which Ann asked if I would flavor with guanciale, cured hog jowl. To start the filling, I smoothed out 3/4 of the beans to a purée in the robot coupe while rendering a really fine dice of guanciale on the stove. After removing the almost browned guanciale from the pan, I cooked a really finely diced onion in the guanciale fat. To the cannellini purée, I added the browned guanciale bits, the onions and their oil, a bunch of pesto, and the remaining quarter of whole beans, for texture. Naturally, I salted to taste.

Rendering Fine Dice of Guanciale
Braciola Stuffing: Cannellini Purée, Whole Cannellini, Pesto, Guanciale,
Onions Cooked in Guanciale Fat
You roll braciole exactly as you would a burrito or an egg roll. Place a small amount of filling toward the top center of the meat and fold the top down and over the filling. Fold the sides in to the center to encase the filling, then roll from the top down to close the packet. Secure with one or more toothpicks. I prefer the longer wooden drink garnish picks; the extra length means that I only need one to secure the packet. Sometimes this takes two toothpicks.

Once the packets are assembled, brown them in a pan on all sides and remove to a braising dish. Meanwhile, make a marinara. My braising pan typically takes a half gallon of sauce to cover the meat that I am braising. Marinara is trivial to make (and we used to make it on the fly at the restaurant whenever a parent would request pasta marinara for a child). For a rough half gallon, put two 28-ounce cans of tomatoes in your blender along with four large cloves worth of minced garlic, a pinch of salt, a tablespoon of dried basil, and a pinch of pepperoncini (crushed red pepper flakes). Blitz it and voilà!

Starting to Brown Braciole
Browned Braciole Ready to be Covered in Marinara
After covering the browned braciole in marinara, cover the brasier (I use aluminum foil, unnecessary if you are using a dish with a cover) and place it on a sheet tray; braciole love to bubble over and create a mess on the bottom of the oven. Braise in a moderate oven for 2 to 3 hours. You'll know they're done when they are fork tender.

To accompany the braciole, I wanted a starch to act as a sop for all the leftover marinara. In Italy, the sauce would often be ladled over pasta as a first course with the meat served afterwards. Ann and I, we wanted something more elegant for our dinner and I proposed gnocchi alla romana, made by cooking semolina, letting it set up on a sheet tray, cutting out rounds, and baking those rounds nicely arranged in a gratin with a sprinkle of cheese until prettily browned.

How silly of me to propose that, given that we needed to keep the dinner gluten-free and semolina is ground wheat. How fortunate though that Ann mistakenly grabbed the container of polenta (which is ground corn) from the pantry instead of the container of semolina! Not trusting the polenta cooked in milk and augmented with egg yolks and butter to fully set up enough to be cut into rounds, Ann put it directly into a baking dish and we baked the whole thing under a thin crust of pecorino romano.

Stirring Polenta
Polenta Ready for Cheese and the Oven
Ann's final contribution to our dinner was a ricotta cheesecake, made without a crust to keep it gluten-free. You can make cheesecake with almost any soft unripened small curd cheese: cream cheese, farmer cheese à la the German quarkkuchen, or ricotta in the Italian style.

Cheesecake is one of the simplest desserts to make and I have made untold hundreds during my career. Here are some tips born of experience.

The basic formula is to figure out how much cheese your springform pan requires and work from there. Naturally, at the restaurant, we were making several cakes at a time; fortunately, the basic ratio scales quite well. At home, our 10" x 2.5" springform mold holds four pounds of cheese without breaking a sweat which works out quite well for ricotta which comes in convenient 2 pound containers. The ratio continues with 2 eggs per pound plus an additional egg for every two pounds, thus 10 eggs for this batch. So, 7-8 eggs for a three-pound brick of cream cheese, if you are going that route.

For each two pounds of cheese, three-quarters of a cup of sugar seems to be about right, though I always add less to start and add flavorings to taste. The amount of sugar can vary based on how sour the cheese is (cream cheese tends to be much more tart than ricotta) as well as the flavorings you are adding. If your flavorings are sweet, you might need less sugar; bitter, such as espresso, you might need more sugar. For additional flavorings, Ann added a good slug of Mexican vanilla and the zest of three lemons.

As an aside, you may not want any sugar at all if you are making a savory cheesecake. We used to make blue cheese cheesecakes with walnut crusts that we would bake in shallow tart pans to pair with certain sweet wines. These cakes required no to minimal sugar. I can remember making black olive and rosemary tarts to accompany wild boar. Your imagination is really the limit with cheesecakes.

Although I always baked my cheesecakes in a slow oven in a water bath (covering the bottom of the pan with aluminum foil to avoid water infiltration), you can certainly bake them in a slow oven without a water bath, which is what Ann did in this case. In any case, 325-350F is about right, though we never had a thermometer on our ovens at the restaurant. You will almost certainly have to tent the top of the cakes with aluminum foil to keep them from burning, simply because the top is going to brown long before the center is set. So, cook your cheesecake uncovered until it is as brown as you would like, then tent it for the duration with aluminum foil.

How long a cheesecake requires in the oven depends on way too many factors to give a hard and fast rule, so do as we did in the restaurant and as Ann did with this one: cook it until it is done. At first, the center of the cake, when you shake it gently, will be liquid and will slosh back and forth. As the cake cooks, it will set from the outer edge and move towards the center. As the cake cooks, the batter will puff up. When it is evenly puffed all the way to the center, you can be pretty certain that it is done. Do not be surprised when the cake settles as it cools.

When cheesecakes come out of the oven, I like to let them cool a few minutes, then run a spatula between the cake and the side walls of the mold. Then I'll crack the mold open, but leave it in place on the cake and let it finish cooling. Separating the mold from the cake in the early cooling stages will help avoid cracks in the cake as it cools. Cheesecakes shrink slightly as they cool and if the edges of the cake adhere to the sides of the pan, the center may shrink away from the edges and tear cracks in your beautiful cake.

Mad Scientist Flavoring the Batter
Done to Perfection
Dusted with Espresso Sugar
Freaking Delicious Ricotta Cheesecake with Hints of Lemon and Espresso
We, the six of us, all had a wonderful time and enjoyed our meal thoroughly. After dinner, Andreas, Rob, and I held forth at the dinner table while the other three, the youngsters of the group, disappeared to the family room. Next thing I knew, the family room erupted in 80's and 90's pop and hip-hop and there was a full-fledged dance party going on! Some parting shots below.

'Tis the Season!
Shout Out to the Chianti Classico Consortium

Ode to the Tortilla

I love tortillas. It wasn't always that way. I am a child of the early 1960s. Then, on the East Coast, our food was influenced by two th...