Friday, July 31, 2020

Kitchen Basics: Simple Syrups

I didn't know that it was possible to buy simple syrup at the grocery store until one day, I was in the drinks aisle looking for tonic water. You can buy a cup of simple syrup at our grocery store for upwards of $3, pure highway robbery.

Simple Syrups: Blueberry, Ginger, Rosemary
Simple syrup is indispensable for cocktails and we made gallons of the stuff on a regular basis at the restaurant for our bar program. And now at home, simple syrups are a summertime constant in our refrigerator, mainly for cocktails, but also for other things.

Simple syrup is a great name for a product that is trivially made. The basic recipe for simple syrup is one measure of sugar and one measure of water, for example, one pint of sugar and one pint of water, which will yield about a pint and a half of finished syrup. Gently heat the sugar and water until the sugar dissolves. Cool to room temperature and store under refrigeration. If you want thicker syrup, use more sugar than water or cook the syrup gently to evaporate some of the water.

Making flavored simple syrups is just about as easy. Above in the photo you see blueberry, ginger, and rosemary simple syrups. For most berry syrups, add fresh berries (a dry pint of berries will flavor about three cups of syrup) and cook gently until the berries burst and give their color and flavor to the syrup.

Ginger Simple Syrup: Ginger, Sugar, Water
For ginger syrup, a small hand (5-6 ounces) of ginger will deeply flavor about three cups of syrup. Cook gently for about 30-35 minutes, until the ginger softens. Think about star anise simple syrup using the same method. 

For rosemary simple syrup, four or five sprigs of rosemary will flavor about three cups of syrup. Thyme works just as well. 

For syrups in which you want to preserve the fresh flavor of the additives, bring the syrup and the flavoring additive up to a quick boil and then turn off the heat. Let the syrup steep for 20-30 minutes. This is a great technique for mint (mojitos anyone?) and strawberries.

Once the syrup has cooled, strain to remove any flavorings and refrigerate the syrup to prevent it molding.

Please don't ever spend good money on simple syrup. You can make gallons of syrup for the price of a cup at the grocery store.

Kitchen Basics: Croutons

Every cook has a certain kitchen calculus that determines whether it is better to make certain things from scratch or buy them pre-made. Admittedly, I prefer making things myself versus buying them. My restaurant had a totally scratch kitchen and now that I am no longer under any time pressure to cook dinner after getting home from a long day at work, I prefer to make most things from scratch.

I can control the quality better when I make things from scratch and I can save a lot of money in the process. A case in point: seasoned croutons for salads. I see at the grocery store that you can spend a ton of money on very few croutons. Or, you can buy a really nice loaf of bread for next to nothing and make enough croutons to last for a very long while.

Bread Cubes
Dice the bread into whatever size cubes you want. They will shrink slightly as they cook. Just keep the size of the cubes consistent so that they cook at the same rate.

Bread Cubes Ready for the Oven
Drizzle a little extra virgin olive oil on the bread cubes and toss them well to coat. You don't want the cubes to be wet, but you do want the seasonings to adhere to them. Sprinkle the cubes with the seasonings of your choice. I use dried basil, dried oregano, dehydrated garlic, salt, and a pinch of red pepper flakes. Toss well to coat and spread in a single layer on a sheet tray.

Finished Croutons, Cooling
Put in a moderate oven (350F). You want to cook the croutons, turning them as necessary, until they are browned all over. It's pretty much impossible to give cook times for them because so much depends on how stale the bread is to begin with. The staler the bread, the less water to evaporate. I know it is a hardship, but this is one of those times when you're just going to have to sample the product as it cooks!

If you are making croutons for just a single use, you can leave them as soft as you like in the center. However, if you are making a batch for long term storage, you will need to cook almost all of the water out of them. If you try to store croutons that are still moist in the center, that moisture will break down the crust on the croutons and they will likely mold.

I cook mine until they are just about crunchy to the center, knowing that the remaining little bit of water will evaporate as the croutons are cooling. They must cool all the way to room temperature before you try to store them. Store in a tightly covered container. They will last a very long time, much longer than it will take you to eat these addictive little cubes of goodness!

Thursday, July 30, 2020

Ras el Hanout

During my tenure as a restaurant owner and chef of a fine dining restaurant, I used to get all kinds of trade publications in the mail. Today in the age of digital magazines, how weird does that sound? Although I always blazed my own trail as a chef, those magazines kept me abreast of American restaurant and menu trends. Some years ago, a big trend was chefs putting ras el hanout on everything.

Ras el Hanout Spices in Grinder
Ras el hanout is a general purpose spice blend from North Africa that is used in the same sense that garam masala, five spice powder, quatre épices, dukkah, and so forth are used. While these spice mixes are convenient and used by millions of cooks around the world, I never appreciated the one-size-fits-all nature of them, because rarely does one size fit all. And I probably spent too much time in an Indian kitchen where each dish had its own specific masala.

One of the things that caused American chefs to fall in love with ras el hanout is the complex mixture of sweet and savory spices that adds a definite North African flair to dishes. Some versions are highly complex indeed, counting dozens of ingredients. No matter the composition, we can all agree that those flavors are wonderful.

I happened on a couple of lamb foreshanks at the farmers market last week and instantly I knew I was going to do a lamb shank tagine, in my ever so traditional Western tagine, my crockpot. 

I don't keep spice mixes in the house because I like to tweak the mix for each dish according to my mood, so the first order of business was to make some ras el hanout. For my blend, I used allspice, coriander, paprika, cumin, caraway, fennel, and black pepper, in decreasing order of amount. I would have added powdered ginger, but I didn't have any, so I leaned a bit heavier on allspice and coriander.

Most people add cinnamon to their mix, but I prefer just to drop a cinnamon stick into the tagine. Many versions include spicy ground chiles, but I left them out, knowing that I would be adding some of my harissa paste (recipe here) directly into the dish. Garlic and saffron went into the dish separately as well.

Ras el Hanout
To start the tagine, I put into the crockpot:

a 28-ounce can of tomatoes
2 carrots, chopped
a large onion, chopped
6 cloves of garlic, minced
a couple huge spoonfuls of harissa
a cinnamon stick
a pinch of saffron 
3-4 tablespoons of my ras el hanout
a teaspoon of Kosher salt
 
Ready to Cook
After a good stir, in went the two lamb shanks to braise for about five hours. (How weird to be only cooking two shanks versus the 40 or so at a time we would cook at the restaurant!) At the end, I added a quart and a half of cooked chickpeas and let them warm through for about 20 minutes. After a final seasoning, the falling apart tender shanks were ready to serve, each with a dollop of harissa on top.

Lamb Shank and Chickpea Tagine with Harissa
The sweet and savory spices of ras el hanout are simply terrific with lamb. And simply torture to smell while cooking for the better part of the day!

Unanticipated bonus: the leftover chickpeas and broth from the tagine became hummus the following day!

Wednesday, July 29, 2020

A Tale of Two Shrimp Seviches

If there's a summer must-have for me, it is seviche. I've made a lot in my life (see scallop seviche here and yellowtail snapper here), but not so much lately. Here in the über-agricultural Willamette Valley, we have all the vegetables you'd ever need for a great seviche, but opportunities to buy fish that you would willingly consume raw are slim. How paradoxical that we are just barely inland of the vast Pacific Ocean!

Tequila Shrimp Seviche
In the absence of fish, there's always vegetable seviche and I've made plenty of that in my life, but I need seafood for the dish to feel authentic. What to do without sushi quality fish? I have been using cooked shrimp and it's working to the extent that some seviche is better than none, an acceptable compromise.

Recently I have made two shrimp seviches, the first a more or less traditional seviche and the second based on mango, a little more non-traditional.

The first, pictured above, contains whole shrimp, tomatoes, cucumber, celery, orange pepper, poblano pepper, red onion, red jalapeño, and cilantro, dressed with lime juice and a shot of tequila. You might think that celery is bizarre in seviche. You'd be right that it is a bit unorthodox, but a yucateco line cook was showing off his chops to me once and gave me some of his seviche containing celery. I've been hooked ever since.

The citrus needs time to work. I took the photo above about 15 minutes after assembling the seviche. It was much better the next morning after hanging out in the refrigerator and coming together.

Shrimp, Mango, and Chipotle Seviche
The second seviche contains diced shrimp, mango, sliced red onion, tomatoes, cilantro, garlic, chipotle, salt, and lime juice. The photo above shows it after sitting in the refrigerator for five hours. I truly love the flavors of mango and chipotle together: they are a pair whose sum is greater than either of the parts. In fact, we used to make mango-chipotle sorbet for an intermezzo at the restaurant.

Why no recipes?

You don't need a recipe for seviche, just the basic procedure and a few tips.

The basic idea is to gather and chop your vegetables, fruits, cilantro, and seafood. Juice enough citrus to bathe everything in, then mix all the ingredients in a non-reactive bowl. Add your favorite spice and salt to taste. Refrigerate for at least a couple of hours.

For spice, anything goes. I've had fiery snapper seviche from the Yucatan with habaneros. I have had tame scallop seviche with a sprinkling of dried chile flakes and some lemon zest. Fresh chiles, dried chiles, canned chipotles in adobo, sambal oelek, Tabasco sauce: they all work, depending on the flavors and spice level you want.

The acid in the citrus juice denatures the proteins in the seafood, yielding the firm quasi-cooked texture of seviche. Lime juice is not required: any citrus or combination works great. I love both yuzu and Seville oranges aka bitter oranges in seviche. Grapefruit is fun for a change and in a pinch, vinegar can be effective (think escabeche).

Finally, because fish is so expensive, I use a lot of vegetables and fruits to stretch the fish. A quick list of vegetables and fruits: tomato, red/white/yellow/green onion, shallot, garlic, celery, jicama, citrus segments, mango, papaya, watermelon, dragonfruit, avocado, corn, cucumber, red/green/yellow peppers, radish. The list is practically endless.

Cooking Shrimp for Salads


My favorite way of cooking shrimp, so that it is flavorful but not soggy and overcooked is by poaching it in a court-bouillon. To chefs, that's the classic French term for a broth of water, an acid (white wine, vinegar, lemon juice), and flavorings in which you poach seafood, sweetbreads, and so forth.

Shrimp in a Court-Bouillon
Into a pot large enough to hold the shrimp, put sufficient water such that the shrimp will be submerged when added. Then add a splash of white wine vinegar, 2 or 3 bay leaves, a few celery or lovage leaves, a couple parsley springs, 15-20 whole black peppercorns, and salt to taste. The bouillon should taste good to you. If it does not, adjust it. If I use white wine instead of vinegar, I usually drop in a half a lemon for acidity.

For most smaller sizes of shrimp, I like to add the raw shrimp to the boiling court-bouillon and immediately turn off the heat so that shrimp poaches gently in the hot broth. Bring the court-bouillon to a rolling boil and let it cook for 2-3 minutes to extract flavor. Then add the shrimp, turn off the flame, and check the shrimp every couple of minutes until they are just set. The shrimp will change color as they cook.

By smaller shrimp, I mean 16-20 and smaller. That is, shrimp that measure 16 to 20 (or more) per pound. For the really large prawns, it is generally necessary to keep the water at a slow simmer to cook them through. Then again, the really large prawns are probably better suited to the grill than to seviche.

Post Script: What's in a Word?

Years ago, a customer reprimanded me because on my menu, I spelled seviche with the letter S as I do in this post. He was unbudgingly certain that it is spelled ceviche with the letter C. "What about cebiche?" I asked him, having seen it spelled that way in much of South America. By the way, all three spellings are pronounced identically, because Spanish speakers pronounce the letters V and B the same.

It tickles me sometimes when people think that every word has a single absolute spelling, ignoring regionality of dialects, differences in pronunciation, differing systems of transliteration, and just plain old spelling preferences among countries. Think flavor and flavour. If you think of spelling as our feeble attempt to record sounds on a sheet of paper, you might be more open to variant spellings.

My references for spelling are Mr. Webster and the OED and both of them preferred seviche when I was learning to spell. For consistency, I continue to spell it that way and index this blog that way.

But I am under no illusion that everyone spells it this way. For giggles, I generated a couple of Ngrams showing the frequency of use in books of the three spellings since 1950. The first chart shows the frequency in English-language books, the second in Spanish-language books. You should take this with a grain of salt: while spellings in books represent careful language as a result of editing, they are sometimes inconsistent with spellings in more casual media. And the results are limited to the set of books that Google has scanned. Click to enlarge the graphs.

Seviche/Ceviche/Cebiche Distribution in English

Seviche/Ceviche/Cebiche Distribution in Spanish

Things that I find interesting:

1. Despite Webster and the OED preferring seviche when I was a kid, the English-speaking world seems to have adopted ceviche. Now if you look up seviche in Webster's dictionary, you see that it is a variant spelling of ceviche.

2. The Spanish-speaking world prefers cebiche, but also uses ceviche.

3. In English, seviche and ceviche were running neck and neck until about 1982 when ceviche started to gradually assume the lead over the next 20 years. I learned how to spell seviche long before 1982. Cebiche never gained any traction.

Who knew?

Language is never constant, but I bet seviche is around for as long as there are citrus and seafood on this planet.

Sunday, July 26, 2020

Rajas con Crema y Elote

One of the glories of Mexican cuisine is rajas con crema, strips of roasted green chile in cream. It doesn't sound like a whole lot, but this is one of those dishes that is way more than the sum of its parts. It's really too bad that you'd be hard pressed to find a restaurant with this classic dish from central and southern Mexico on the menu. But cry not, it's a simple dish to make.

Tacos de Rajas con Crema y Elote
Recently I had an overload of poblano peppers in the refrigerator that I wanted to use before they started going bad, so I thought to make rajas con crema y elote for Ann. I knew she would love it and I was certain she had never had this dish before.

Although you can make rajas out of any large green chile, pretty much everyone uses the large, deep green, and mildly spicy poblano, the same chile that most people stuff for chiles rellenos.

Aside from small, spicy peppers such as jalapeños or serranos, poblanos are the only green pepper in my refrigerator. My palate dislikes cooked green (unripe) bell peppers. Like a lot of people, I find that they repeat on me and the second visit is most unwelcome. I have no such issue with poblanos. Never once in 15 years did we ever have a green bell pepper in my restaurant, while we used a half a bushel of poblanos a week at a minimum.

Unlike when I first started cooking, poblanos are now in most grocery stores. Do be aware that they may be labelled pasilla peppers. For some reason, the American produce trade frequently labels poblanos as pasillas. To get poblanos at the restaurant, I had to order pasillas. The other day at our grocery store, a new clerk had to look up the code for the poblano peppers in my cart. I helped her scan the list of peppers on her terminal. We finally found a picture of them labelled pasillas.

For the record, though not many people care, we are confusing two peppers, the poblano, a large deep green, broad and strongly triangular chile, and the chilaca, a very long skinny, often twisted, also very dark pepper that tapers on both ends much like a serrano. When dried, we call a poblano an ancho. Likewise, the chilaca becomes the pasilla. So, besides being different peppers, a poblano is a fresh chile while a pasilla is a chile seco, a dried chile.

Preparing Rajas


Rajas translate into English as strips, strips of chiles being implied. The first step in preparing them is to peel the poblanos. After peeling, then you can cut them into strips. To remove the tough skins, you have to char the chiles to the point where the skin will detach.

Charring the Skin with a Torch
There are many ways to do this. At the restaurant, we would line our grill with poblanos and as each side would char and blister, we'd give the chiles a turn. Because of the triangular shape, poblanos generally have three sides. If you have good ventilation, you can char them right in the flame of your range top. Or, you can run them under the broiler in your oven or in a restaurant, under the flame of the salamander.

At home, because I have the world's most useless broiler and even crappier ventilation, I prefer to char mine outside. I could do this on the propane grill, but I prefer my propane torch. If you've ever seen how they roast Hatch chiles in big metal lattice drums rotating over propane flames, you have seen my inspiration.

Here's a shameless plug for my Bernzomatic TS8000 torch head. Although expensive, these torch heads get the job done. I wasted a lot of money on cheaper heads over the years. We used TS8000s constantly at the restaurant for scores of tasks from popping the air bubbles on top of a custard to lighting charcoal to adding a little color to a dish to caramelizing sugar on everything from split figs to crème brûlée.

Any way you choose to do it, after you char the skin, a pepper will appear similar to the photo just below.

A Poblano Charred All Over
After charring each pepper, place it into a plastic bag, where the trapped steam will help the skin to separate from the flesh of the pepper. 

Charred Poblanos Steaming in a Plastic Bag
After about 20 minutes, the chiles will have steamed enough and cooled enough to handle to peel. You might think about gloving up to peel the chiles. I have run across some wickedly spicy poblanos that left painful chemical burns on my hands. This is really rare, but... consider yourself forewarned. Also, if you get capsaicinoids on your bare hands, it's easy to inadvertently burn your eyes, face, or your privates. Enough said. Just trust me on this lesson learned.

Peeled Poblanos Ready to Process Further
After peeling the poblanos, you are ready to process them further. For rajas, I slice the top off, slit one side, and remove all the seeds. If I am making rellenos, I cut a T in the side (from bottom to top and across the shoulders), open the flaps, and pull out the seeds, leaving the top and stem intact. For rajas, once I have flattened the chiles, I stack them and cut them into strips lengthwise.

As you can see, using a torch leaves the poblanos almost raw which is perfect for stuffing. If you char them by other means, the flesh is going to be a lot softer, prone to ripping, and a lot slipperier when trying to stuff them. For rajas as in this case, you are going to want to cook the pepper strips a bit further to soften them up and to lose the raw flavor. You can see in the photo below how raw my rajas look.

Rajas

Making Rajas con Crema


Once you have your rajas, you are ready to make your creamed poblanos. I'm not going to give an exact recipe here because I used a somewhat unorthodox method. A lot of fat doesn't sit well in my stomach, so I went with a much lower fat method than is traditional. Also, many recipes call for a bit of onion in with the peppers; I deviated because I prefer garlic instead.

Shaving Corn off the Cob
Many people shave fresh corn (elote) into their rajas and if I have fresh corn, I do too. The sweetness of the corn and the earthy spiciness of the poblanos are perfect foils for one another. After you have shaved the corn off the cob with a knife, flip the knife around and run the spine of the blade down the cobs to extract as much of the milky juice as possible. That juice contains a lot of corn starch and will help thicken your sauce.

Although there are as many methods to make the dish as there are cooks, it is traditionally made with cream (crema) and white cheese, the kind of cheese varying from cook to cook. To reduce the fat, I make a thick béchamel using 2 percent milk and omit the cheese.

Because my rajas were nearly raw, I needed to soften them further by putting them in a skillet with a tablespoon or two of oil and a cup or so of chicken stock. For a vegetarian dish, water would have worked just as effectively. As the chicken stock boiled, it steamed the rajas to tender in about seven or eight minutes.

Once all the chicken stock evaporated and I could hear the rajas crackling in the oil, I added a couple of garlic cloves, finely minced, and the shaved corn. I let that cook for a minute, just long enough for the garlic smell to go from raw to cooked. At this point I sprinkled a couple tablespoons of flour over, stirred it in, and let it cook another couple of minutes to remove any raw flour flavor, without browning the flour at all.

After that I added a cup or two of 2 percent milk, salt, and pepper, making a béchamel. Once the béchamel cooked down very tight, I took the pan off the flame, stirred in a spoonful of sour cream and served the rajas on tortillas with queso Cotija and cilantro, as you see in the lead photo of this article.

Traditionally, you cook the crema down tight and swirl the cheese in to yield a very rich dish that is firm enough to put on tortillas. That amount of fat doesn't work for me, while the béchamel method makes me very happy. ¡Buen provecho!

Wednesday, July 22, 2020

Scrapple 101

Since retiring, Ann and I do a couple of crosswords a day. Ann, who is infinitely better at them than me, has been doing them for a long time, while I just started. One puzzle prompted her to ask me, "What is scrapple?" forgetting that she has had it before.

Scrapple, Eggs, and Tomatoes
I explained as well as I could that scrapple is a member of a class of foods designed to make use of all the scraps leftover from butchering a hog. It is in essence headcheese cross polenta, formed into loaves, sliced and fried, generally served as a breakfast food.

Knowing that searching for commercial scrapple here in Oregon was probably a non-starter, I resolved silently to make her a batch so that she could taste it again for herself. Before I get into my scrapple making tale, a little backstory is in order.

While I grew up in central Virginia, my people are all from a couple hours south in Southside, the former tobacco country along the North Carolina border where scrapple was a fact of the breakfast table. Despite some hog butcherings in the family, I do not recall anyone in the family making scrapple. I do vividly remember boiling kettles of lard and the resulting crunchy bits of skin called cracklin' that adorned our cornbread. But no, scrapple making I don't remember. By the time I can remember, scrapple was something bought at the grocery store and Rapa was the family brand.

As an adult, I had migrated a couple more hours north to the very northern tip of Virginia in the Shenandoah Valley, an area that was settled largely by Germans coming around the mountains from the north from Philly and southern Pennsylvania. There in Winchester, I learned that scrapple was readily available at the deli counter of the supermarket, going by the Pennsylvania Deutsch name of Panhaas ("pan hare/rabbit" in German).

With panhaas available in bulk, I never paid too much attention to the packaged scrapple in the cold case, though I did notice two things: 1) packaged scrapple was available in two brands, Rapa and Habersett, and 2) the Pennsylvania Dutch panhaas was stiffer and contained less liver than I was used to.

Nowadays, scrapple production in the US is largely controlled by a single company, Jones Dairy Farm, that owns both Rapa and Habersett brands and recipes, as well as producing scrapple under their own label. And I believe both products are made primarily in the old Rapa factory in Delaware.

When I was a kid, Rapa was a Delaware brand out of Bridgeville that basically owned the Baltimore, DC, and Virginia markets. Further north from the Harrisburg PA area, if memory serves correctly, came the Habersett brand which ruled in the Pennsylvania market. Your scrapple allegiance, therefore, was basically a result of where you lived. People that love one brand still like to put down the other brand, but they're all good.

Back in the day, I used to see small vendors with handmade scrapple in the big markets in York, Baltimore, and Dover, but those folks seem to have gone the way of a lot of good things. Any longer, and especially where I live in Oregon, if you want handmade scrapple, you're going to have to do it yourself.

Before the scrapple tutorial, I will also point out slight variations as I know them. Panhaas tends to contain buckwheat flour in addition to cornmeal as a binder, yielding a firmer product. Further south in the Carolinas, they have livermush, which is also awesome, but focuses more on liver than does scrapple. Further west in the Ohio territory you find goetta, a similar product bound with oats. These products clearly demonstrate the early German settler diaspora in the US.

Making Scrapple


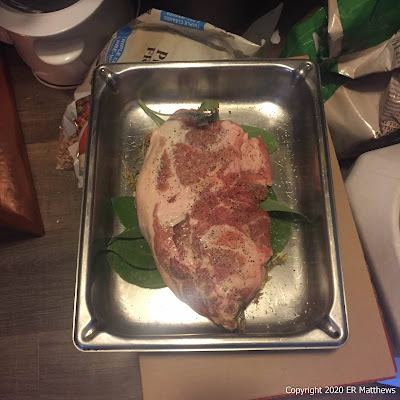
Pork Shoulder, Sage, and Garlic
In the restaurant days, when we had a constant supply of hogs, making scrapple was a lot easier than it is at home today. We made scrapple in the traditional style, always having a head, the neck, and some liver to use. But in all honesty, we made more headcheese and liver mousse than scrapple, just because those products were easier to move on our charcuterie boards.

While boiling is really the best way to get the meat from a head or neck bones, if you're starting with shoulder as I am forced to do at home, you might as well roast the shoulder to intensify the flavor versus boiling/stewing it. I placed a slab of shoulder on several sage sprigs and crushed cloves of garlic. I put the pan, covered in foil, in a slow oven to roast until falling apart, about three hours.

Chopped Pork Shoulder
After chilling overnight, the pork was ready to break down. I pulled all the meat off the bones, skin, and fat and chopped it pretty fine.

Making the Stock
Because I did not boil the meat, I needed to make a stock in which to cook the cornmeal. All the scraps, juices, sage, and roasted garlic went into a stock pot along with a lot more fresh sage, sprigs of thyme, parsley, red onion, lovage, leek leaves, dried arbol chiles, black pepper, bay leaves, and some fresh pork trimmings. I wish I had had some pork trotters to amp up the gelatin in the stock. Towards the end, I added four sheets of gelatin to help make up for that.

After draining the highly reduced stock, I used it to make a couple cups of cornmeal into very thick mush and then mixed in the chopped pork shoulder. I lined a mold with plastic wrap and coated the plastic wrap with pan spray to make it easy to release the set block of scrapple. In went the mush and after it cooled, I finished wrapping the mold and put it into the fridge overnight to set.

Scrapple Cooking
Inverting the mold and tugging on the plastic wrap released the block of scrapple from the mold. I then sliced the block into 3/4" slices, rolled them in seasoned flour, and fried them. For me, scrapple is all about texture, that wonderful contrast between crisp outside and almost molten inside, which is why I slice it so thick.

The trick to cooking scrapple slices is modulating the flame so that outside gets good and crisp without causing the slices to melt and fall apart in the pan. Basically, it requires a moderate flame and the patience to let a good crust develop.

So there we go: Scrapple 101. Damn was it good, but still I wish I had some pork liver to give this batch more flavor!

Tuesday, July 21, 2020

Annie Does Leek Fritters

Annie cooked for me! For a couple of weeks, she had been talking about making dinner for me and asked me to get some leeks and sour cream for her from the store. She wanted to make a recipe from Deb Perelman's Smitten Kitchen cookbook, Leek Fritters with Garlic Sour Cream. It's not often that Ann cooks. I love it when she does because she's a great cook! Her dinners always make me happy.

Leek Fritters with Chive Sour Cream
I was happy, but surprised when Ann asked me to help her in the kitchen to cut the leeks, green onions, and garlic. It's tough for her to be in the kitchen with me because sometimes I forget that I am no longer a chef and no longer in charge of the kitchen. As a chef, my job was always to be checking up on things, tasting, giving feedback, and instructing on technique.

In a home kitchen, when addressed to your wife, no matter how well intentioned, this stuff comes across as patronizing and irritating. I get it and I am trying to keep my mouth shut. After all, as Ann says, we're cooking dinner at home, not running a restaurant. I think I'm getting better, but old habits die a slow, slow death.

Poaching the Leeks
The original recipe called for finely minced garlic for the sour cream and lemon topping for the latkes. Ann had asked me to mince garlic for her and I did so, thinking it would have gone into the latkes, because that's what I would have done. But then she put it in the sour cream, saying, "I don't know about all this raw garlic in the sour cream."

Ann made it, tasted it, and wasn't very pleased. After some hesitation born of wasting food, she ended up pitching it and making a chive sour cream instead, a much more pleasing sauce.

Mixing in the Flour and Egg à la Latkes
After cooking the leeks and mixing in the green onions, flour, and egg, Ann started cooking the fritters using my old cast iron skillet, latke style, two by two. Any idea how hard it is to watch them cooking and smell their delicious aroma, yet having to wait for them to be done to dig in?

Cooking Leek Fritters
When the fritters were cooked, we ended up on the front patio dining al fresco. It was worth the wait! These leek fritters were so awesome that Ann vowed to make them again. But next time, she's going to sweat the leeks instead. We agreed that poaching dilutes flavor, while sweating concentrates flavor.

My Griswold #8 Skillet from the 1930s
For years while I was in the restaurant business and did not really have time or energy to cook at home, my old Griswold cast iron skillet stayed in the cabinet. Every now and again, I'd rub it down with a bit of oil, but it went unused for years.

Now that I'm retired and cooking all the time, the old skillet is back in action once again where it deserves to be. I've never seen a finer, flatter, and more well-seasoned skillet in my life. This skillet is in immaculate condition and will long outlast me, as long as it has an owner who will take care of it as it was before it ever came to me.

I am vague on the provenance of this skillet. I am certain that my mother gave it to me, probably after I had graduated from college and was setting up my first post-student kitchen, back in the mid-1980s. But where did she get such a treasured gift?

Was it a family heirloom? Certainly all the women on her side of the family were great cooks and every one of them had such a pan, if not several. I know that Mom had a range of pans from small skillets to vast chicken fryers. For all I know, it could be her mother's or one of my great grandmothers'. I will never know for certain, because there is no one left alive who could tell me.

It's not a unique pan in any way such that perhaps one of my living aunts might recognize it as belonging to someone in particular. The Griswold #8s were among the most highly produced size and therefore the most common and now the least valuable on the collector's market. Still, I find it amusing that a pan that I have used for all of my adult life is now a collector's item.

But because it is a collector's item, it is easy to date and value the pan. This pan was cast in the 1930s and in perfect condition as it is, could fetch $75 to $250 dollars. A pan that cooks this fine is of far more value in use in our kitchen, however, than it would be sitting on some collector's shelf gathering dust.

I hope one of our children will adopt this pan some day. But who knows how much their generation and subsequent generations will value such a venerable and untrendy workhorse?


Monday, July 20, 2020

Bacon and Egg Fried Rice

I love rice and I especially love it for breakfast. Always have, always will. I might have been born on the wrong continent. The Asian influence is strong: a big bowl of jook or congee is what I crave in cold weather. Breakfast all over Asia involves rice, but in America, not so much. Grits, oats, farina, other cereals, yes. Rice, no. A few specific locales (that all have exceptional cuisines, by the way) excepted, there is not much rice culture here in the US.

I took a nod from Japan in making this breakfast from rice leftover from the night before, combining Asian rice technique with good old American bacon and eggs.

Bacon and Egg Fried Rice

This is a simple fried rice that I made by frying cubed guanciale (my bacon) in sesame oil until crisp, then adding rice in single layer and letting it crisp. After that, I stirred in a few scrambled eggs. Each serving got a scattering of sliced green onions and toasted sesame seeds. This was a breakfast that was as delicious as it was easy to make.

Toasting Sesame Seeds

One of the best things about this dish in my mind is the sesame flavor from the sesame oil and the freshly toasted sesame seeds. Although I took my cue for this dish from Japan, I can almost envision it as a South Carolina low country breakfast using the locally grown Carolina Gold rice and heirloom benne (sesame seeds). 

On Being a Rice Cooker Failure


I admit it. In my six decades on this planet, I have used a rice cooker twice and twice I ended up with a miserable product. Thirty-five years ago when I was first married, we received not one but three rice cookers as wedding gifts. After giving away two of them, I tried a batch of rice in the remaining cooker. The result was terrible, "fuzzy logic" be damned. I promptly gave away the third rice cooker.

Fast forward to the restaurant era some 15-20 years later. We needed a vast amount of rice for some dinner, so I borrowed a large commercial rice cooker from another restaurant. You guessed it. That rice turned out so bad that we could barely choke it down for staff meals. That was my second and last rice cooker failure.

It's not like I don't know what I am doing. My mother taught me how to cook rice before I was in school and I have been doing it ever since, exactly the way she taught me, in a pot, on the range. When I left home for college, for the first time in my life, I had no pot in which to cook rice.

I remember saving my money and scouring the department stores for a pan that I thought would cook good rice. I was looking for a heavy pan with a tight fitting lid. And I found it in a fancy department store, in Richmond, Virginia I believe. Though I can still see the interior of that store, I no longer remember where exactly it was located.

My Rice Cooker: 2-Quart Magnalite Sauce Pan
The one that I bought, a 2-quart Magnalite anodized magnesium and aluminum alloy sauce pan with a thick lid, was wickedly expensive for my budget then. I remember thinking that I could have bought several cases of beer for the price of a pan. And that is a tough tradeoff for a college kid. Now I see that my pan is labeled "vintage" on Ebay and a few are available for collectors in the $20-30 range, a fraction of the cost of any decent new sauce pan. You know you are getting on in years when things that you have bought are now labeled vintage!

Based on how my mom taught me to cook rice back in the naïveté and absolute certainty of my youth, I knew without a doubt the one true and correct way to cook rice. Now many decades on, having seen dozens of people cook rice in many different ways, all successful, I shake my head at my no doubt belligerent know-it-all younger version. Kids!

So while I won't judge how anyone cooks rice as long as the rice turns out great, I do have one final thought about rice cookers. I may be a Luddite or I may be tight on storage space or I might be really frugal, or even some combination of all of those, but I have never really liked single-purpose cookware. I have always felt strongly that if I am going to have a piece of gear in my kitchen, it should be general purpose. Rice cookers for me seem singularly single-purpose. Hypocrisy in action: ask me about my single-purpose cherry pitter!

P.S. A quick anecdote about the know-it-all nature of being a kid. In the restaurant business, after dinner service is done in a small town, where do you go after work to unwind from the adrenaline rush of dinner, to have a couple beers, and to get some dinner? We used to end up at each other's restaurant kitchens where we'd throw together some chow and kibbitz until the adrenaline buzz wore off.

I remember being in one kitchen and needing some onions for a dish, so I went to the prep area, grabbed a couple onions, a knife, and a cutting board and started dicing the onions. I have evolved my onion cutting skills over the years and have settled on a quick and efficient method that works for me.

From over my shoulder, I heard, "That's not the way you're supposed to cut onions!" I looked up, still dicing my onion, and saw a teenage prep cook, probably not even old enough to grow a beard, a reminder of my young, cocky, know-it-all self. Poor kid did not even know that I was a chef.

So, I said, "Show me the right way then!" and he obliged. I didn't sense that he was being smug or a show-off, just that he was a naïve kid to whom the world was still black and white. I tried as kindly as I could to show him six different, equally effective ways to cut the same onion. You gotta learn some time not to judge and to keep your mouth shut, something I am still working on!

Saturday, July 18, 2020

Summer Cocktails

It's high summer and the bar is now open!

The Bar on our Patio
Ann and I decided a fairly long time ago that we needed a small table on our front patio to serve as a bar for summer Happy Hours. Some years ago, Ann bought an old window sash at Habitat for Humanity. I thought it would be cool to reuse it for a sign reading BAR to hang on the wall above the table. Both bar table and sign are now installed and have made a beautiful addition to our favorite outdoor space.

Bar Sign Mock-Up
I refinished the sash by scraping off tons of mustard yellow overspray from the glass pane and painting the sash black. My fingers ached for days from the hours with a razor blade, scraping and scraping. I found a carnival lettering font on the internet and mocked up what I wanted painted on the glass, then took it to a local sign painter who specializes in gold foil signs. Totally coincidentally, he happens to be a neighbor who lives two houses away. A month or so later, we got back this really gorgeous work of art that you see in the photo below.

While the sign was away being painted, I made the bar table in the same style as all the cocktail tables that I had made for our outdoor spaces. Each is topped with French white oak staves recovered from wine tanks. Tank-aged red wines often have staves of oak hung inside to simulate barrel ageing; when the wine is bottled, the staves are no longer good for winemaking.

I'm working on ways to reuse them after leaving them outside in the weather for the winter so that the rains gently wash away most of the red wine lees and built-up tartrates. I could scrape, sand, or pressure wash the staves, but I want them to have a rustic look and not look raw and brand new.

The Finished Bar Table and Sign

We have certainly already started to put the bar to good use and I am back to creating cocktails. While we mostly drink red wine during cold weather, we drink a lot more beer and cocktails in hot weather. Here are three recent cocktails, all tonic based. Our cocktails have a tonic focus because we both like complexity in our drinks and we don't really appreciate sweet drinks: we want them to be balanced and refreshing. This rules out a lot of juice- and soda-based cocktails.

Red, White, and Blue Berry Smash


Red, White, and Blue Berry Smash
Conceived at Ann's request on the Fourth of July, "Make us a red, white, and blue cocktail!," this refreshing cocktail takes advantage of the abundance of summer berries here in the Willamette Valley. It's kind of a cross between a Tom Collins and a Gin and Tonic. The quantities in the recipe below are for two cocktails.

1/4 cup red raspberries
1/4 cup blueberries
1 sprig rosemary
2 teaspoons granulated sugar
3 ounces lemon vodka (Absolut Citron)
3 ounces London dry gin (Aria)
1-1/2 ounces elderflower liqueur (St. Germain)
8-10 drops lemon bitters (Fee's)
juice of 2 lemons
2-3 ounces simple syrup
6 ounces tonic water (Fever Tree Citrus)

Fill two tall glasses 2/3 full with ice cubes. Add 5-6 red raspberries and blueberries to each glass.

In a mortar, smash the remaining berries and rosemary with the sugar.

Add the berry mash and the remaining ingredients except the tonic water to a large mixing glass. Stir, then taste for balance. Ann likes more simple syrup; I like less. I like heavy bitters.

Strain into the two glasses. Top with tonic water and give a light swirl. Garnish with a lemon slice and a sprig of rosemary.

Summer Rosemary Tequila Tonic


Summer Rosemary Tequila Tonic
I find that a splash of tequila in a cocktail adds an herbal smokiness that can't readily be attributed to tequila and that makes for a really interesting flavor profile, especially when paired with rosemary.

1-1/2 ounces London dry gin (Aria)
3/4 ounce Triple Sec
3/4 ounce silver tequila
1/2 lemon, juiced
equal amount of simple syrup
4 dashes old fashioned bitters (Angostura)
tonic water

In a tall glass filled with ice, add the liquors, lemon juice, simple syrup, and bitters. Add tonic water to fill. Stir gently. Garnish with a lemon slice and a rosemary sprig.

Pomegranate Gin & Tonic


Pomegranate Gin & Tonic
This is a straightforward and delicious cross between a G&T and a gimlet. 

juice of half a lime
equal amount of simple syrup
1-1/2 ounces of London dry gin (Aria)
4 dashes pomegranate or rhubarb bitters (Fee's)
splash of pomegranate liqueur (Pama)
tonic water to top (Fever Tree)

In a tall glass filled with ice, add all the ingredients, stir gently, and garnish with a lime wedge.

Thursday, July 16, 2020

Gravlax

Gravlax, salt- and sugar-cured salmon, is a thing of beauty. And it is so simple to make that I'm not sure why you would ever buy it. I've been making gravlax regularly for at least 35 years. I recently put up a tail section of a salmon filet as gravlax, the first that I have made at home in more than two decades. I never needed to: we always had plenty at the restaurant.

Everything Bagel, Chive Cream Cheese, Gravlax, Shallots, and Capers
I can't really think of a time at the restaurant when we wouldn't have at least a couple sides of salmon curing and a couple more in service. I even came up with my own spin on it, calling it prosciutto of salmon, salmon that had cured more than is typical for gravlax and then hung to dry and age for a couple of weeks, just like a ham. Sliced ultrathin, it had a lot of the same great umami qualities as a good ham. Think katsuobushi or bottarga meets prosciutto.

Many recipes make gravlax seem more complicated to prepare than it truly is. Weights, slotted pans for draining, cheesecloth, precise amounts of salt, etc. Baloney! You'll see none of that as you follow along below. Making gravlax is truly simple.

Deboned Salmon Tail Section, Skin On
If I'm not using whole sides to make gravlax (who needs a whole side at home?), I like to use the tail portion. Why, when many recipes suggest that center cut is the best? Because at home I want to serve the center cut portions for dinner and use the less desirable tail portions for gravlax. It's going to be sliced paper thin anyway, so why use the best parts? Pull all the pin bones with a pair of needlenose pliers and leave the skin on.

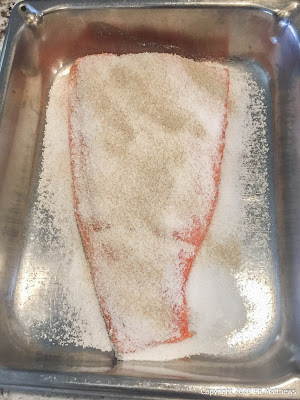
Cover the Salmon with Sugar, Salt, and White Pepper
Place the salmon skin side down in a glass or stainless steel pan. The salt will eat up an aluminum container, so use something non-reactive. The ratio of sugar to salt is a personal preference. I believe that most people, like me, like a lot less sugar than salt. First, I sprinkle the salmon with a small amount of sugar, just a good sprinkling. Then I cover the salmon in a good layer of salt as you can see above. I sprinkle the whole with a bit of ground white pepper.

If I were going to add an herb for flavoring, I would put it on next. Dill is the classic herb. I omitted it because I didn't have any. I also love to use Thai basil or anise hyssop to flavor the salmon.

Gravlax After 48 Hours
The fish then goes into the refrigerator. You can cover it or not. After 48 hours, I pull it out and check on it. Here is where experience comes into play. The fish is edible at any point. You have to decide what texture you want. I like mine firm to the touch throughout the whole filet. The thinner points are going to firm first. In the photo above, the lower three quarters of the fish are cured to my liking.

At this point, I rinse the fish, pat it dry, and rinse out the curing pan. Then I put the fish back in the pan and re-cover only the parts that I want to cure further with more salt. I check the fish every day from this point to see how it is progressing. I was satisfied with this piece after 4 days, 96 hours total in the cure.

After rinsing the fish and patting it dry, you can serve it right away. But I like to put the fish back in the refrigerator, uncovered, and let it dry a bit for 24-48 hours. This does two things. It fully firms up the flesh and it lets the salt equalize throughout the filet so that there are no super salty spots.

It's important to note that there is no right or wrong time to take your salmon out of the cure. It is a matter of personal preference. Although my preference is for a longer cure and a firmer texture more akin to a ham, I also love a brief 10-minute cure for meltingly soft salmon sashimi. There's a spectrum and you have to find your spot on the spectrum through experimentation. Do understand that the longer the cure, the saltier the result.

There are various ways to slice gravlax. For soft textured (24- to 48-hour) gravlax, it's often best to slice the fish vertically down to but not through the skin. Then you can slide your knife along the skin to remove all the slices at once. With firmer and saltier gravlax such as I make, it's probably best to take very thin slices towards the tail. I start about three inches back from the tail and make a very thin slice to the tail. Then I maintain this angle for the entire fish, yielding slices that you can see through as in the very top photo in this post. You can see the chives in the cream cheese through the salmon.

Making gravlax is very simple, a lot simpler than a lot of recipes make it seem. It's also ultra-rewarding to cure something so delicious yourself. And yes, those bagels were fabulous!

Tuesday, July 14, 2020

Souvlaki

I really miss the Greek Festival every August back in Winchester. The really crummy and cheap Greek wine under the big tents out front of the church, the kids running around like crazy, the smells of roasting lamb and grilling souvlakia, all accompanied by the strains of the emphatic bouzouki band. It was so miserably hot and humid every year, but a heck of a lot of fun! Thinking about it got me to wanting to make some souvlaki ("little skewers") from a pork tenderloin that I had in the refrigerator.

Souvlaki, Spinach, Rice, Tzatziki
The marinade for souvlaki starts with lots of garlic and oregano. Good thing our oregano is going nuts in the back yard right now.

Oregano and Garlic, Sine Qua Non of Souvlaki
I put the finely minced oregano and garlic in a gallon bag along with the zest and juice of a lemon, and a few glugs of extra virgin olive oil.

Ready for the Refrigerator
I cut a large pork tenderloin into roughly one-inch dice, yielding enough cubes for four nice skewers of souvlaki. Into the bag to marinate, the pork went in the refrigerator for two hours before firing the grill.

Skewers of Pork Ready for the Grill
I like to grill my souvlaki hot and quick, so I fired all three burners of the grill for 20 minutes before putting the pork on. The skewers were done at about two to two and a half minutes per side: that's a hot grill.

Souvlaki on the Grill

I wish you could have smelled the fragrant smoke coming off the grill as some of the olive oil in the marinade dripped onto the flame baffles. That's about as good a smell as there is! I know the neighborhood had to be jealous!

I'd normally want to shove these small pork kebabs in a pita with a bit of sliced cucumber and a slathering of tzatziki. I did want to do that this time as well, but we're watching the amount of bread that we shove in our faces.

At least for a few minutes, we were transported back to the Greek Festival in Virginia. Too bad the closest festival is in downtown Portland, an hour and a parking nightmare away. Opa!

Lamb Chops and Gigantes Plaki

Spring is starting to arrive in fits and starts here in Bend although one day will be warm and sunny and the next brisk and cool. There'...