Saturday, January 30, 2021

Tacos de Calabaza

It's no secret that we love tacos and we love really tasty vegetarian food, so I've been making a lot of vegetarian tacos: rajas con crema, grilled vegetable, spaghetti squash and black bean, and now, butternut squash and poblano pepper.

I thought of these orange and green tacos some weeks ago but I hadn't committed the time to roast butternut squash cubes until yesterday. The idea came from a vegetarian green chile with butternut that I made about the beginning of December. I knew the sweet roasted flavor of the squash would pair tremendously with the mildly spicy earthy flavor of the poblanos. The result was wicked good.

Tacos de Calabaza: Butternut Squash and Poblano
To make the taco filling, I cubed and roasted a butternut, then made a quick sauté of large dice of poblano, diced red onion, sliced green onion, minced garlic, and minced cilantro stems, with just a hint of ground mild Numex chile. I added the squash to the sauté and seasoned it before serving it on corn tortillas with chipotle adobo, cotija cheese, and cilantro leaves. Keeper!

Wednesday, January 27, 2021

Snowy Day Soup

Two days ago we were going to have turkey-vegetable soup, but being in a bit of a celebratory mood, I changed my mind and decided to make pappardelle con ragù, saving the soup for yesterday. And I'm so glad I did. It started snowing mid-morning and did not let up until after dark. If ever there were a list of days for a bowl of warm and comforting soup, a snowy day would be close to the top of the list.

A Perfect Soup Day
As transplanted easterners, we were delighted to see the snow. Snow here on the valley floor is rare. Sure, the tens and tens of feet of snowpack in the Cascades and in the Coast Range is impressive, but on a year-in-year-out basis, we don't get snow down here at only 150 feet of elevation. In fact, on most days this January, I have been wearing short pants during our daily walks. This mild Mediterranean climate lets us grow figs and olives with near impunity and causes our rosemary to explode into large shrubs. But it causes some of us who grew up with snow to miss the winter season, especially the bright red cardinals silhouetted against the snow.

Turkey Vegetable Soup
Why is soup so comforting? I think it is instinctive in humans to make soup for warmth and comfort. Why else do we turn to soup naturally when we are unwell? I don't think the higher part of our brain is actually involved; it is my private hypothesis that humans have been making soup for eons and at some primal level, know instinctively that it is simultaneously warming, nourishing, comforting, and hydrating, all things we desire when we feel ill or in need of comfort.

Theories aside, I try to make soup frequently in the winter. This winter, my go-to soup is turkey-vegetable. I bought a case of turkey necks from the grocery store just after the holidays when the meat manager was delighted to move them out of his freezer and into my cart.

Making soup is a two-day process. The first day, I roast the turkey necks (and in this case, the detritus from a chicken carcass) to golden brown, then deglaze the roasting pan, and simmer all the roasted meats and bones for a few hours to extract all the goodness. Into the fridge the stockpot goes to set up so that I can remove all the fat from the top the next day.

Then I rewarm everything, pull the meat and bones out, pick all the meat, and add the meat and vegetables back to the stock. The soup cooks for 15-20 minutes just before we want to eat so that the vegetables retain their texture.

This soup contains tomatoes, onions, leeks, carrots, celery, kale, black-eyed peas, stelline pasta, rehydrated porcini mushrooms, and a swirl of pesto at the end.

Tuesday, January 26, 2021

Pappardelle con Ragù

Our waistlines continue to shrink and I'm at the point where I really want to slow the loss. I was at the grocery store this morning with a plan to make turkey-vegetable soup for dinner, but I felt like we should celebrate a little tonight with a nice meal and a bottle of wine. Nothing was really coming to mind, but when I walked by one of the meat cases, I saw some country-style pork ribs, pork shoulder by any other name, that triggered a memory of ragù, meat sauce.

I thought it would be a wonderful treat on a very cold and rainy (34F and raining is the pits) day to have a warm bowl of pappardelle with meat sauce. And so it was, incredibly delicious, but probably too much quantity and definitely too rich. I made the sauce in a single enameled cast iron cocotte in oven with the whole process taking about 6 hours.

Pappardelle con Ragù
Browning Pork in the Cocotte
Browning the Flip Side
Braised for 2.5 Hours in White Wine and Water
Soffritto Sautéed with Garlic and Basil; Deglazed with White Wine; Meat Added
Tomatoes Added; Ready for Oven
Ragù Ready After Braising for Two Hours
Annie Coloring Outside the Well
Pasta Resting for An Hour
Rolling Out the Dough
Pappardelle Drying Before Cooking

Basic Egg Pasta Dough


Basic egg pasta is simple to make. The following makes plenty for two people.

2 cups all-purpose flour
1/2 teaspoon kosher salt
2 whole large eggs
2 egg yolks

Mix the flour and salt and form a pile with a well in it. Crack the eggs into the well. Add a drizzle of olive oil if you like. Sometimes I do, sometimes I don't. Beat the eggs in the center of the well and slowly incorporate the flour from the edges of the well until all the flour is incorporated into the dough. Add little dribbles of water if the dough is too stiff. Knead for several minutes until the dough is smooth and evenly colored. Allow the dough to rest, covered, for at least 30 minutes before rolling and cutting.

Friday, January 22, 2021

Chicken Broth with Egg and Spinach

Ann has been asking me to make a chicken broth-based soup with egg in it for a few weeks now, but it has always been pushed aside for something else. I poached a chicken early this week with the express purpose of making broth for this soup and last night was the night for the soup. To the boiling chicken stock, I added one breast that I diced, two big handfuls of spinach leaves, and five beaten eggs. It was just what the doctor ordered yesterday, after a day of working out in the cold.

Chicken Broth with Egg and Spinach
Almost every culture has its version of chicken broth and egg soup, probably because it is so simple to make, so tasty, so easy to digest, and so comforting, something that mom might make for you when you are not feeling up to par. There are not too many dishes like that in the culinary world! Just off hand, I can think of Cantonese egg drop soup, Greek avgolemono, Italian stracciatella, and Bavarian/Tirolean Eierflockensuppe. Ann, being Italian on all sides of her family, was lucky enough to be fed stracciatella with acini di pepe and parmigiano when she wasn't well!

This soup was the third dish that I made from that very versatile poached chicken. A chicken can so easily feed a lot of people for very little cost, if you know how to stretch them. Consider that with this chicken I made chicken pot pies, chicken tacos, and this soup. This chicken is not done yet: I will roast the remaining bones and skin along with some turkey necks that I have in the freezer to make yet another big pot of turkey-vegetable soup this weekend. I'll have to do a post soon on chicken tacos and how to stretch six ounces of chicken with onions and black beans to feed two people very heartily.

Thursday, January 21, 2021

Inauguration Day Cocktails and Cheese Puffs

Our heads are still reeling from the rabid mobs swarming and wreaking havoc on the Capitol on the 6th and the fact that our president incited that riot. Ann and I are fed up with such shameful behavior and were so looking forward to the inauguration of a new president yesterday, that we decided to have cocktails and hors d'oeuvres to celebrate what hopefully will be a transition back to more sane behavior in the White House.

Cheese Puffs and Passion for Whiskey Cocktail

Earlier in the week, I had made chicken pot pie and had some leftover pie crust. I knew that I was going to use the pie crust to make an hors d'oeuvre for our little celebration. Then it dawned on me to convert that pie crust to a laminated pastry (puff pastry) with cheddar cheese to bake into cheese puffs to accompany our cocktails.

Cheese Puffs
Although I never went to culinary school, I taught myself everything (and a lot more) that these schools have to teach, including pastry basics. Throughout my chef career, I made a lot of puff pastry (though you can buy it frozen easily in the trade). There's not a whole lot of difference between my pie crust and puff pastry, except that the pie crust is not laminated.

Lamination is the key to puff pastry: folding and refolding it into layers upon layers as you can see in the photo above. Generally, you start with a basic pastry and seal that around a hunk of butter (the process called beurrage). Then you roll the dough out, trifold it, rotate it 90 degrees, roll it out, trifold it again, then let it rest in the refrigerator for 45 minutes to an hour. You do this once or twice more, building layers and layers.

I decided to put a mound of shredded cheddar cheese (rather than butter) in the middle of my pie crust and treat it just like puff pastry. I went through the rolling and folding process three times.

Final Sheet of Puff Pastry, Ready to Cut

I sliced the sheet of pastry down the center and then cut each half into fingers. I put the fingers on a sheet tray, spritzed them with pan spray, sprinkled on sel gris (French gray sea salt), and put them into a hot oven (425F) for 20 minutes.

Passion for Whiskey Cocktail


In addition to being known for a menu of local cuisine that changed nightly, my restaurant was way in the craft cocktail vanguard. I created all the cocktail recipes, using my chef's palate to ensure that they were refreshing and balanced. One huge customer favorite was a drink that I called Passion for Whiskey, basically a passionfruit whiskey sour. It's a great drink and what we had last night.

1 1/2 ounces bourbon
3/4 ounce St. Germain
3/4 ounce lemon juice
3/4 ounce passionfruit syrup
4 dashes old fashioned bitters

Swirl all ingredients in a shaker full of ice. Strain into a coupe or martini glass. Serve up with a wild cherry for garnish.

Chicken Pot Pie

My wife is a little crazy and I love her for it. This week when I had poached a chicken, she nonchalantly and quite apropos of nothing (that I could ascertain; who knows what was buzzing around in her infinitely circular brain?) asked me to make a chicken pot pie, saying that she would really like that a lot. Why not? Anything for her.

So I poach all the vegetables, make the gravy, make the crust, bake the pies, and get them to the table. Just before we dig in, she says, "I've never had pot pie before." All the while, I assume that she has asked me to make her a pot pie because she had eaten one and found it delicious enough to want again.

Don't you think that she would have said to me, "I've never had a pot pie before and really want to try one! Would you make me a chicken pot pie?" Nut!

Chicken Pot Pie
Pie Vegetables
You can use any vegetables that you want for your pies. I had planned to use celery, leeks, carrots, and green beans. When I got home from the store, I found that someone (not naming names) had roasted all the green beans that I was going to use in the pies. So I substituted some broccoli florets.

I brought some salted water to a boil and gave each of the vegetables a quick parboil. I cooked each vegetable in sequence until it was crisp-soft and put it in ice water to stop the cooking. Meanwhile, I picked a bit of chicken off a carcass that I had poached the day before.

Pies Ready for Topping
I brought the chicken stock that I had made the day before to a roiling boil and thickened it with a corn starch slurry. I poured the thick gravy over the vegetables and chicken, then seasoned with salt, plenty of black pepper, and a mound of freshly chopped parsley.

In retrospect, I should have used a beurre manié (flour and butter mix) to thicken the gravy. I was trying to back off the calories by using corn starch, but the gravy broke down in the oven later, something that flour will not do. Even an old chef learns the hard way (to be fair to myself, in my restaurant career, I did not get any experience in low-fat, low-calorie cooking!).

Pies Ready for Oven
We don't have any special dishes for pot pie and I thought that it would be nice to make individual ones, so I repurposed a couple of cereal bowls. I topped each with pie crust (recipe below), trimmed the crust, crimped it into the rim of the bowls with the tines of a fork, slit the crusts for steam vents, and brushed the tops with egg wash. 

The pies want to be in a hot oven (425F) until the top crusts brown nicely. I want to say that these took 35-40 minutes, but I wasn't watching the clock like a hawk.

Pie Crust Recipe

This is my tried and true all-butter super flaky pie crust. I would love to say that I learned it from my mother or her mother, inveterate pie bakers both, but that wouldn't be the truth. They were diehard Southerners and it was Crisco for their pie crust or nothing. I gave up on trans fats and hydrogenated shortening a very, very long time ago in favor of butter or (rarely) lard.

The following recipe will make a generous single pie crust (with generally enough left over to make a lattice top), depending on what size pie plate you are making. I measure my baking ingredients by weight in grams. If you do not have a scale, get one. It will be the single best thing you can do to improve your baking.

150 grams all purpose flour
1/4 teaspoon kosher salt
140 grams cold butter, in small cubes
ice water as needed

Spin the flour and salt in the food processor for a second to mix it. Add the cold butter cubes and pulse. Pulse until the butter resembles really small peas in size. Add a couple tablespoons of water and pulse. Add water in dribbles and pulse in between. When the dough just starts to come together, bring it out onto a floured counter and shape it into a flat disc. Wrap it in film and refrigerate for an hour to cool it off. After this rest, it will be ready to use.

Saturday, January 16, 2021

Fish and Black Bean Tostadas

Fish and Black Bean Tostadas
We eat a lot of tacos suaves at our house. Sometimes we are looking for a little different texture, so I have been making tostadas recently. The latest batch is fish and black bean, the black beans helping to stretch the expensive fish and also to bulk the dish so that we consume fewer tortillas. We might only eat 3 or 4 tostadas, but if we're just having tacos, we're probably going to eat 5 or 6.

This dish has three components: the tostadas, the beans, and the fish. If you need a refresher on making tostadas, you can find it here. The black beans are flavored with a soffritto of (scraps from the refrigerator) red onion, shallot, green onion, cilantro stems, garlic, and mild ground Numex chile. The fish (Pacific rockfish) is baked on a sheet tray after being sprinkled with a mix of mild ground Numex chile, ground cumin, granulated garlic, salt, and aromatic Mexican oregano.

For us, tostadas are a great change of pace. And these fish and black bean ones were so delicious that they'll probably become something of a regular replacement for fish tacos.

Kitchen Basics: Making Baked Tostadas

If you have time, making tostadas at home is way more economical than buying them at the store. All it takes is two sheet trays, corn tortillas, and time. You can also make tostadas by frying the tortillas in oil (and they are crazy good), but that's not super healthy eating, is it? Baking the tostadas removes fat from the equation and yields a very good result.

Raw Tortillas on a Sheet Tray
For every two half sheet trays, you can make 8 tostadas, plenty for two people. Lay out the tortillas as you see in the photo above, with three tortillas down each side of the pan and the other two tortillas in the middle, overlapping those on the edges.

Keep the Tortillas Flat
Keep the tortillas flat during cooking by covering them with another sheet tray.

First Turn at 15 Minutes
Place in moderate oven (350F) for fifteen minutes. Remove and flip all the tortillas. This will give the water vapor a chance to evaporate and help dry the tostadas. Notice that the tortillas have shrunk to the point where there is almost no overlap.

Second Turn at 30 Minutes
Return the covered tortillas to the oven for another fifteen minutes. Then remove them and flip them once again. You'll be able to judge how dry they are at this point and make an estimate of how much longer they need to cook. I notice timing differences if I am using the bottom shelf (near the flame) or the top shelf (away from the flame). How fresh the tortillas are (how much water they contain) also influences cook time as well as how full the oven is. It takes longer if I am also cooking another tray of tostadas or something else simultaneously.

Finished and Cooling at 37-40 Minutes
Once the tortillas are done to the point where they are crisp without being burnt, pull them out and uncover them to let them finish evaporating any remaining water while they cool. Once they have cooled to room temperature, you can store them for very long periods in a tightly sealed container. Humidity is the bane of tostadas, so keep them well-sealed if you are not going to eat them in short order.

Friday, January 15, 2021

Brined Roasted Steelhead with Fennel-Orange Slaw

We end up eating a fair amount of steelhead trout and salmon, to the point where I am looking for ways to cook it other than on the grill or in a steel pan. I remember years ago at the restaurant, sometimes I would brine and roast fish and that's what I decided to do in this case. Brining gives fish a silky, sexy texture and this piece of steelhead was amazingly moist and delicious.

Brined Roasted Steelhead with Fennel-Orange Slaw
It's hard to come up with garnishes for dishes in the middle of winter because so few things are in season. Fortunately, winter is a great time for both citrus and fennel. On spying a nice fennel bulb at the market, I brought it home to make into slaw for the steelhead. Haricots verts have very good shelf life and are not too bad during winter, so I brought some of those home to roast as well.

Brining Steelhead
A decent brine is a tablespoon of Kosher salt per cup of water. For this brine, I put two tablespoons of salt and a tablespoon of sugar in a pint of water. The steelhead was in the brine for about two hours. Even ten minutes in the brine improves both texture and flavor. I did not salt the fish otherwise.

Fennel-Orange Slaw
This fennel-orange slaw could not be any simpler to make. It contains one fennel bulb, core removed and shaved, the segments of two large navel oranges, and a bit of shaved red onion. It is seasoned with salt, sugar, red wine vinegar, and the orange juice that I squeezed from the oranges after removing the segments.

Pan-Seared Barramundi with "Sauce Vièrge"

I'm a huge proponent of wild-caught local fish from well-managed fisheries, but out here in Oregon, our selection is quite limited in comparison to what I am used to on the East Coast, where we served many dozens of species at the restaurant. Out here, we have access to salmon, steelhead, rockfish, Pacific cod, albacore, sturgeon, sablefish, halibut, and not a whole lot else. Often I wish for a bit more diversity in the fish that we eat, so when I ran across some beautiful farmed barramundi, I snapped it up.

Every now and again at the restaurant, we could not get much in the way of local wild-caught fish because of a hurricane or nor'easter keeping the fleet in port. At such times, I had no choice but to buy farmed fish and farmed barramundi from Massachusetts was a great choice. It cooks (and has crowd appeal) just like any of the eastern firm white fish: striped bass, grouper, wreckfish, drum, corvina, or snapper.

Ann, who I do not believe had ever eaten barramundi, asked me to grill it, but I knew from working with the fish for many years that one of the best things about it is the crispy skin that you can get from cooking it in a steel or cast iron pan. And so I crisped the portions and served them with a sauce that I call sauce vièrge.

Pan-Seared Barramundi with "Sauce Vièrge"
"Sauce Vièrge"
When I was learning my chops in the 1980s, one of the most influential chefs was Michel Guérard, who was arguably the father of nouvelle cuisine, the more modern take-off of haute cuisine with an emphasis on lighter saucing, brighter flavors, and beautiful presentations. Chef Guérard recorded a lot of his dishes in a book called Cuisine Minceur, so-called slimming cuisine. While some of the dishes seemed to me to be a bit too austere in pursuit of diet consciousness, I did read and learn.

One of preparations for which he became well known among chefs was a sauce that he called virgin sauce, sauce vièrge, virgin in the sense of uncooked and raw. It is essentially finely chopped tomatoes in a vinaigrette. I took the sauce and adopted it to my kitchen and served it with seafood during late summer when the necessary ingredients were in the market.

My version is more or less a chopped salad meets vinaigrette. Last night's version included red pepper, yellow pepper, cucumber, tomato, minced shallot, capers, olive oil, and lemon juice. I generally include either basil or parsley, but the winter has not been kind to my parsley and of course, the basil is long dead.

So, while the execution of the sauce is all mine, I freely admit that I stole the base idea from Michel Guérard. That theft is in the chef world one of the highest forms of flattery: something that one chef does is so good that other chefs take that idea and adapt it to their kitchens. I'd like to think that one of more of my sous chefs and other cooks might have taken some of my ideas into their own kitchens.

Tuesday, January 12, 2021

Spaghetti Squash and Black Bean Tostadas

Spaghetti Squash and Black Bean Tostadas
The last time that I made spaghetti squash with black beans and baked it into a casserole, Ann commented that she'd really like the dish if I were to make it as a tostada topping. You can find the recipe for the topping at the link above. Last evening, I baked a spaghetti squash and made the tostadas that she asked for.

Making Tostadas

Although I see bags of tostadas flying off the shelves at the local supermarket, I don't see the point of buying them, if you have time to make them yourself. All it takes is a bag of corn tortillas, two sheet trays, an oven, and about 45 minutes. Although I lay out the process below, there is a step-by-step photo shoot of how to do it here.

To make tostadas, I lay 8 corn tortillas on a sheet tray, 3 along each side and two in the center. Then I top the sheet tray with another such that the tortillas are trapped between the two sheet trays. This will keep the tostada shells relatively flat.

The tortillas go into a moderate (350F) oven for fifteen minutes, at which point I pull them out of the oven and take the top sheet tray off. This lets the water vapor escape. Then I flip the tortillas over. At this point, you will see that they have shrunk to the point where all eight fit on the sheet tray with almost no overlap.

Re-covering the tortillas, I put them back into the oven for another 15 minutes and repeat the same process for a final 15 minutes. At this point, the tortillas should be dry and crisp. Pull them out and leave them uncovered until you are ready to eat. The hot tortillas will continue to evaporate any last bits of water in them as they cool.

You should eat the tostadas right away, but if you cannot, once they have cooled to room temperature, you can store them for a very long period in a tightly covered container. Humidity is their enemy so keep them cool and dry.

Vegetable "Lasagna"

Ann put me onto the idea of making a vegetarian lasagna a week or so ago. It was kind of a fun dish to assemble and eat. Naturally, it would have been a lot better if I weren't working so hard to minimize the fat in it, but it was delicious.

Vegetable "Lasagna"
Once I assembled the lasagna, it baked in a moderate (350F) oven for an hour to heat through and crisp the pecorino romano that I grated over the top. I filled the oiled 9x9 baking dish level with the top rim and as you can see in the photo, the lasagna puffed up about a half an inch above the rim of the dish. It later settled back as it cooled.

Baked Squash Slices for "Noodles"
I started by cutting several (let's call it 9 or 10) small zucchini and Lebanese squash (the light green, small straight squash) into 5-6 slices each and placing the slices on two sheet trays sprayed with pan spray. They went into a moderate oven (350F) with a turn every fifteen minutes for about an hour.

The point of pre-cooking them is to evaporate much of the water in the squash so that it does not bleed into the lasagna. I jammed the slices together as closely as possible until both sheet trays were full. You can see how much shrinkage there was in the oven; that's water that will not dilute the dish.

I know that Ann wanted me to use eggplant in the dish as well but it is winter now. While we have a year-round supply of decent summer squash at the store, the eggplants tend to be terrible out of season. I just want Ann to note that I have bent my rule about using out-of-season produce (the squash) to make her what she requested.

Extra Thick Marinara
To make the tomato sauce, I roughly blended two drained 28-ounce cans of diced tomatoes and then put them on the flame to reduce and thicken. To the pan, I added four cloves of garlic (minced), a tablespoon of dried basil, and a pinch of red pepper flakes. I never salt dishes that are going to be highly reduced until the end for fear of overly concentrating the salt.

When reducing tomato sauce, you really want to watch the flame so that you don't send geysers of red sauce all over the kitchen, especially as the sauce becomes thick. It took about an hour of cooking to reduce the sauce to the point you see above, with me getting up from my movie every 10 minutes to check the flame and stir the sauce.

White Bean and Pesto Purée
For the alternating layers, I decided to make a purée of white beans and pesto. I drained four 15-ounce cans of white beans and put them in the food processor with a tablespoon and a half of pesto. It took several minutes for the food processor to convert the very dry beans to a smooth but stiff purée. I seasoned it to taste with salt.

Then came the assembly: a thin layer of marinara, a layer of squash, a layer of beans, a layer of squash, a layer of marinara, a layer of squash, a layer of beans, a layer of marinara, and a grating of pecorino romano.

This was a fun dish for a lazy and cold winter Sunday afternoon.

Monday, January 11, 2021

Roast Chicken with Potatoes and Brussels Sprouts

One of Ann's favorite meals is a simple roast chicken and I share her enthusiasm for it. When she asked me last week to roast a chicken for her, I could not refuse. A roast chicken has a lot going for it: it is delicious; it is a simple dish to prepare; and, it provides leftovers for additional meals.

Roast Chicken with Potatoes and Brussels Sprouts
Chicken Trussed and Ready to Roast
To ready the bird for the oven, I patted it dry, stuffed some rosemary sprigs into the cavity, trussed it with string, sprinkled it with salt and pepper, and put it in the roaster, surrounded by Yukon Gold potatoes, brussels sprouts, peeled cloves of garlic, and more rosemary sprigs.

Then it went into a moderate oven (350F) until the legs moved freely in the joint. The internal temperature in the thickest part of the thighs was 165F and I'm sure it finished ten degrees higher than that. This 4-pound bird was in the oven for 90 minutes.

I truss my bird because that's the way I learned to cook poultry, old school classic French technique called ficeler un poulet. I don't know what they teach new cooks, but I fear that I may be of the last generation to truss poultry so that it cooks evenly and looks nice on the table. I fear that new cooks may not even know how to cut up a chicken, let alone roast a whole one. Do I underestimate our culinary schools? I don't know; I never attended. They did not exist in my youth.

Along with hard boiling an egg and making a decent omelette, roasting a chicken is a basic culinary skill. I like to roast a bird or two a year to keep my practice up, though there really is not too much to it other than knowing when to take the bird out of the oven so that the dark meat is cooked and before the white meat dries out.

One of the best things about a roast chicken is that it provides additional meals. We ate roast chicken and vegetables the first night, chicken tinga the second night, and vegetable soup with chicken stock the third. Not a bad yield for a $5 bird.

Saturday, January 9, 2021

New Year's Black-Eyed Peas

It's an old tradition, at least in the South, that we eat black-eyed peas for good luck in the new year. I don't know what in the hell happened in 2020: I assure you that I ate my black-eyed peas. This year, I wanted to do a dish reminiscent of my time in New Orleans, a creole take on a black-eyed pea stew.

Creole Black-Eyed Peas

Ready to Cook
The dish is simply made. I decided to start with two pounds of dried black-eyed peas because I wanted leftovers for lunches. After draining and rinsing the soaked peas, I put them in the slow cooker with a chunk of smoked turkey neck, large can of diced tomatoes and juice, a lot of minced garlic (an entire bulb, minced), and a bunch of "trinity." My trinity comprised two poblanos, a bunch of green onions, a huge yellow onion, and three stalks of celery, all diced. I filled the slow cooker with water and put it on high for seven hours (and it was done in about 6:45).

Later in the day, I mixed up a batch of my Cajun spice mix, which I call Magic Dust. I would have put it in from the get go, but I was out. My spice mix contains thyme, salt, black pepper, white pepper, garlic powder, onion powder, cayenne pepper, basil, oregano, smoked paprika, mustard, and bay leaves. I grind the basil, oregano, mustard, thyme, and bay to order. My ratios have been determined by trial and error over forty years. I don't currently have any onion powder, so I went heavy on the granulated garlic. I added three heaping spoonsful of spice mix to the stew.

Once the beans were tender, I mashed a bunch of them against the side of the slow cooker with the back of a wooden spoon. This helps thicken the stew, otherwise, you end up with a sort of thin black-eyed pea soup, not what I was aiming at.

Although this stew contains a chunk of smoked turkey for flavor, it would make a fantastic vegetarian stew by omitting the meat. My Cajun spice mix has enough smoked paprika in it to give a smoky flavor without the smoked meat.

"Warm" Greek Salad: White Beans with Horiatiki

I'm a big fan of mixing textures of foods in the same dish, witness my vegetable tacos in which I mix cooked vegetables with raw ones to achieve the final product. In the same vein and in response to wanting something warm for dinner in this cold season, but also wanting something fresh, bright, and cheerful, I started thinking about combining two dishes: a humble pan of white beans and horiatiki, the classic chopped Greek salad.

"Warm" Greek Salad: White Beans with Horiatiki
White Beans with Red Onion, Spinach, and Garlic
Horiatiki Without Feta
It's quite simple really: cook some onion and garlic in olive oil, add spinach and white beans to warm through and wilt the spinach. Assemble a chopped salad of tomatoes, cucumbers, olives, red onions, and peppers and dress them with olive oil, lemon juice, oregano, and salt. Lay the beans in a bowl and top with the horiatiki.

Feta would be great in this salad or crumbled into the beans or over the top of the plate but we are watching our fat intake and my gut has issues processing a lot of cheese. It's a shame because a great sheep's milk feta is one of the world's great cheeses.

Ann asked me to make this dish again. It really is tasty and it's a great vegetarian dish that can be on the table in under ten minutes start to finish.

Friday, January 8, 2021

Squid, White Beans, and Arugula

There must be foods in everyone's lives, if they ever take the time to reflect on it, that are somehow meaningful in ways that have nothing to do with alleviating hunger, foods that conjure memories. Perhaps it is a dish that grandma used to make, a dessert eaten on a first date, or a secret midnight snack to satisfy a particular craving. In my life, many such dishes make me feel things. Topping the list, perhaps, is white beans with squid and arugula, a dish that I made once again just recently.

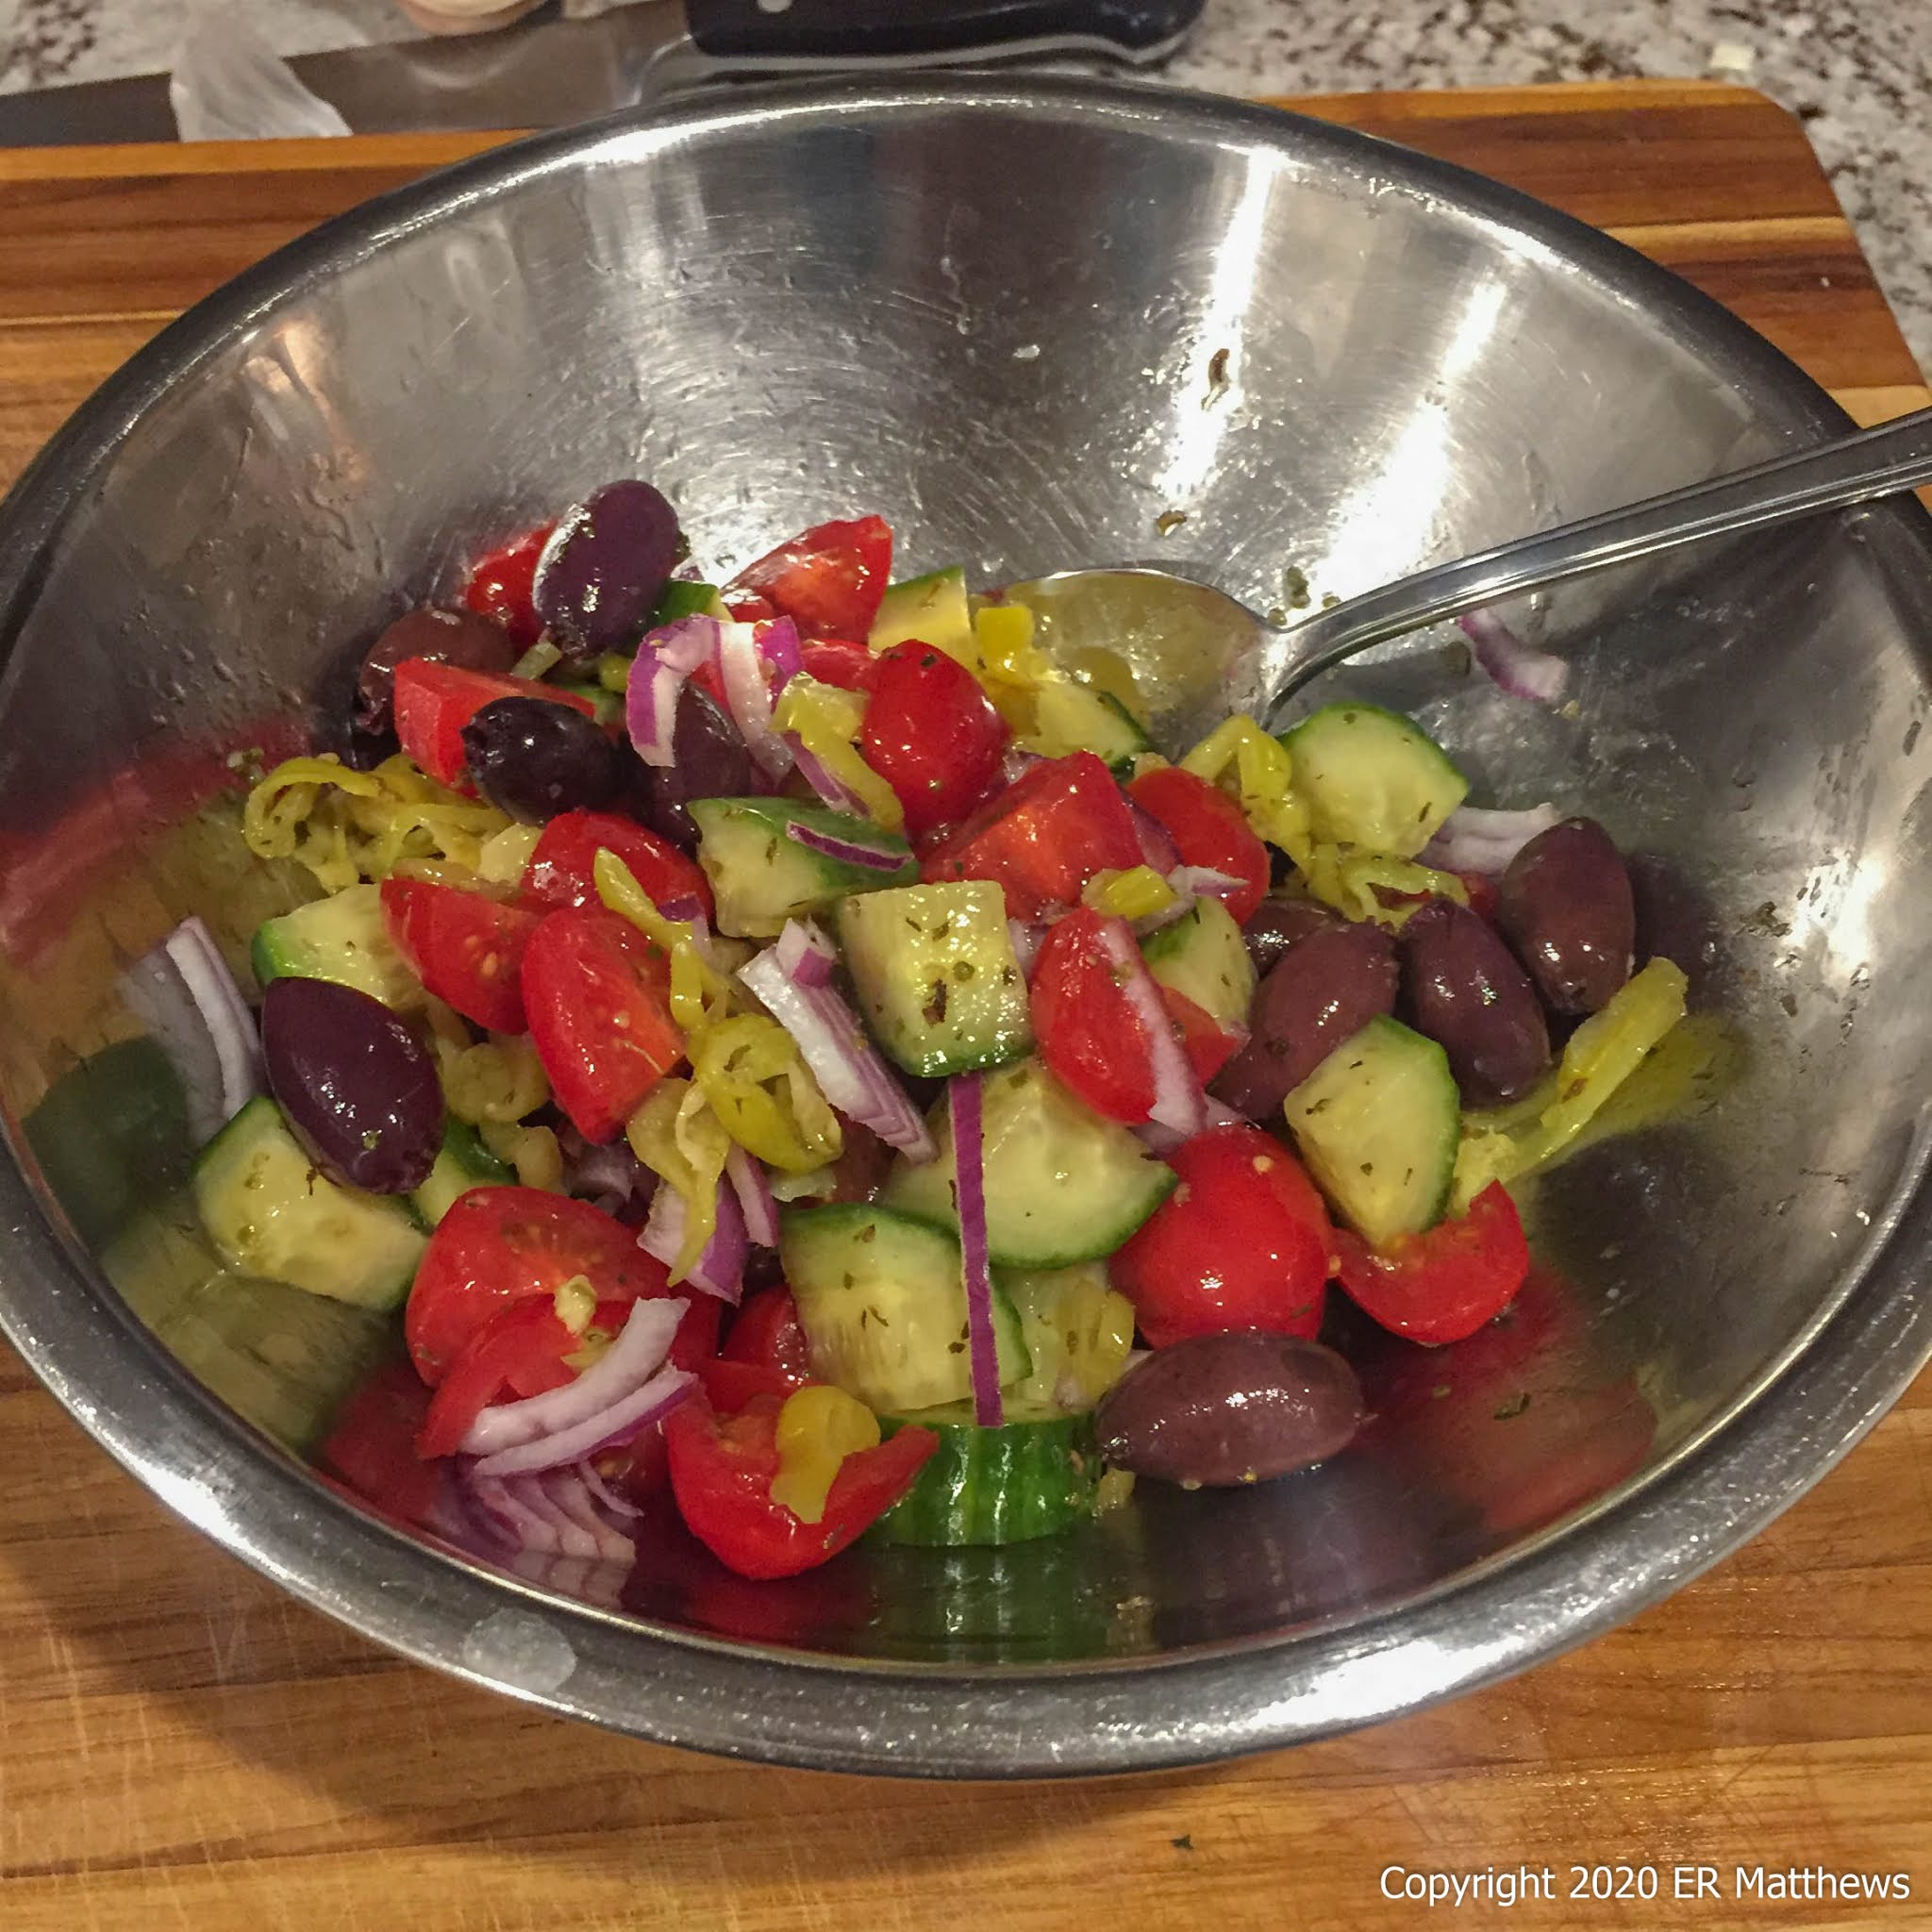
Squid, White Beans and Arugula
On the face of it, it is a trivially constructed dish consisting of cannellini beans, baby arugula, raw red onions, and lightly cooked squid dressed with lemon juice, olive oil, salt, and oregano. It is so simple that to taste it is to know how to make it. But it is one of those amazing dishes whose flavors and textures are transcendent, that are more than the sum of the parts. One of my former sous chefs calls it "a perfect dish," high praise indeed.

I cannot in any way take credit for this dish. My history with this dish started in Richmond, VA in the 1980s. Once upon a time, I used to spend pretty much every weekend in Richmond, commuting from my apartment in the DMV in suburban Maryland.

On Richmond's Oregon Hill across from the Virginia War Memorial on the north bank of the James River in a building that looks boarded up sits a restaurant called Mamma 'Zu, a self-styled Italian restaurant that really puts the D in dive. It has no décor to speak of, no fancy furnishings, a surly host, a no-nonsense menu written on a chalkboard, and a wine rack in the back. If you want a bottle of wine, you go to the back and grab a bottle and bring it to your table, or that was the drill 35 years ago.

It is a polarizing restaurant: people love it or they hate it. The restaurant has a well-deserved reputation for taking shit from nobody. They don't accept credit cards, they don't modify their dishes, and you follow their rules or you hit the road. It is a place where the host is intimidating and if you act intimidated, you could be in for a long night. It is also a place where the vibe is chaotically electric and the cooks are jammed into a tiny hell hole of an inferno.

But they turn out some exquisite food. They don't list their excellent pizza anywhere, but if you go there enough, you'll see pizzas coming out along with mounds of pasta. But what I went there for was impeccable seafood. The menu would mainly list the name of the fish and a price, such as "Sardines 24" and "Rockfish 30" and you just ordered them. Woe be unto the newbie who enquired about a preparation or worse, asked for a change in a dish. Me, I never cared. My trust in the kitchen was implicit.

My favorite was an appetizer called Squid, White Beans, and Arugula, the very same dish that you see above, a dish which my then-wife would not touch. I loved it so much that it had to be on the table every time we ate there, which was regularly. Sometimes we would venture to their second location near VCU in The Fan District, a restaurant called Edo's Squid which also had this same dish on the menu. I never liked the swankier location as much, but the food was just as good.

We continued to visit Mamma 'Zu with nearly every trip to Richmond for many years. Fast forward fifteen years or so to a point at which I had opened my own restaurant. One day, into the restaurant walks a young cook looking for employment at a point when I had just lost my sous chef. On the strength of his resume which included stints at both Mamma 'Zu and Edo's Squid, I hired him (and he has gone on to helm many of his own kitchens). In the bustle of getting a new restaurant off the ground, I had put squid and white beans to the back of my mind. He inspired me to put the squid dish on our menu occasionally.

My restaurant was located in Winchester, VA at the very northern point of the state, far, far closer to Pennsylvania than Richmond. The primary industry in Winchester is the hospital which is a large regional trauma center serving a vast geographic area. Many of the employees of the hospital and associated doctor's practices trained at MCV in Richmond and were familiar with the dish from Mamma 'Zu and/or Edo's Squid, which is located just a few blocks west of the hospital.

Many was the transplanted Richmonder who would call me and ask me to make the dish for them on their visit to my restaurant. Such is the nature of the dish that it inspires great loyalty. I have great memories of all the friends and customers who loved this dish as much as I do.

To keep in touch with this dish, I make it from time to time at home. Ann and I both love it. For me, it brings back memories of when I was young, a favorite restaurant, a young sous chef who has gone forth to do great things, of my restaurant and special customers, and of a meal that really resonates with Ann and me. She doesn't have the connection to the dish that I do, but she is the reason that I continue to make it.

Wednesday, January 6, 2021

Savory Bread Pudding: Shiitake, Leek, and Goat Cheese

Way back in the Thanksgiving time frame, Ann expressed a desire to have a savory bread pudding for Christmas Day brunch, by way of celebrating. We haven't been eating many simple carbs at all since August and the bread pudding would be a rare treat. I proposed making one with shiitakes, leeks, and goat cheese and she agreed, further asking if I could make it with challah. So I made a loaf of challah and assembled the bread pudding on Christmas Eve, baking it in early afternoon on Christmas Day.

Savory Bread Pudding: Shiitake, Leek, and Goat Cheese
I really love doing dishes like this for brunch because I can assemble everything the night before, leaving only to pull it out of the refrigerator and put it in the oven the next day.

Starting the Flavorings: Leeks and Shiitakes
Cooking the Leeks and Shiitakes with Thyme
I started by cooking sliced leeks and shiitakes with a bit of thyme. Thyme is one of my favorite herbs and I think it pairs extremely well with shiitakes.

Measuring the Bread
When making any kind of bread pudding, I always use the baking pan to measure the bread. I keep cutting cubes until the pan is full. That way, there's no guessing. Because challah is so soft, I cut it into very large cubes so that it will not fall apart when I add the custard. I prefer to use more substantial bread for bread puddings. When using bread with more body and a tougher crust, I would cut it much smaller.

You can use any bread you like. For example, I have made bread pudding with croissants and my grandmother used to smear store-bought white bread with butter and jam and shingle (overlap) the whole slices of smeared bread the length of her baking dish.

Dry Ingredients Before Mixing with Custard
Bread Pudding Ready to Bake or Refrigerate
The custard for bread pudding can be flavored or unflavored. In the restaurant days, I would infuse the cream for the custard with garlic, herbs, spices, and dried mushrooms, among other flavorings. For this bread pudding, I did not want to take that extra step, mainly because I had just made the challah and spent three days making French onion soup for Christmas Eve Dinner. Also, I wanted to reduce the fat in the custard by using low fat milk rather than the 40% heavy cream that I used to use at the restaurant.

A decent rule of thumb is that each egg will set one cup of liquid, so each quart of liquid requires four eggs. I always use five eggs. It's always a good idea to know how much custard volume you need for the size pan you will be using. A full shallow hotel pan will take a gallon (plus 20 eggs), a half hotel will take a half gallon (plus 10 eggs), and this 9x9 pan will take a quart (plus 5 eggs).

At the restaurant, in addition to making large puddings, we used to bake bread puddings in individual molds, in which case, we'd fill each mold full of bread and then ladle custard into the mold until the mold was full.

This 9x9 pan contains, in addition in addition to the bread and custard, a leek, a half a pound of shiitakes stemmed and sliced, and four ounces of fresh goat cheese.
 
Bread Pudding Coming Out of the Oven
Baking bread puddings is a simple matter of putting them uncovered in a moderate oven (350F) and waiting for them to set up and brown on top to the degree that you want. A bread pudding of this depth will take about 90 minutes, a good bit longer than many people expect. A full hotel pan of bread pudding is going to take about two hours to set in the center and brown. If you're wanting to eat your bread pudding while it is still warm, you'll probably want it to cool for 20 minutes before you cut it so that it has a chance to solidify a bit. All this is by way of saying that you should allow plenty of time to cook and cool your bread pudding before you want to eat it.

Prosecco: A Great Match for Goat Cheese
The slightly acidic flavor of the goat cheese in the bread pudding seems to go incredibly well with Prosecco, so we put a bottle in the refrigerator and had a glass while the pudding was in the oven and another glass with the pudding.

Lamb Chops and Gigantes Plaki

Spring is starting to arrive in fits and starts here in Bend although one day will be warm and sunny and the next brisk and cool. There'...