Showing posts with label cannellini. Show all posts

Monday, June 3, 2024

Memorial Day 2024

Another Memorial Day is in the books. Now that we are starting to have some spring weather, Ann has whipped our courtyard patio into shape and has been looking forward to entertaining out there. So we invited Michelle and Andreas and Jen and Will over for a little cookout and relaxation.

Ann Worked Really Hard to Set Up our Outdoor Space
After a Long Winter
It really didn't take long to put together a menu once we decided that the feature would be ribs. When I look back at our Memorial Day posts, they always feature something on the grill, late May typically signifying the beginning of our outdoor grilling season. The menu we arrived at for this Memorial Day was:

Cannellini and Roasted Red Pepper "Hummus"
Dry-Rubbed Pork Spareribs
Barbeque Sauce
Chimichurri
Potato Salad with Sour Cream and Bacon
Grilled Asparagus
Strawberry-Lime-Chipotle Sorbet

I decided to start with a simple gluten-free appetizer dip for Michelle, a white bean and roasted red pepper "hummus" to be served with almond meal crackers, cucumbers, and sweet peppers. And then there would be pork spareribs for which Ann really wanted me to make chimichurri and potato salad. I wanted to grill some asparagus, because grill. And then Ann asked me to make a sorbet for dessert, and so using really the only fruit that is ripe right now, I made a strawberry-lime-chipotle sorbet as the finale to our dinner. 

When you add in making the barbeque sauce and the dry rub that I call "butt rub," that's a fair amount of cooking. So I took my usual approach of spreading it over three days so as not to overwhelm myself, but mostly so I could do the dishes in shifts and not kill myself washing half the kitchen in the hour before our guests arrived. That hour we reserve for relaxation, showers, and a pre-game glass of wine as we await our guests. 

Saturday, I made the fake hummus, a batch of Carolina "mop sauce" that would be the basis for the barbeque sauce, and a batch of dry rub. The mop sauce recipe is at the bottom of this post; you'll find the recipe is outlined here for the spice mix for the ribs that I call "butt rub." In addition, I made a super simple batch of the white bean and red pepper "hummus," the recipe for which also appears at the bottom of this post.

Vinegar and Pepper Carolina "Mop Sauce"
In my world of pork barbeque, very much influenced by East Carolina barbeque, when you put a hog on the smoker to go low and slow, you baste it (using a mop, hence the name) from time to time with a thin and tangy vinegar, salt, and hot pepper sauce. Mop sauce traditionally contains very little sugar which tends to burn with long hours in the smoker. My recipe appears at the end of this post.

First thing Sunday, I made one of the two more tedious dishes, the base for the sorbet. The tedious bit is spending 20 minutes deseeding the sorbet base, a step that is somewhat optional, but hello, I'm a chef! About the only ripe fresh fruit this time of year is strawberries. Because these strawberries were not supremely ripe and tasty, I decided to trick them up with a bit of lime and a bit of chipotle as a surprise. I put spice in a lot of my sorbets; it is both unconventional and interesting to taste a bit of a fruity sorbet only moments later for the spice to creep in on the back of the palate. My recipe is at the bottom of this post as well.

Deseeding the Strawberry Purée
While deseeding the sorbet base, I brought a pan of salted water to a boil and blanched three bunches of asparagus until just barely tender, about five minutes. I stopped the cooking in cold water and put the asparagus in the fridge to await the grill the next afternoon. When I am grilling asparagus, I almost always blanch it so that all it needs to do on the grill is get beautiful grill marks and a bit of smoke. If asparagus has any thickness at all, you risk charring the outside on the grill in an attempt to get it cooked all the way through. Precooking eliminates this risk.

Next I was on to the potato salad that Ann requested. While a potato salad still warm from the just-boiled potatoes has its appeal, I like to make potato salad the day before so it, like the sorbet base, can repose in the refrigerator and have its flavors mingle and become more pronounced. My potato salad recipe also appears at the bottom of this post.

Potato Salad with Sour Cream, Bacon, Green Onions, and Parsley
Monday I made the other really tedious dish: chimichurri. It is only tedious because when I make it for friends, I like to destem the herbs and cut them by hand. Blitzing everything in the food processor makes short work of the sauce, and I wouldn't blame you for doing it, but the texture does suffer. I have previously published my chimichurri recipe; Monday I made a double batch.

Parsley and Cilantro Flavor the Red Wine Vinegar and Olive Oil Base
Thirty Minutes Later, Destemmed Herbs Ready to Chop
Chimichurri with Hand-Chopped Herbs
Soon after tidying up from making the chimichurri, I set about the ribs, because I wanted them to sit in their coating of spices for a couple hours before starting to cook. I do not have a smoker, given that our only outdoor space is a confined courtyard where the smoke would be unwelcome. So, I opt for cooking my ribs in the oven and then finishing them on the grill outside.

My ribs were the three-pack from Costco, not gonna lie. I don't have a good pork supplier here in Oregon. After skinning them (pulling the silverskin layer off the backside using a towel for grip), I cut each of the three racks into three single-serving pieces. I do this because sparerib racks are typically longer than my half sheet trays and I do not want any drips from overhanging racks hitting the bottom of the oven. It might be sacrilegious, but not having to deep clean my oven trumps pristine racks of ribs.
 
Ribs "Marinating" in Dry Rub
When I dry-roast pork in the oven, I almost always place the pork on a bed of onion slabs. The onions add a little moisture to the pork, they keep the pork off the bottom of the pan in the same way that roasting it on a rack would do, and they are a super-tasty bonus that I planned to use later on in making my barbeque sauce.

After standing for a couple of hours to let the dry rub penetrate a bit, the ribs went into the oven. I planned a 3-step cooking process: covered to cook the ribs through, uncovered to develop the bark, and finally, mopped with sauce and re-covered in dry rub and onto the grill for a final char.

I covered the sheet trays with aluminum foil and sealed them tightly before putting them in the oven. These ribs were really thick so they ended up taking about three hours in a slow oven (275F) to get to the point where a toothpick would easily pierce them. At this point, I removed the ribs to clean sheet trays and put them back into the oven for another 45 minutes to develop a nice crust, a nice bark.

At this point, I turned off the oven and let the ribs sit until I was ready to grill them, at which point, I brushed them with sauce, re-coated them in dry rub, and put them on a hot grill for about five minutes to caramelize the sugar in the dry rub and to reheat the ribs.

Appetizer: Cannellini and Roasted Red Pepper "Hummus"
Feast is Ready!
Three Rib Accompaniments
Chimichurri (left), Dry Rub (top), Onion BBQ Sauce (right)
I'm not a big fan of barbeque sauce in that I often think that it obscures rather than complements the hard work of the pitmaster. Accordingly, I always serve a little more dry rub on the side to dust on the barbeque, if guests desire. As I mentioned earlier, Ann is a big fan of chimichurri (honestly, who is not?) and asked me to make a batch of this salsa verde to go with the ribs. And recognizing that others may indeed want barbeque sauce with their ribs, I made a complementary sauce.

This sauce I made quickly in the blender. When I uncovered the ribs, I separated the onions from the liquid in the bottom of the roasting pans. I put these meltingly tender dry rub-flavored onions, three very large ones in total, into my blender. I added three-quarters of the mop sauce (3/4 of a pint) to the blender and gave it a couple quick pulses. Then after defatting the liquid from the roasting pan, I put enough of it into the blender to yield a sauce of the consistency I wanted, the consistency that you see in the photo above. I left a decent amount of texture in the onions.

Jen, Goofing!
Somebody Must Have Told a Good Joke
Will Holding Court

Recipes


Cannellini and Roasted Red Pepper "Hummus"

Once upon a time, I threw a similar dip together using items on hand in my pantry, and the idea stuck. This is a ratio recipe: 4 parts white beans to one part roasted red peppers.

2 15.5-ounce cans of cannellini, drained
8 ounces roasted red peppers, piquillos preferably
two cloves of finely minced garlic
half a teaspoon of Kosher salt
a quarter teaspoon of smoked paprika
one tablespoon of sherry vinegar
two tablespoons of extra virgin olive oil

Put all the ingredients in a food processor and smooth it out as much, Season it and serve, or refrigerate it for some hours to improve the flavor. After it warms up a bit, taste it and re-season as necessary.

Carolina "Mop Sauce" for Barbeque

Here's my classic vinegar sauce. I roughly respect the recipe, but I always make it to taste. This makes roughly a pint, plenty of mop for several shoulders or many racks. Traditionally in eastern North Carolina, the peppers used would be crushed dried red peppers or ground cayenne and often there's a touch of ketchup for color and a bit of sweetness. I use the peppers I have on hand (there's no ketchup in my house) which tends to be Huy Fong sambal oelek (crushed red jalapeños) and Huy Fong sriracha. Also typical is brown sugar. I don't happen to use it much and when I do, I buy it in bulk and buy just what I need. But I do have Demerara in the pantry, so I use that.

one pint apple cider vinegar
4 tablespoons of Demerara sugar
2 tablespoons sriracha
2 tablespoons sambal oelek
1 tablespoon Morton's kosher salt
one teaspoon of coarsely ground black pepper

Put all the ingredients into a non-reactive sauce pan and bring them to a gentle boil to integrate the sugar and salt. Once cooled, taste for seasoning.

Strawberry-Lime-Chipotle Sorbet

This recipe will yield about a quart and a half of base, enough for 8 servings. I add all the seasonings to taste. This recipe is best when made the day before and refrigerated overnight so that the lime zest has time to do its job. Although it is not necessary to deseed the sorbet base, it's about 1000% better if you go to the effort (and it is effort) to do it.

4 dry pints of strawberries, hulled and halved
2 limes
1 cup sugar, or to taste
half teaspoon of Kosher salt, optional
1 ounce vodka, optional
two tablespoons chipotle adobo, to taste

While I have specified a cup of sugar or to taste, less sugar is not really an option. A good-textured sorbet (I'm not going into theory and Brix levels here) requires sugar even though the fruit might already taste sweet enough. That's why we balance the sugar with additional acid in the form of citrus (or at times a vinegar such as balsamic).

Also, I use salt to help balance the sweet. You'll never know that the salt is there but what you will notice if you taste a base with and without salt, the salted one will likely taste better. Most good pastry chefs will sneak some salt into their recipes for this reason.

Finally, I add a half a shot of unflavored vodka to the base because that tiny amount of alcohol will help break up the large ice crystals in the sorbet and yield a smoother product. By all means, if you cannot have alcohol, omit it.

Before getting started, zest and juice one of the limes. Reserve the other lime for later.

Place the strawberries, sugar, salt, vodka, lime zest, lime juice, and one tablespoon of chipotle adobo in the blender and blend until smooth. Next, push the base through a fine chinois or strainer to remove the seeds. I use a standard 2-ounce ladle to push the base through my chinois. This, unfortunately, is going to take some time and elbow grease.

Zest the other lime directly into the base and taste it. I decided that I needed the juice of half the reserved lime to balance the sweetness and that I wanted another tablespoon of adobo to bring slightly more heat. Refrigerate the base to macerate, preferably overnight. The lime flavoring from the zest will become much more pronounced after sitting overnight.

Taste and adjust seasoning just before putting the base into the freezer. I deemed that this batch of base needed nothing else, but that it not always the case.

Potato Salad with Sour Cream and Bacon

This potato salad is simple and can be served warm or cold or at room temperature. I like to make potato salad the day before I serve it so that it can repose in the refrigerator and have its flavors mingle and become more pronounced. This recipe starts with a ten-pound sack of potatoes and makes a really big bowl of potato salad, because, who doesn't like to eat too much potato salad? I used parsley and green onions in this batch, but you can use the herbs that suit you. How bad would tarragon and chervil be in this? Not at all bad; it would be wonderful.

10 pounds of small potatoes cut into bite-sized pieces
1 pound of bacon cut into lardons and cooked, grease drained
1 pint of sour cream (or more)
1 bunch of Italian parsley, minced
1 bunch of green onions, sliced (or chives, minced)
salt to taste

Place the potatoes in a large pan, add a tablespoon of salt, and cover with water. Cook, about 20 minutes, until the potatoes are just done. Drain the potatoes and while still warm, transfer to a large bowl. Add the the cooked bacon, sour cream, parsley, and onions or chives. Mix well and season to taste with salt.

You can serve this salad warm and it is wonderful. Or place it in the refrigerator overnight to let the flavors of the herbs and bacon bloom. If you refrigerate it, let it warm a bit and then taste for seasoning. Also, you may want to add more sour cream to make it creamier, though I never do because I am lactose-intolerant.

Saturday, April 6, 2024

Easter 2023

Ever since Ann's father passed away in 2016, we really haven't celebrated Easter all that much. With no family to cook for, it has seemed kind of pointless. This year, Rob and Dyce invited us over for Easter ham dinner which was much appreciated. It is very hard to find anyone who is willing to cook for me. People are intimidated by feeding a chef, but paradoxically, as a bunch we are just pretty happy to have anyone cook anything for us at any time.

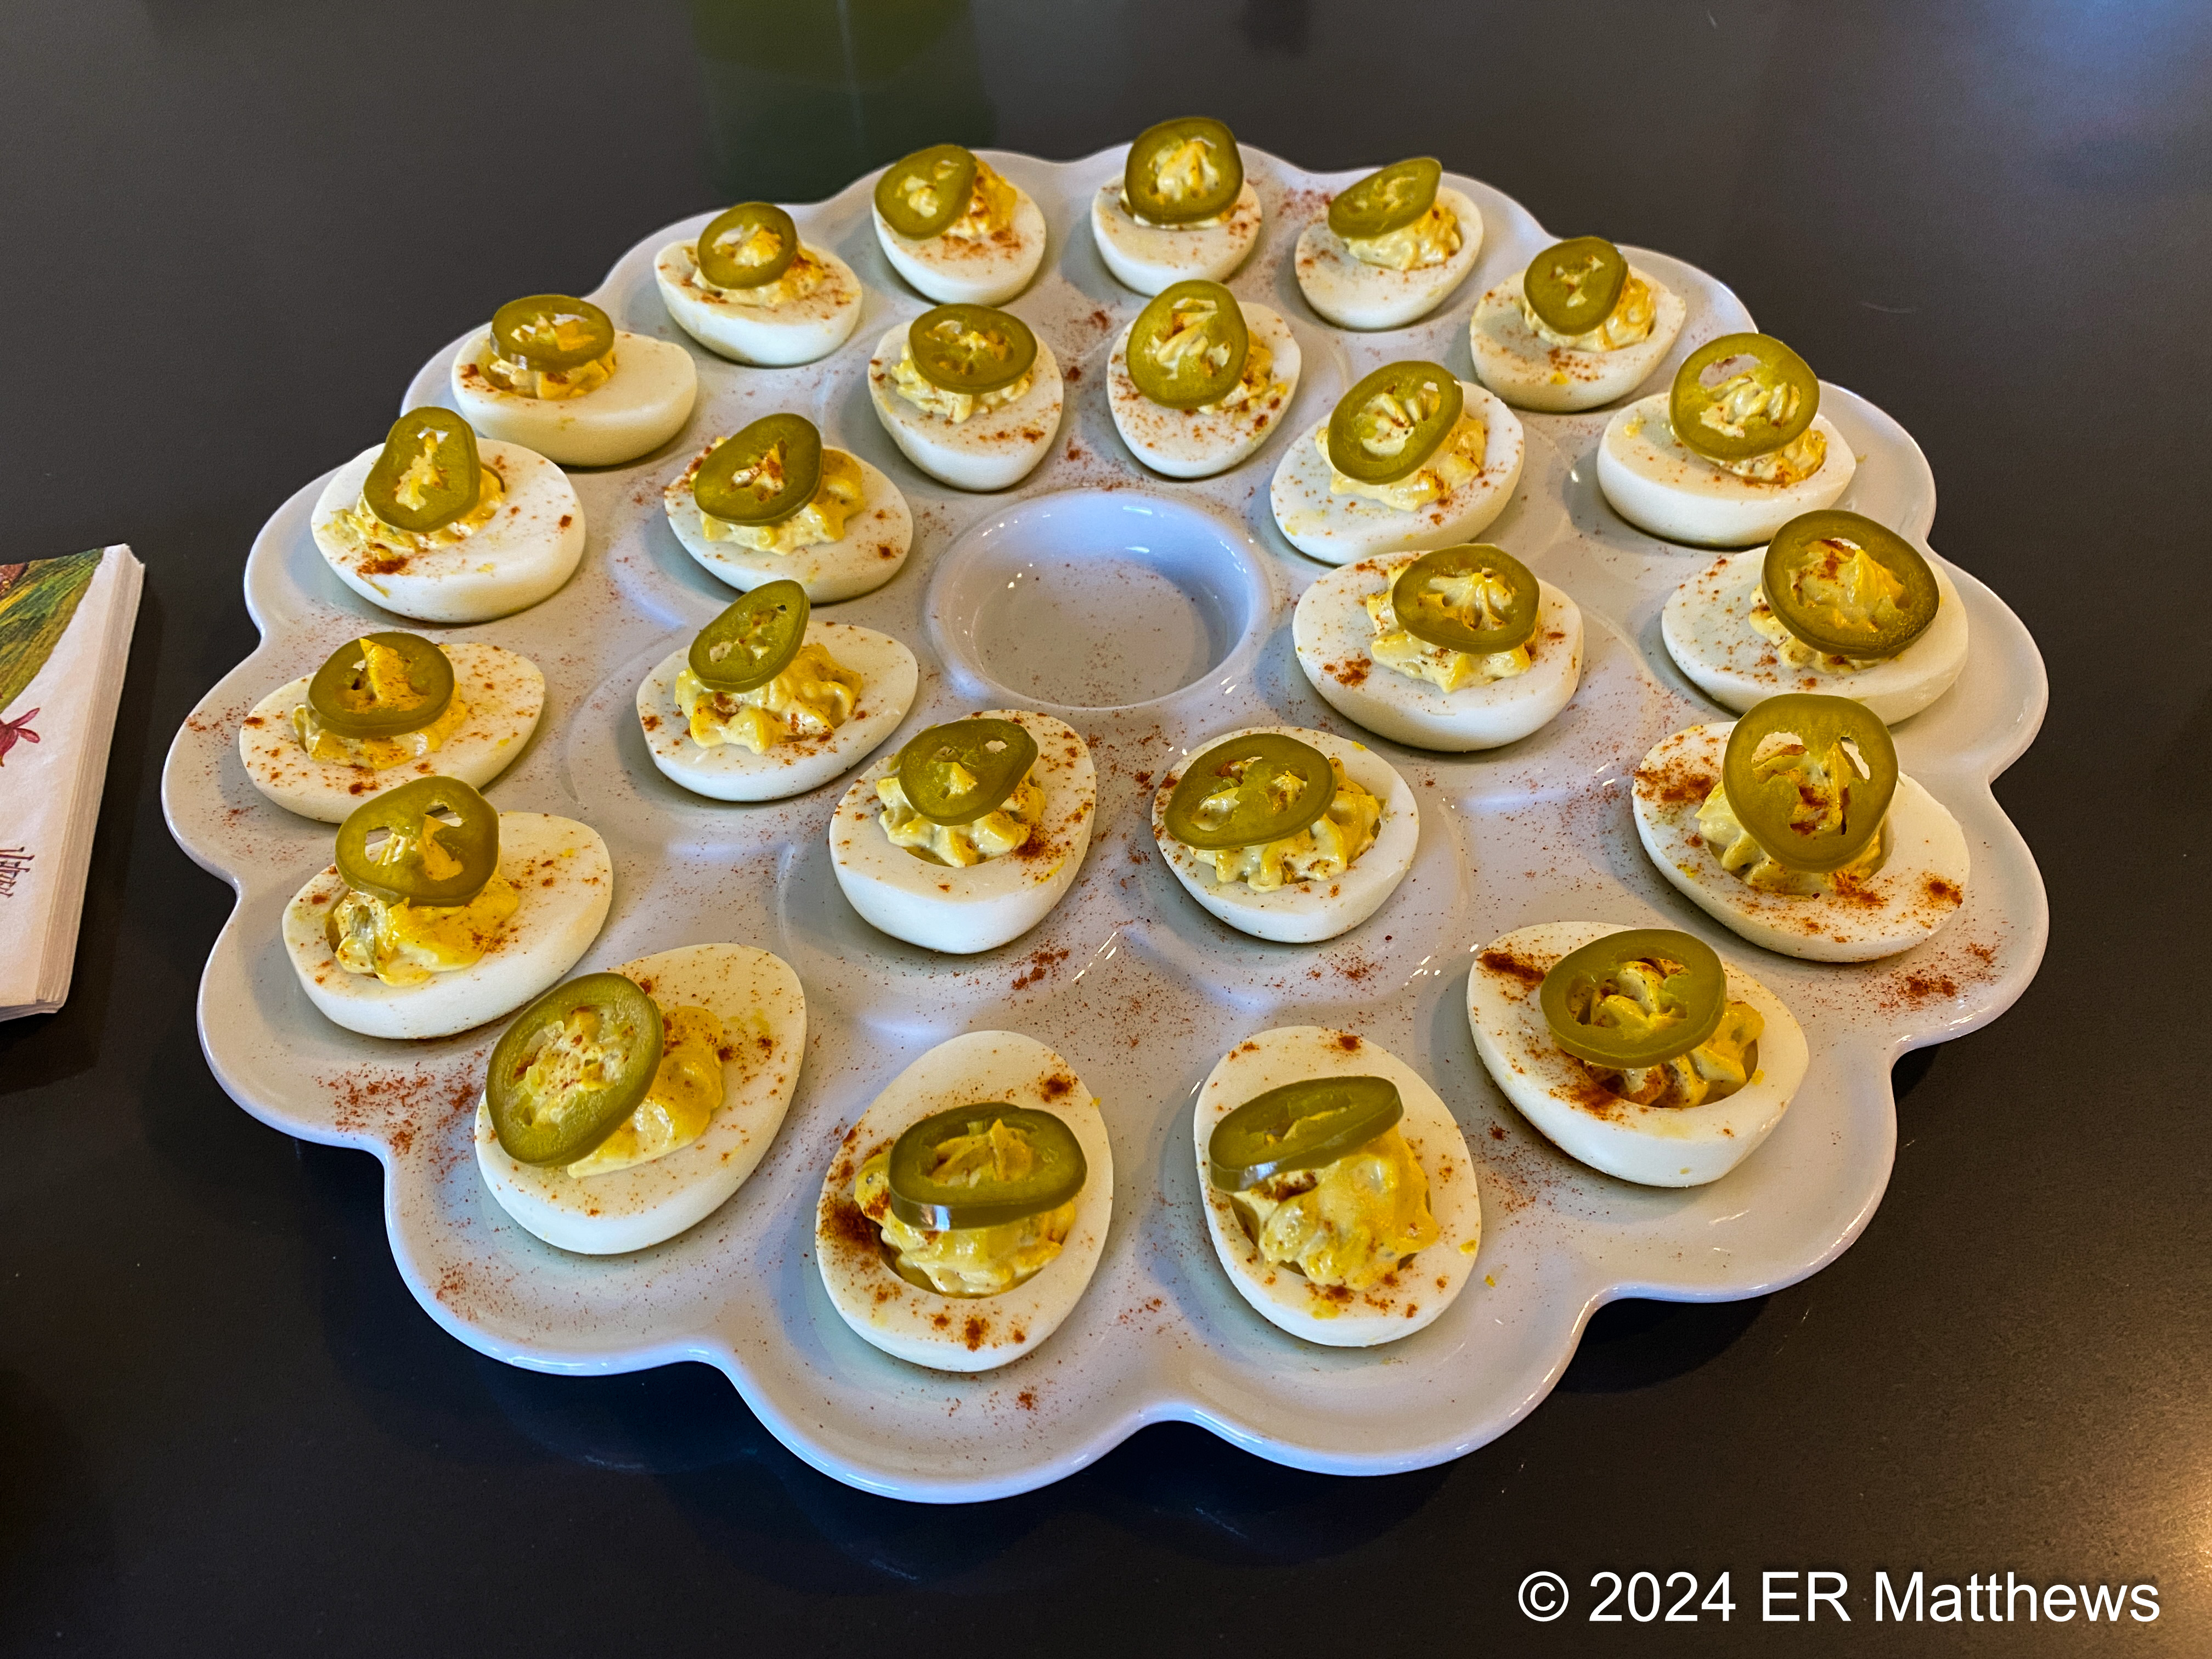
Easter Sunday late afternoon we drove across the river to Rob and Dyce's house on a beautifully sunny day. We were greeted with delicious cocktails whose name I can no longer remember, if ever I knew. As I recall, they consisted of St. Germain, lime, mint, and sparkling wine. They were refreshingly delicious and worked well with Dyce's deviled eggs made with pickled jalapeños.

Deviled Eggs with Jalapeño
Going over to their house is always a treat for us in that we are guaranteed to get our dog fix in visiting with Lola and Reilly. We really miss our dogs and these two help with that. Lola's a crazy bundle of non-stop energy, while the smaller Reilly is much more sedate, but rules the roost.

Busted!
Reilly is Never Far From Rob

Rob smoked a Kurobuta (Berkshire) ham from Snake River Farms, a regional (next door in Idaho) purveyor of fine beef and pork. You'll see a lot of their products in high-end restaurants in this area.

Rob's Ham Fresh from the Smoker
Dyce made a salad to accompany the ham that was equally tasty and unusual. Don't quote me on this as I was too busy eating to dissect it, but I believe the salad was primarily shaved raw brussels sprouts, roasted artichoke hearts, cannellini, Italian parsley, and grated cheese (pecorino or Parmigiano) in a shallot vinaigrette.

Dyce's Salad of Brussels Sprouts, Cannellini, and Artichoke Hearts
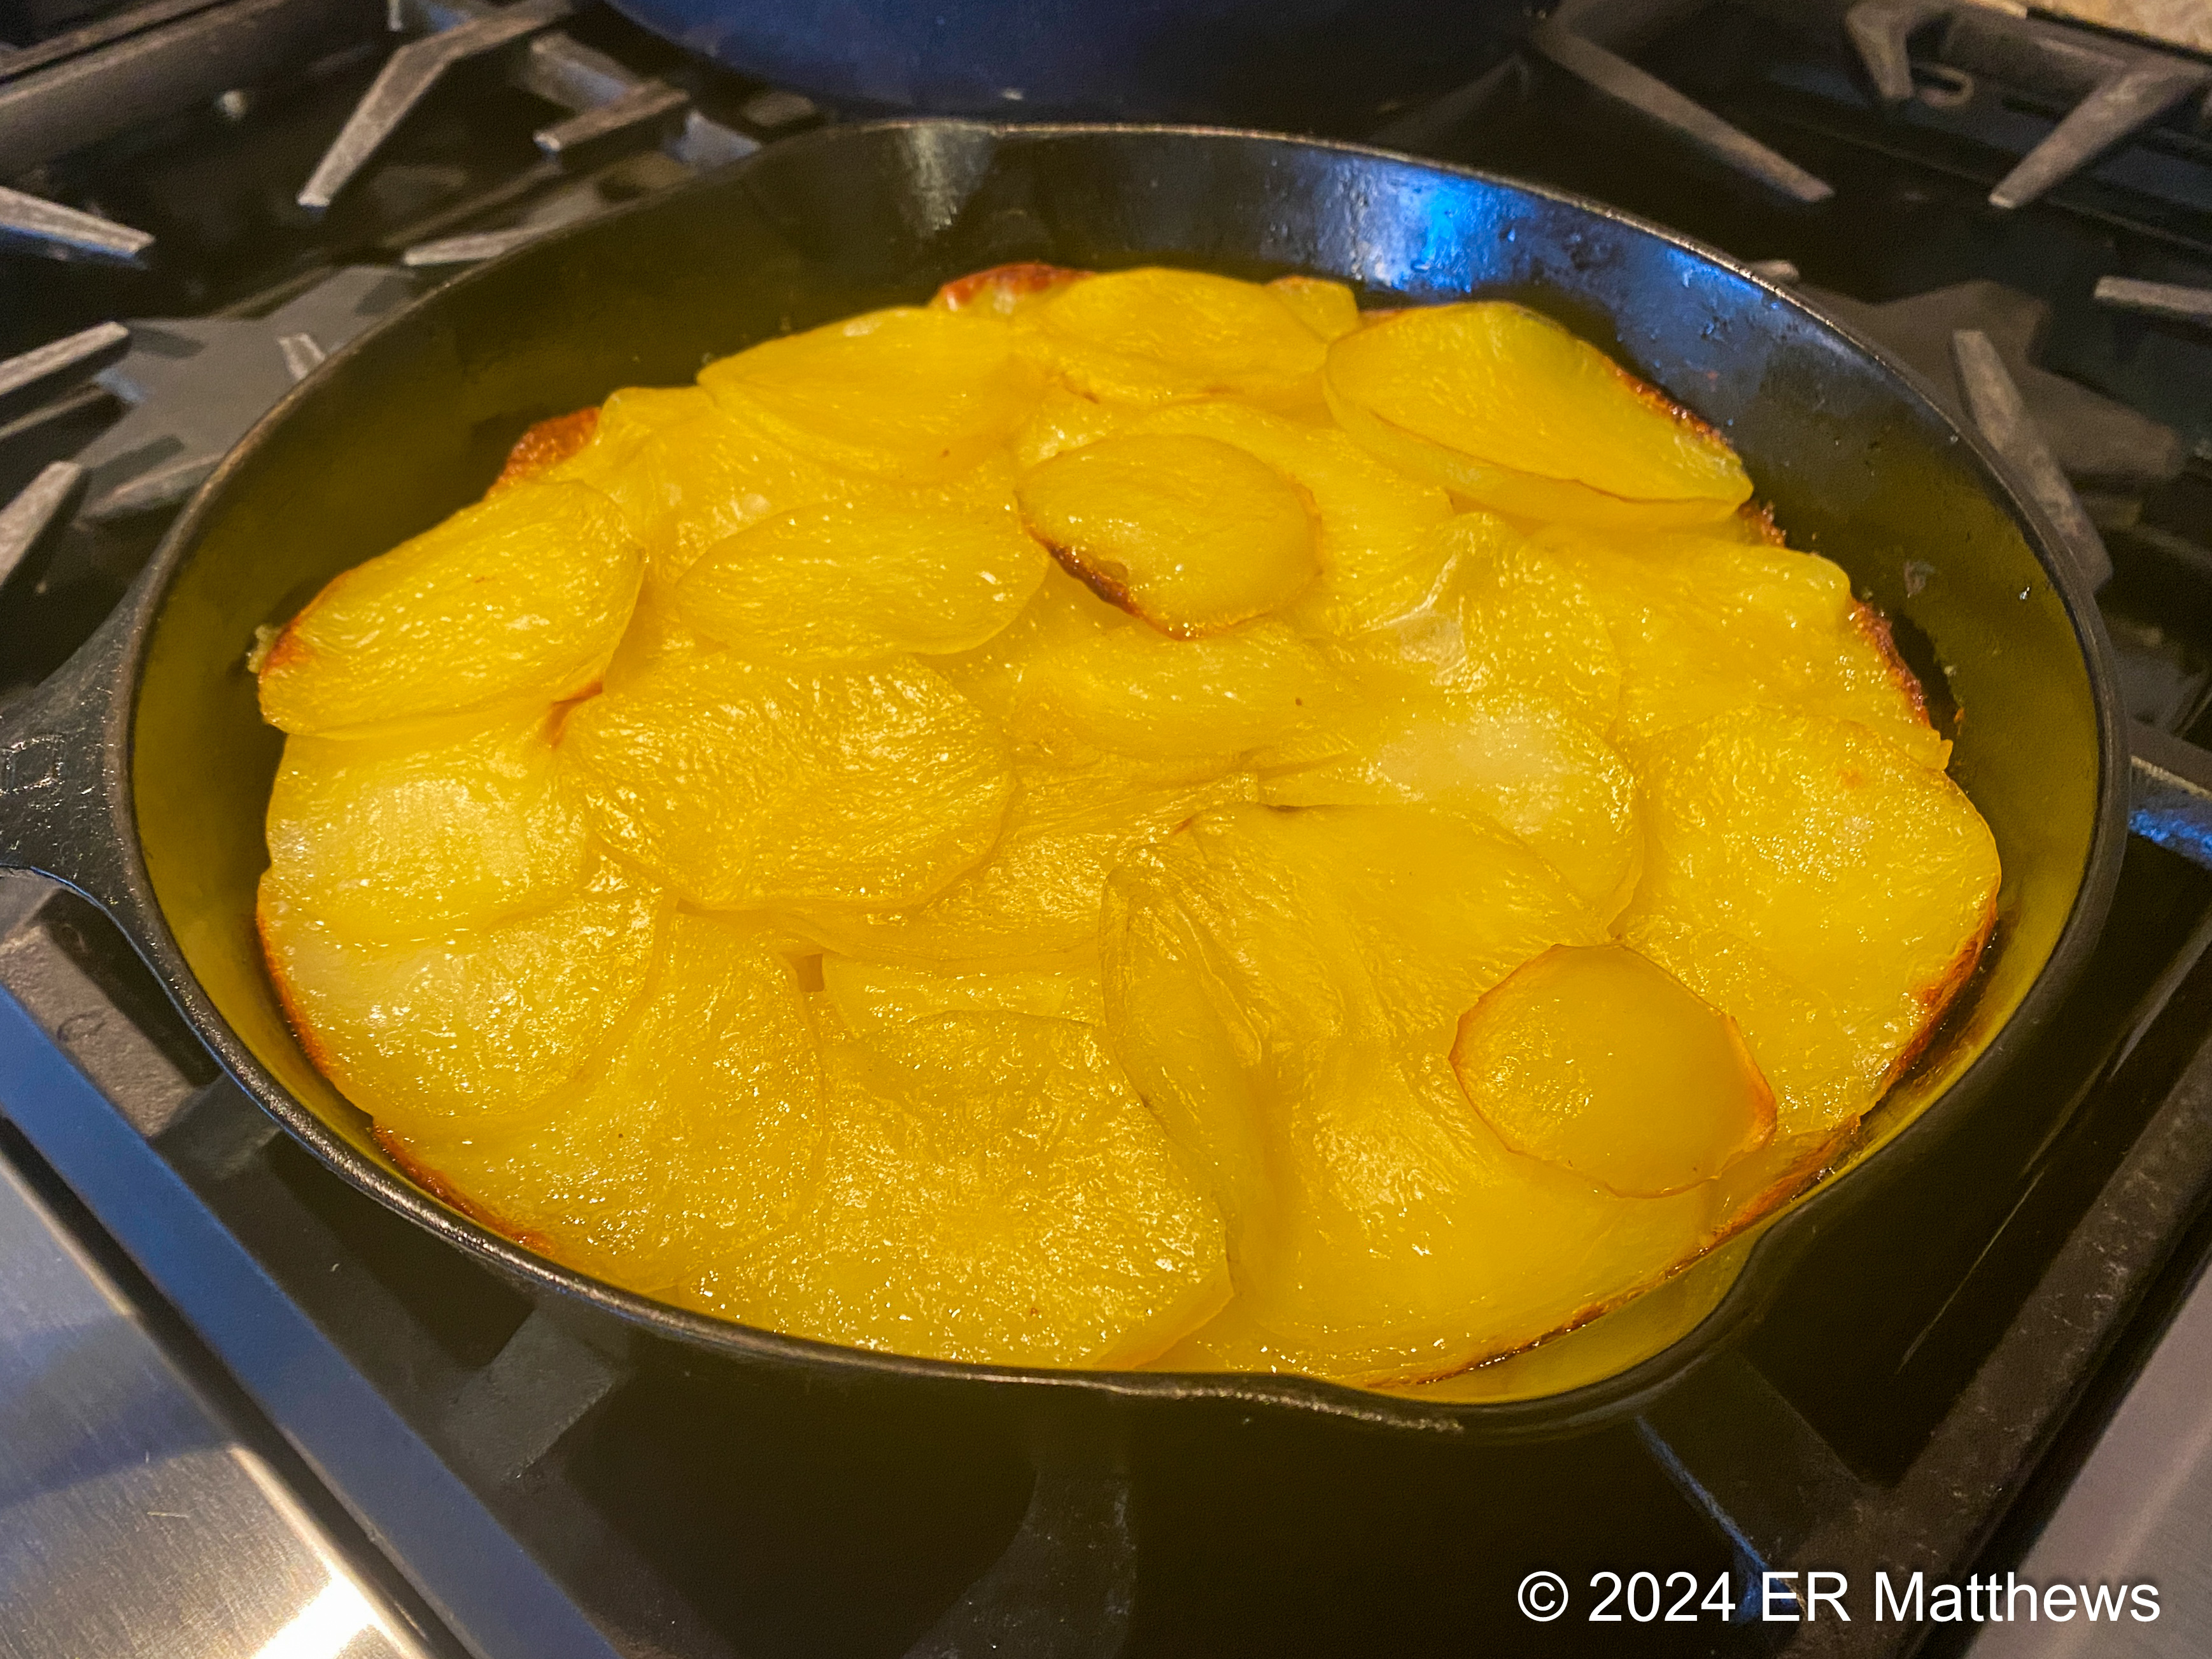
Rob had asked me some weeks ago to make pommes Anna to accompany the ham. When he asked, neither he nor I knew that the vast majority of times that I have made pommes Anna at home, it has been for an Easter celebration. I determined this by looking at all the pommes Anna posts I have made over the years. Some coincidence!

I tried something new for this pommes Anna that I cannot recommend. Because we were having the potato dish at Rob and Dyce's house, I wanted to do the majority of cooking at our house and then finish it at theirs so that it would be hot for dinner. Pommes Anna cooks in two steps: first, covered to essentially steam the potatoes done and then uncovered, to dry them out a bit and finish the dish.

I decided to do the covered cooking at home and transport the potatoes to their house still covered and finish the uncovered cooking part in their oven. While in theory this was a good idea, in reality, during transport, the potatoes glued themselves to the bottom of my cast iron pan and would not release. I put the finished cake back together as well as I could, but it was a disappointing outcome. Now I know.

Pommes Anna with Yellow Potatoes

With the ham and potatoes, Rob opened a stunning dry Riesling from the Nahe, the 2020 Schäfer-Fröhlich Bockenauer Felseneck Riesling Grosses Gewächs. This was a first-class wine and a natural pairing with ham. Ham is a tricky dish to pair with wine because it is often very salty, smoky, or sweet, or really any combination of those three.

While Riesling is a great choice, we don't have any in the cooler from last summer, so what to bring? My pairing rule of thumb has always been, when in doubt: Pinot Noir. Because of the inherent sweetness of ham, I prefer a younger wine that still has a lot of its fruit, so I opted to bring a 2021 Patty Green Pinot Noir Estate Old Vine Ribbon Ridge, which is one of the best of the splendid 2021 Willamette Valley wines that we have tasted.


And finally, a few more photos.


As always, Ann and I so enjoyed our time with Dyce, Rob, and the girls. If we do it again, I won't be splitting the cooking of the pommes Anna between houses!

Tuesday, December 12, 2023

Good Times: A Mutt of an Italian Meal

Ann and I, like most Americans, love Italian food, especially peasant food, cucina povere, for its simple and honest flavors. Unlike most Americans, however, we would almost never go out to eat at an Italian restaurant. Why pay for food that is so easy to make better at home? Although I don't think we necessarily set out to have an Italian-themed dinner, it turned out so and the saga follows.

What's Better Than Chianti Classico?
A Jeroboam of Chianti Classico Riserva!
Ann's a full-blooded Italian, no matter how you slice it. She's adopted. Her birth parents are both napoletani and her adoptive parents are calabrese and barese (pugliese) respectively. So she's spicy and opinionated southern Italian through and through. You would think that the menus that she comes up with would be southern-inflected, but really, she has no problem mixing and matching from the various corners of Italy, something that would be frowned upon in the old country. I don't know that she set out to have an Italian dinner, but that's where we ended up after she asked me to make braciole.

Such is our menu planning that Ann asks "Will you make this?" and I do. Sometimes I throw in an idea or two or a refinement here and there, but mostly because I can and will cook anything, more often than not, I leave the broad strokes of the menu to Ann. If it pleases her to have a dish, I am pleased to make it for her. I think I may have suggested gnocchi alla romana as a sop for the braciole braising sauce, but I no longer remember. It was a tag-team effort in both menu composition and cooking.

The menu in this cold, pre-Christmas season for our quasi-holiday dinner before our friends all get wrapped up in their own holiday travels and plans is pretty much all down to Ann. We split the cooking. For our antipasto, I whipped up a batch of bagna càuda from Piemonte via Provence in France. For dinner, Ann made a primo of baked polenta, also from the north in Lombardia and neighbors, while I made a secondo of braciole, a dish from Calabria and Sicilia (where the little meat bundles are called involtini). And for the dolce course, Ann made a ricotta cheesecake, cosmopolitan to Italy with Greek origins. So, quite naturally, the wine we selected was from Tuscany, just to further mix up the regions!

Hence the title of this post: a mutt of an Italian meal. And I mean this is the best of ways. Although there can be some pejorative meaning to the word mutt, as dog lovers, Ann and I know that the non-purebred dogs, the rescue mutts from the shelters, are often the best dogs combining the best traits of many breeds. And by extension, we hope our menu combines the best of the many regions of Italy.

Ann decided for this dinner that we should be a bit more formal than most of our meals that are consumed around the island in the kitchen, so she set a beautiful, simple, and tasteful table in the dining room. 

As guests Rob and Dyce and Michelle and Andreas were arriving, I was reheating the pot of bagna càuda on a low flame so that it would be good and hot for our appetizer course. If you speak any Romance language at all, you will recognize the term bagna càuda in the piemontese dialect means "hot bath." And indeed, bagna càuda is a hot bath into which to dip bread and/or crudités, typically bitter vegetables such as chicories (endives) and cardoons. For our little soirée, I used what I had in the refrigerator: sweet peppers, carrots, celery, and cucumbers.

Unappetizing Looking Bagna Càuda
Now on to what bagna càuda is for those of you who have not experienced this culinary delight that looks much like oily mud, nearly off-putting in appearance by all accounts. It is a mix of three ingredients: anchovies, garlic, and olive oil. The amalgam of these three ingredients is way more than the sum of the three individual ingredients, but you have to allow yourself to try it without prejudice. Only then can you decide if it is for you.

If you think a salty, funky, umami-laden oily mix of anchovies and garlic is a culinary delight, you are welcome at our table. Otherwise, maybe take a hard pass on dinner at our house where we make food for people who like to eat anything and everything.

My canonical recipe (actually, it is a ratio, not a recipe) for bagna càuda is one head of garlic to 3 tins of anchovies (90-100 grams) to one-half cup (100-125ml) of extra virgin olive oil. Step one is to soften the garlic so that you can make a paste of it. I like to do so by poaching it in milk and after the milk is drained away, I mash the garlic with a wooden spoon. Then I add the anchovies and heat them a bit over low flame to get them falling apart, then add the oil. If you like (as I like), rather than stirring and stirring, use an immersion blender to smooth out the sauce. Serve warm to hot.

Poaching Garlic in Milk
Mashed Garlic Awaiting Anchovies
While we were in the kitchen dipping our veggies in bagna càuda and washing it down with the double magnum of Chianti, the braciole and the polenta were both in the oven finishing up. At some point in the evening, I pulled them both out of the oven and we grabbed our glasses of wine and headed to the dining room to grab our plates to fill them with dinner.

Pork Braciole in Marinara, Baked Polenta
Pork Braciole in Marinara
Baked Polenta
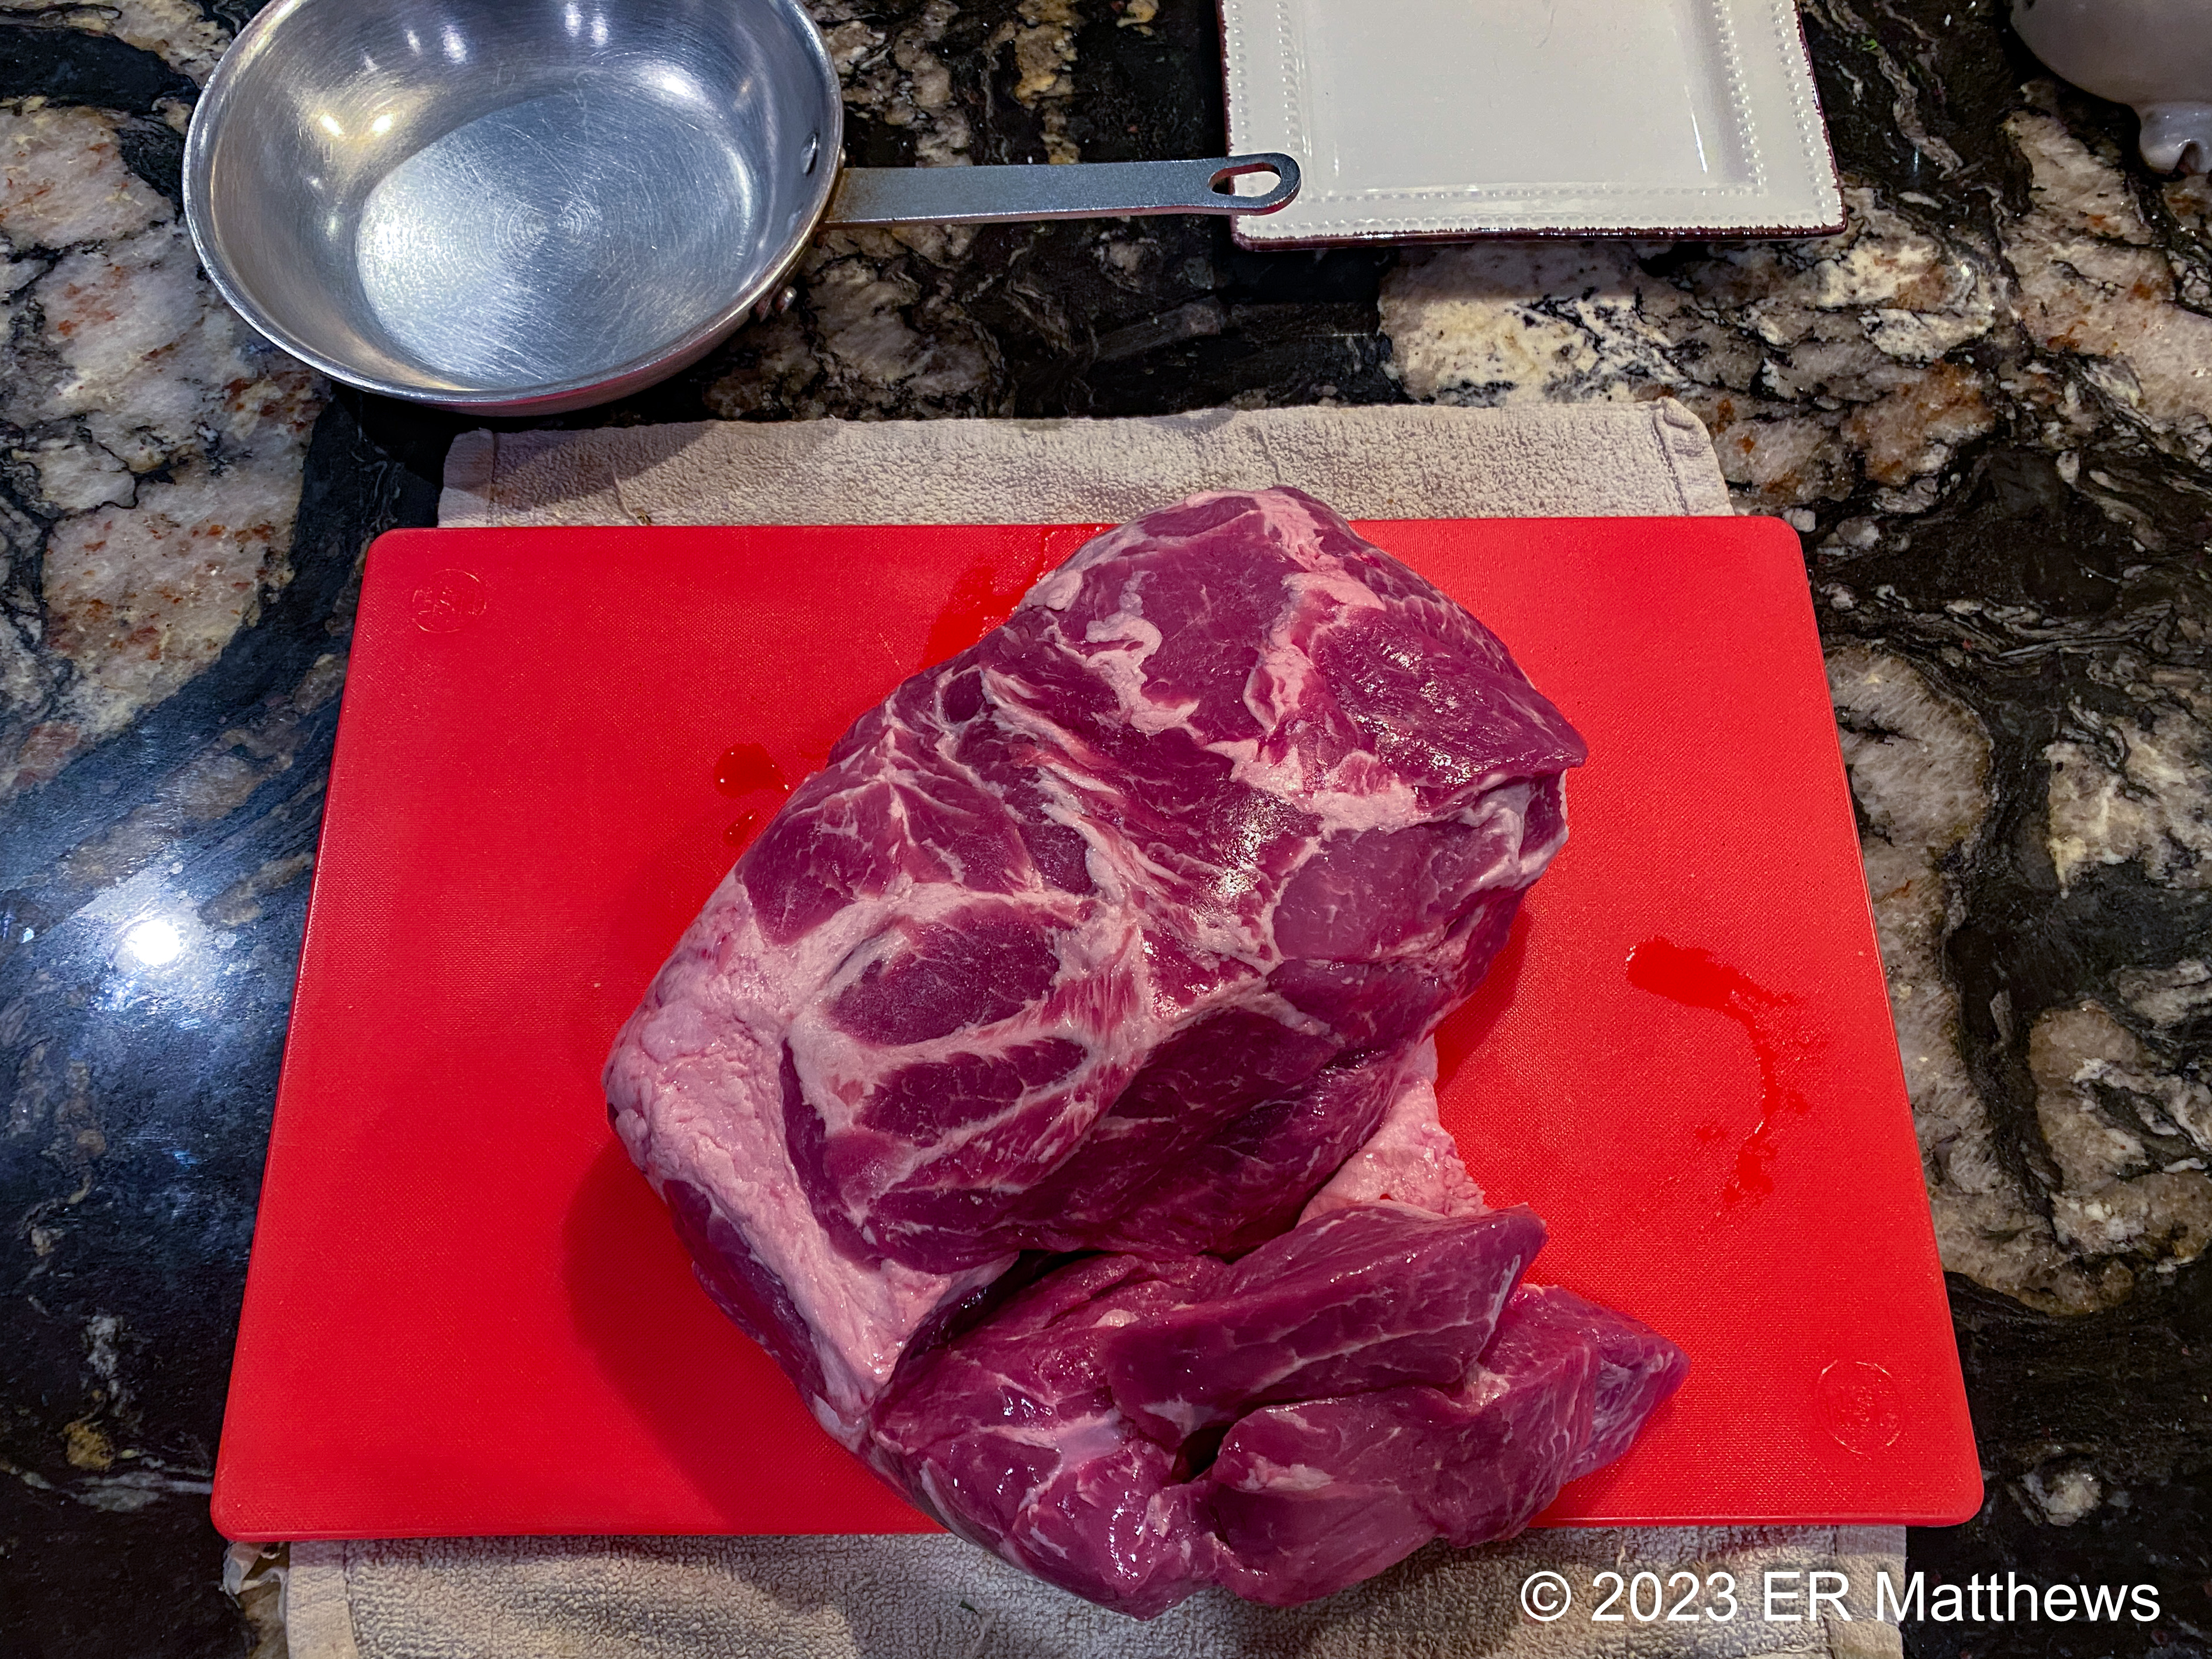
Making braciole is relatively simple, but it does take some effort and patience. While it is more traditionally made from beef, such as flank cut thin, I prefer to make it out of pork shoulder which I find more flavorful and more tender. Although you can buy in some meat markets thin slices for braciole, I prefer to buy a roast and cut and pound my own. Below, you see a deboned pork shoulder on my cutting board along with my industry-standard meat pounder, a small frying pan.

I've been in a bunch of restaurant kitchens, and by and large, every cook I've ever seen pounding out meat used the bottom of a frying pan to do so. Slice your roast into quarter-inch steaks and then flatten them to an eighth of an inch. To pound the meat, place a slice on the cutting board and cover it with a piece of film wrap, then use the flat of the frying pan to gently persuade the meat to flatten out. It doesn't generally take a lot of force.

Pork Shoulder with Ersatz Meat Pounder
Pounded Pieces of Pork Shoulder, Trim Cut for Carnitas or Ragù
Braciole are quite often stuffed with a bread crumb mixture. For this dinner, we needed to keep the filling gluten-free, so Ann and I kicked about ideas, landing ultimately on white beans which Ann asked if I would flavor with guanciale, cured hog jowl. To start the filling, I smoothed out 3/4 of the beans to a purée in the robot coupe while rendering a really fine dice of guanciale on the stove. After removing the almost browned guanciale from the pan, I cooked a really finely diced onion in the guanciale fat. To the cannellini purée, I added the browned guanciale bits, the onions and their oil, a bunch of pesto, and the remaining quarter of whole beans, for texture. Naturally, I salted to taste.

Rendering Fine Dice of Guanciale
Braciola Stuffing: Cannellini Purée, Whole Cannellini, Pesto, Guanciale,
Onions Cooked in Guanciale Fat
You roll braciole exactly as you would a burrito or an egg roll. Place a small amount of filling toward the top center of the meat and fold the top down and over the filling. Fold the sides in to the center to encase the filling, then roll from the top down to close the packet. Secure with one or more toothpicks. I prefer the longer wooden drink garnish picks; the extra length means that I only need one to secure the packet. Sometimes this takes two toothpicks.

Once the packets are assembled, brown them in a pan on all sides and remove to a braising dish. Meanwhile, make a marinara. My braising pan typically takes a half gallon of sauce to cover the meat that I am braising. Marinara is trivial to make (and we used to make it on the fly at the restaurant whenever a parent would request pasta marinara for a child). For a rough half gallon, put two 28-ounce cans of tomatoes in your blender along with four large cloves worth of minced garlic, a pinch of salt, a tablespoon of dried basil, and a pinch of pepperoncini (crushed red pepper flakes). Blitz it and voilà!

Starting to Brown Braciole
Browned Braciole Ready to be Covered in Marinara
After covering the browned braciole in marinara, cover the brasier (I use aluminum foil, unnecessary if you are using a dish with a cover) and place it on a sheet tray; braciole love to bubble over and create a mess on the bottom of the oven. Braise in a moderate oven for 2 to 3 hours. You'll know they're done when they are fork tender.

To accompany the braciole, I wanted a starch to act as a sop for all the leftover marinara. In Italy, the sauce would often be ladled over pasta as a first course with the meat served afterwards. Ann and I, we wanted something more elegant for our dinner and I proposed gnocchi alla romana, made by cooking semolina, letting it set up on a sheet tray, cutting out rounds, and baking those rounds nicely arranged in a gratin with a sprinkle of cheese until prettily browned.

How silly of me to propose that, given that we needed to keep the dinner gluten-free and semolina is ground wheat. How fortunate though that Ann mistakenly grabbed the container of polenta (which is ground corn) from the pantry instead of the container of semolina! Not trusting the polenta cooked in milk and augmented with egg yolks and butter to fully set up enough to be cut into rounds, Ann put it directly into a baking dish and we baked the whole thing under a thin crust of pecorino romano.

Stirring Polenta
Polenta Ready for Cheese and the Oven
Ann's final contribution to our dinner was a ricotta cheesecake, made without a crust to keep it gluten-free. You can make cheesecake with almost any soft unripened small curd cheese: cream cheese, farmer cheese à la the German quarkkuchen, or ricotta in the Italian style.

Cheesecake is one of the simplest desserts to make and I have made untold hundreds during my career. Here are some tips born of experience.

The basic formula is to figure out how much cheese your springform pan requires and work from there. Naturally, at the restaurant, we were making several cakes at a time; fortunately, the basic ratio scales quite well. At home, our 10" x 2.5" springform mold holds four pounds of cheese without breaking a sweat which works out quite well for ricotta which comes in convenient 2 pound containers. The ratio continues with 2 eggs per pound plus an additional egg for every two pounds, thus 10 eggs for this batch. So, 7-8 eggs for a three-pound brick of cream cheese, if you are going that route.

For each two pounds of cheese, three-quarters of a cup of sugar seems to be about right, though I always add less to start and add flavorings to taste. The amount of sugar can vary based on how sour the cheese is (cream cheese tends to be much more tart than ricotta) as well as the flavorings you are adding. If your flavorings are sweet, you might need less sugar; bitter, such as espresso, you might need more sugar. For additional flavorings, Ann added a good slug of Mexican vanilla and the zest of three lemons.

As an aside, you may not want any sugar at all if you are making a savory cheesecake. We used to make blue cheese cheesecakes with walnut crusts that we would bake in shallow tart pans to pair with certain sweet wines. These cakes required no to minimal sugar. I can remember making black olive and rosemary tarts to accompany wild boar. Your imagination is really the limit with cheesecakes.

Although I always baked my cheesecakes in a slow oven in a water bath (covering the bottom of the pan with aluminum foil to avoid water infiltration), you can certainly bake them in a slow oven without a water bath, which is what Ann did in this case. In any case, 325-350F is about right, though we never had a thermometer on our ovens at the restaurant. You will almost certainly have to tent the top of the cakes with aluminum foil to keep them from burning, simply because the top is going to brown long before the center is set. So, cook your cheesecake uncovered until it is as brown as you would like, then tent it for the duration with aluminum foil.

How long a cheesecake requires in the oven depends on way too many factors to give a hard and fast rule, so do as we did in the restaurant and as Ann did with this one: cook it until it is done. At first, the center of the cake, when you shake it gently, will be liquid and will slosh back and forth. As the cake cooks, it will set from the outer edge and move towards the center. As the cake cooks, the batter will puff up. When it is evenly puffed all the way to the center, you can be pretty certain that it is done. Do not be surprised when the cake settles as it cools.

When cheesecakes come out of the oven, I like to let them cool a few minutes, then run a spatula between the cake and the side walls of the mold. Then I'll crack the mold open, but leave it in place on the cake and let it finish cooling. Separating the mold from the cake in the early cooling stages will help avoid cracks in the cake as it cools. Cheesecakes shrink slightly as they cool and if the edges of the cake adhere to the sides of the pan, the center may shrink away from the edges and tear cracks in your beautiful cake.

Mad Scientist Flavoring the Batter
Done to Perfection
Dusted with Espresso Sugar
Freaking Delicious Ricotta Cheesecake with Hints of Lemon and Espresso
We, the six of us, all had a wonderful time and enjoyed our meal thoroughly. After dinner, Andreas, Rob, and I held forth at the dinner table while the other three, the youngsters of the group, disappeared to the family room. Next thing I knew, the family room erupted in 80's and 90's pop and hip-hop and there was a full-fledged dance party going on! Some parting shots below.

'Tis the Season!
Shout Out to the Chianti Classico Consortium

Ode to the Tortilla

I love tortillas. It wasn't always that way. I am a child of the early 1960s. Then, on the East Coast, our food was influenced by two th...