 |
| Everything Bagel, Chive Cream Cheese, Gravlax, Shallots, and Capers |
I can't really think of a time at the restaurant when we wouldn't have at least a couple sides of salmon curing and a couple more in service. I even came up with my own spin on it, calling it prosciutto of salmon, salmon that had cured more than is typical for gravlax and then hung to dry and age for a couple of weeks, just like a ham. Sliced ultrathin, it had a lot of the same great umami qualities as a good ham. Think katsuobushi or bottarga meets prosciutto.
Many recipes make gravlax seem more complicated to prepare than it truly is. Weights, slotted pans for draining, cheesecloth, precise amounts of salt, etc. Baloney! You'll see none of that as you follow along below. Making gravlax is truly simple.
 |
| Deboned Salmon Tail Section, Skin On |
If I'm not using whole sides to make gravlax (who needs a whole side at home?), I like to use the tail portion. Why, when many recipes suggest that center cut is the best? Because at home I want to serve the center cut portions for dinner and use the less desirable tail portions for gravlax. It's going to be sliced paper thin anyway, so why use the best parts? Pull all the pin bones with a pair of needlenose pliers and leave the skin on.
 |
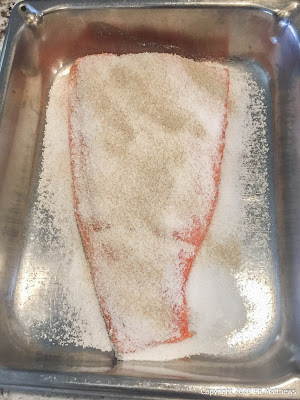
| Cover the Salmon with Sugar, Salt, and White Pepper |
Place the salmon skin side down in a glass or stainless steel pan. The salt will eat up an aluminum container, so use something non-reactive. The ratio of sugar to salt is a personal preference. I believe that most people, like me, like a lot less sugar than salt. First, I sprinkle the salmon with a small amount of sugar, just a good sprinkling. Then I cover the salmon in a good layer of salt as you can see above. I sprinkle the whole with a bit of ground white pepper.
If I were going to add an herb for flavoring, I would put it on next. Dill is the classic herb. I omitted it because I didn't have any. I also love to use Thai basil or anise hyssop to flavor the salmon.
 |
| Gravlax After 48 Hours |
The fish then goes into the refrigerator. You can cover it or not. After 48 hours, I pull it out and check on it. Here is where experience comes into play. The fish is edible at any point. You have to decide what texture you want. I like mine firm to the touch throughout the whole filet. The thinner points are going to firm first. In the photo above, the lower three quarters of the fish are cured to my liking.
At this point, I rinse the fish, pat it dry, and rinse out the curing pan. Then I put the fish back in the pan and re-cover only the parts that I want to cure further with more salt. I check the fish every day from this point to see how it is progressing. I was satisfied with this piece after 4 days, 96 hours total in the cure.
After rinsing the fish and patting it dry, you can serve it right away. But I like to put the fish back in the refrigerator, uncovered, and let it dry a bit for 24-48 hours. This does two things. It fully firms up the flesh and it lets the salt equalize throughout the filet so that there are no super salty spots.
It's important to note that there is no right or wrong time to take your salmon out of the cure. It is a matter of personal preference. Although my preference is for a longer cure and a firmer texture more akin to a ham, I also love a brief 10-minute cure for meltingly soft salmon sashimi. There's a spectrum and you have to find your spot on the spectrum through experimentation. Do understand that the longer the cure, the saltier the result.
There are various ways to slice gravlax. For soft textured (24- to 48-hour) gravlax, it's often best to slice the fish vertically down to but not through the skin. Then you can slide your knife along the skin to remove all the slices at once. With firmer and saltier gravlax such as I make, it's probably best to take very thin slices towards the tail. I start about three inches back from the tail and make a very thin slice to the tail. Then I maintain this angle for the entire fish, yielding slices that you can see through as in the very top photo in this post. You can see the chives in the cream cheese through the salmon.
Making gravlax is very simple, a lot simpler than a lot of recipes make it seem. It's also ultra-rewarding to cure something so delicious yourself. And yes, those bagels were fabulous!


No comments:
Post a Comment