Thursday, October 8, 2020

Halibut Cheeks Ed's Style

"Oh my god, this is the best fish I ever put in my mouth!"

"Do people know about halibut cheeks?!?!"

"I'm glad we're eating this at home. I'd get kicked out of a restaurant for making obscene noises!"

                        —Ann Chiappetta

I didn't realize when I bought a pound of halibut cheeks at the fish market that Ann had never had them before. It is so hard to remember what we've eaten together versus what I cooked for guests at the restaurant. Still, I am surprised that she was never at the restaurant on a night when I had halibut cheeks on a tasting menu. I would surely have sent one to her table.

To answer her question: yes, seafood connoisseurs know about halibut cheeks, while thankfully, much of the dining public thinks that they are gross, because of the name cheeks. Just as veal cheeks are the best morsel on the young steer, halibut cheeks are the best morsel on the fish that is among the best of all fish. I say thankfully, because they are a rare item and the fewer people that will eat them, the more there are for the rest of us.

Because of the negative reaction to the name cheeks and to forestall objections to them and other delicacies such as sweetbreads or headcheese, I never published menus in advance for the tasting menus and the servers always told diners what the course was, after they finished it. Sad, but true.

Halibut Cheeks Ed's Style
Halibut cheeks are so divinely good, sweet, and tender that they do not need elaborate dishes built around them. Simplicity is best when it comes to them, and a lot of other food items as well. This week, I served the cheeks in a style that came to be known over the years as Ed's Style. Not only is it a signature of my cooking, but the moniker gives people an easy handle by which to order a dish.

Imagine the difficulty a diner might have with the following mouthful, "I'll have the halibut with tomatoes, artichokes, basil, caramelized garlic, and white wine." So much easier to say "Halibut Ed's Style." Of course, the diner could always save everyone time and order the "halibut." The ticket, when it hits the kitchen, is going to say just that: halibut. But, I digress.

Basil, Essential to Ed's Style
When I brought the cheeks home, I had no idea how I was going to prepare them. No idea, that is, until I saw this big bunch of basil in a vase on the counter. Immediately my mind leapt to Ed's Style, so critical to and entwined with this dish is fresh basil.

Halibut Cheeks, Roughly Two Ounces Each
When halibut cheeks came in to the restaurant from our supplier in Seward on the Kenai Peninsula in Alaska, they would be of all different sizes from an ounce and a half to eight ounces, depending on the size of fish from which they came. When cooking an order of cheeks, it is important that they all be of the same size so that they cook in all roughly the same amount of time. I asked the fish merchant to select eight of the same size for me.

It was always a task to separate the cheeks into consistently-sized orders and then on the line, if two or more orders were going to the same table, it would be up to the fish cook to select orders of more or less the same size so that everyone's plate looked the same. It is an epic fail to send an order of four 2-ounce pieces and another of two 4-ounce pieces to the same table. Invariably, the person with two pieces is going to complain (or write a highly negative review) that he or she got shorted. Yet again, I digress.

Lightly Dusted with Wondra
I like to lightly dust the halibut cheeks with salt, pepper, and Wondra, a granulated pregelatinized flour available in most grocery stores. Although it is marketed principally for thickening sauces (because it is pregelatinized, it will not clump), Wondra has found another market in professional kitchens. Chefs have adopted it en masse for the delightfully thin, crisp, and barely there crust that it gives. I put it on the halibut cheeks to keep them from sticking to the bottom of my stainless steel-lined skillet.

If you do not have Wondra in your pantry, put it on your shopping list today. You will also say, "Thank you General Mills!"

Seared on One Side, Cooking on the Other
Cook the cheeks in a skillet until they brown well on the bottom side. You'll see the flesh turn from pink and transparent to white and opaque around the edges as the bottom cooks. I flip the cheeks when I can see the white edge all the way around the cheek. Finish up the cooking another couple of minutes and then remove the cheeks and keep warm while you make the sauce. The sauce recipe is at the end of this post.

Caramelized Garlic and Red Pepper Flakes
Film the pan with a bit of olive oil, then add the garlic. I have added three cloves that are minced along with a pinch of red pepper flakes. For this dish, it is imperative to caramelize the garlic to the point that you see in the photo above. Although Julia Child would scold that you were going to "burn the garlic," it will be just fine. Trust me, I've made this dish thousands of times.

Ed's Sauce After Adding All Ingredients
Once the garlic becomes caramelized, stop the cooking by adding two ounces of dry white wine to the pan. Then add quickly two tablespoons of brined capers along with a bit of the brine, a cup and a half each of diced tomatoes and cooked quartered artichoke hearts. Finish by adding a handful of chiffonaded fresh basil.

Rewarming the Halibut Cheeks
Let the sauce cook for a couple of minutes to reduce the extra liquid, then place the halibut cheeks back on top to warm through. Remove the cheeks as the sauce becomes almost dry. Although my line cooks were always tempted to add a pat of butter to finish the sauce (and I am sure they tried when I wasn't looking), I do not see a need for butter in an Italian-inspired sauce that is nothing but a modified puttanesca sauce.

Plate however you see fit. With cheeks, I like to plate them on the sauce. With larger fillets of fish, I often would drape the sauce over the fish. 

Ed's Sauce


This quantity of sauce is perfect for garnishing two entrées or two plates of pasta.

1 tablespoon extra virgin olive oil
3 cloves of garlic, finely minced
1 pinch pepperoncini (red pepper flakes)
2 ounces dry white wine
2 tablespoons pickled capers with a bit of brine
1-1/2 cups diced, peeled, and seeded tomatoes
1-1/2 cups cooked artichoke heart quarters (one 15-ounce can, drained)
1/2 cup fresh basil en chiffonade (leaves rolled and thinly sliced)

Heat the olive oil in a skillet and add the garlic and red pepper flakes.

When the garlic is caramelized and just at the point of overcooking, quickly add the white wine to stop the cooking, followed by the rest of the ingredients.

Cook over high flame until the sauce is as wet or as dry as you like. Season to taste, though additional salt is usually not necessary because of the capers.

Tuesday, October 6, 2020

Anniversary: Crab Cakes

Many weeks ago back in the summer, Ann told me that she'd like crab cakes for our anniversary at the end of September, partly in celebration and partly as a reward for dropping some of this COVID weight. We've both been successful in that mission so far, dropping a combined 17 pounds over the last month of eating carefully, but well. But more importantly, we're celebrating having been married for 8 years now, 8 years that have seemingly flown by, each better than the last.

To find decent crab, which out here in Oregon means Dungeness, I had to go two towns over to the seafood retailer in Newberg, where I bought a pound of crab, a small bag of mussels, and a pound of halibut cheeks. Not only do we have an anniversary to celebrate, but Ann has a birthday coming up in three days, and seafood is our splurge.

Before hitting the seafood store, though, I stopped at what is probably our best retail wine shop to buy a bottle of sparkling wine, because what's better than crab cakes? Crab cakes and sparkling wine!

Crab Cakes
We have not had crab cakes since I closed the restaurant in 2017. Actually, I needed that break after cooking them every night of my life for fifteen years. I really needed that distance. But I am glad to have made them for our anniversary: they were delicious and brought back good memories, memories of the restaurant and of my life most of which has been lived near the Chesapeake Bay, crab central for the East Coast.

My fondest crab memories are not of crab cakes, which have always been restaurant fare and not part of our ordinary lives. In the real world, everyone rolled up their sleeves and cracked crabs and swilled beer like Ann and I did with Jeff and Kelly in Mathews, VA in the summer of 2016. For me, cracking crabs is where the memories are.

My experience cracking crabs started long ago. I crabbed each summer when we would stay down on the Bay for our vacation in a cabin that my aunt owned. There was always a bunch of my mother's family there, coming and going as schedules permitted. Crabs were a big deal and my taste and smell memories of those summers are intense to this day, some 50 years later.

We'd have a big crab feast at least once while we were there, beer-steamed crabs redolent of Old Bay seasoning piled high on the newspaper-clad picnic table on the deck, with a cooler full of Natty Boh for the adults. And if we could get our hands on some peelers, the local name for softshell crabs, my mom and her sisters would make us fried softshell crab sandwiches for lunch. 

We had a chickenwire crab pot that we would toss out of the end of the dock, baited with trash fish, backbones, heads, etc., that I would check a couple of times a day, transferring the crabs to a large wire mesh pot tied off to the dock. I learned early on how to grab a big jimmy from behind to keep him from amputating a finger. As the oldest of all of the cousins who might be there, I was the one handling the crabs.

While the trap yielded some crabs, more came from lines that us kids, and by that, I mean mainly me, would toss out from the end of the dock. The drill with the lines was to drive a nail through a chicken neck and tie off a line to the nail in such a way that the conniving crabs could not make off with the bait. The bait wouldn't be in the water long before a crab would grab it and start dragging it. The idea was to gently pull the line in and elevate the crab off the bottom﹘it wasn't giving up on a free meal that easily﹘to run a dip net under the crab.

Even when I was off fishing at the point where our "creek" met the Bay proper, I'd have a couple of crab lines out. And if I were bottom fishing in the deep channel for flounder, as opposed to top water fishing for bluefish, sea trout, or that prize of all prizes, striped bass, I'd often reel in a crab that could be netted. On my way to and from fishing, I would wade the marshes with a dip net and a bucket looking for crabs. When I would spy one through the clear water, I would stealthily dip net the unsuspecting crab. I became pretty good at it. All these crabs went into the communal pot.

All these memories are now part of me and are inextricably entwined with my love of crab, blue crab, in particular. It may just be those memories coloring my palate, but I swear that blue crab, as hard it is to pick relative to the huge Dungies out here, tastes so much better. Blue is sweeter and more delicate.

If you'd like to read a fantastic book about blue crabs and the waterman's life on the Chesapeake, I highly recommend the Pulitzer Prize-winning Beautiful Swimmers by William Warner. It's a fascinating read about an endangered way of life.

My Lovely Wife of 8 Years
Champagne on the Porch
Before cooking the crab cakes, Ann and I decided to take advantage of the delightful end-of-September weather by having Champagne on the front porch. And not just any old Champagne either: this is Bouzy Grand Cru from Pierre Paillard, from a lieu-dit called "Les Parcelles." I tend to prefer blanc de blancs sparkling made from 100% Chardonnay with seafood, but I know that Ann favors the restrained red fruits in blanc de noirs. This 70% Pinot, 30% Chardonnay cuvée was a wonderful compromise. I hadn't set out to buy Champagne, thinking to get a local sparkler, but the wine merchant dissuaded me. He was not wrong. This was delightful grand cru Champagne at an affordable price.

Making Crab Cakes


Crab Cake Ingredients
I have an extremely minimalist approach when it comes to crab cakes. Crab is wicked expensive (fresh, unpasteurized Dungeness is going for about $40 per pound) and delicately flavored. I do not want to hide all that expensive crab meat behind a lot of filler that might overpower the delicate crab flavor. It is my philosophy that the crab should shine, but people's tastes are all different. While my crab cakes were always mentioned in magazine articles about the restaurant as being outstanding, they were scorned by a few internet reviewers as bland or tasteless.

This means that you will never find seafood seasoning, onions, or peppers in my crab cakes. Never. No highly flavored ingredients at all. My crab cakes are crab, mayonnaise, celery, Italian parsley, panko, white pepper, and salt as necessary. Each pound of crab will yield about five four-ounce crab cakes.

1 pound crab meat
1/2 cup mayonnaise
1 stalk celery, in small dice
1/4 cup minced parsley
1/4 teaspoon ground white pepper
1/2-1 cup panko
salt as necessary

Mix the crab, mayo, celery, parsley, and pepper. Sprinkle on the panko as necessary and gently fold until the mix holds together and is neither too wet or too dry. Taste for seasoning and adjust as needed. Refrigerate for at least an hour. Check the mix before shaping into cakes. If it is too dry to hold together, add a bit more mayo. If it is too wet, add more panko and let it sit a few more minutes.

Here are some lessons learned. For small batches of crab meat, under three pounds, I do not use an egg. For every three pounds of crab, I use one egg. For every two pounds of jumbo lump crab, I would use a pound of lump, so that the smaller lump would help the crab cakes lock together with minimal binder. If your crab is very wet (typical of pasteurized crab meat), squeeze out the excess liquid and use it for soup stock. 

Be sure not to overmix the crab and bust up the lumps, yet distribute the mayonnaise and seasoning well. Add panko sparingly. Once the crab mix will hold together when you squeeze it gently, it is ready for the refrigerator. Refrigerate your crab mix for at least an hour before making it into cakes to give the panko time to absorb moisture and set the cakes.

When frying the cakes, do not crowd them in the pan to help them brown and to give yourself room to work a spatula under the cakes. If you use minimal panko as did, a solid crust is the key to holding the cake together. I used only a scant half a cup, but I do not recommend this for beginners because the cakes are very delicate and easy to break. Make sure to brown both sides well.

Crab Mix Ready for Refrigerator
Frying Crab Cakes

Monday, October 5, 2020

Salmon Burgers

Once again, Ann was the impetus for bringing a dish to the table. The September Oregon Coho season was just open for 24 hours when the quota was met and as luck would have it, our store had a couple of the fish. I came home with a 2-pound chunk of late-season wild Oregon Coho salmon and I asked her how she'd like me to serve it. To be honest, I hadn't even thought of salmon burgers until she suggested it.

Her suggestion was great. Coho is not a very fatty salmon to begin with, not like chinook or king, and adding a bit of fat and flavor is a great thing to do to this kind of salmon. And we had just had some seared Coho earlier, from hatchery fish, so a change would be welcome. I would never put a fat piece of king in the food processor like this Coho. It would get seared or grilled to medium rare and the scrap would become salmon tartare, full stop.

I call the patties that you see in the photo below salmon burgers, made from raw salmon, to distinguish them from salmon cakes, made from cooked flaked salmon. These salmon patties are more akin to hamburgers than to fish or crab cakes. 

Salmon Burgers sans Buns
We used to make similar salmon burgers for our lunch menu at the restaurant, where we would usually serve them seared medium on a grilled brioche bun with cucumber slices, lettuce, red onion, and an herb- and caper-mayonnaise. At home, however, we omit the buns and the condiments.

Salmon Burger Mise en Place
The photo above shows all the ingredients for salmon burgers, starting in the lower left: Italian parsley, shallot, capers, Dijon-style mustard, an egg, Coho, and cayenne pepper. I don't typically add salt because both the capers and mustard are salty; in fact, that's why they are in the recipe: to add salt. To be certain, after I spin the mix up in the food processor, I taste it for seasoning and adjust as necessary.

The egg is not necessary. I add it only because I am working with lean Coho (right, you see no cream-colored stripes of fat in the red flesh) and I wanted to add a bit more fat and moisture to the burgers. If I were making this with fatty farm salmon rather than lean wild salmon, I would omit the egg.

Also, the herb or herbs that I use varies from batch to batch. Although this batch was made with Italian parsley, I more often use dill. If I had it, I would use chervil and in the very early spring before anything else had come up, I would use chives. Any or any mixture of the classic fines herbes will work just fine.

Please note that I only ever use flat-leafed Italian parsley. It is so much easier to work with and more flavorful than curly parsley, so it is all I ever grow. Now that I think about it, I don't think that my grocery store even carries curly parsley. If you ever read the word parsley on this blog, I'm talking about Italian parsley.

Note also that just as you wouldn't think about a binder in a hamburger, you shouldn't think about adding panko or other breadcrumbs to salmon burgers. The raw flesh has plenty of protein to bind the cake into a decent patty without any filler.

Ready to Process
To ready the ingredients for the food processor, pull or cut out the pin bones, if any, from the salmon. Skin the salmon and cut the filet into large cubes. Mince the parsley and the shallot. Add the ingredients to the food processor and pulse until you have a workable paste with quarter-inch chunks of salmon in it.

Four-Ounce Salmon Burgers Ready to Cook
Patty the burgers into whatever size you want. Because I am serving each person two cakes, I opted to make four-ounce cakes. At the restaurant, to have the patties fit our buns, we served one seven-ounce cake. I prefer my patties to be on the thicker side so that I can get a good sear on both sides while still having the center be warm but not cooked, about medium.

Salmon Burgers

Here's a decent starting point from which you can make your own modifications to suit your taste. Makes 8 4-ounce cakes.

2 pounds Coho salmon
1 shallot, minced
1/2 bunch parsley (or other herb such as dill), minced (1/2 cup in total)
2 tablespoons Dijon-style mustard
1/2 cup capers
1 egg
1/4-1/2 teaspoon cayenne pepper, to taste 
salt as needed

Bone and skin the salmon. Cut into large cubes. Put in a food processor with the remaining ingredients. Pulse on and off until the salmon just forms a paste similar to hamburger. Season to taste. Patty. Sear in a hot pan until brown on both sides, but warm and uncooked in the center.

Sunday, October 4, 2020

Estouffade d'Agneau à la Provençale

Ann has been thinking a lot recently about dishes she wants me to make. She had been leafing through a French country cookbook and was intrigued by a Provençale farmhouse recipe for a lamb stew. At her urging, I bought a lamb shoulder at the farmers market a couple of weeks back and set out to make a stew.

My stew is modeled on one called an estouffade which can also be called a daube after the daubière, the specialized pot in which the stew cooks. By either moniker, this stew is made most typically from red meat, lamb or beef, that has been marinated with vegetables and red wine and then cooked slowly in a covered braising dish of the cook's choice, be it cocotte, doufeu, or daubière.

The word estouffade might seem familiar to you as it is to me. When I was a teenager in Alabama, I was highly influenced by Cajun cuisine which calls certain stews étouffées. Both words come from the verb étouffer meaning to smother, but are distanced from each other in time and by an ocean, the one being Parisian French and the other Acadian French, the form of French that migrated to first Québec in the 1600s and then later to the bayou country of south Louisiana. In the latter half of the 20th century in Cajun country, étouffée move further away from estouffade to become a roux-based stew of shellfish, typically shrimp or crawfish, less commonly of crab or white fish.

Estouffade d'Agneau; Purée de Celeri-Rave
Enough with the language history and on with the lamb stew that you can see on a pile of celery root purée. At the farmers market, I picked up a couple of nice celery roots, the first of the year, with an eye towards braising chunks of them in the stew instead of potatoes. But after lugging them home, I decided to turn them into a purée and serve the estouffade over them.

You can see how transparent the broth is and it's just what I wanted for a home dinner. But for restaurant service, I would have reduced the broth and amped it with lamb glace and potentially have thickened it with a beurre manié, a mixture of butter and flour kneaded into a ball. I would have also cooked the vegetables separately and combined everything at the last second before plating. But then, that just wouldn't be home cooking, would it?

A stew is something that you are supposed to throw in the oven or on a back burner and forget about, not slave over. The French even have an awesome verb, mijoter, that captures this idea of throwing something on low heat and forgetting about it and letting it do its thing until it achieves awesomeness. Sure, we have braise and we have simmer, but they don't capture the full essence or insouciance of mijoter.

Making a daube or estouffade is at least a two-day process. On the first day, you prep and marinate the lamb and vegetables and make the stock. You cook and serve the lamb on day two, or as in my case, on day three.

Lamb Shoulder, Carrots, Leeks, Rosemary Ready to Marinate
First, break down the lamb shoulder, cubing the lamb into chunks while reserving the trim to make a stock in which to braise the stew. Put the lamb in a large bowl.

Next, prep the vegetables: carrots in chunks and leeks, sliced into centimeter-wide coins. More traditionally, cooks use onions, but I had some beautiful leeks that I wanted to use. Add the vegetables to the lamb.

Add whatever herbs you want: I opted for rosemary only. Add seasoning: garlic, salt, pepper, and orange zest. Orange zest is a sometimes added to Provençale stews along with olives and rosemary. This happens to be a flavor combination that resonates with me, so that's what I did.

Toss everything together with a half a bottle of red wine and then put it in the refrigerator at least overnight. My lamb marinated two nights because I wasn't ready to cook it the next day.

Lamb Trim for Stock
Lamb shoulder contains a lot of fat and gristle, unlike the leg which is leaner. I prefer shoulder for stews because it braises out more tender than leg, though either will do. You could even start with pre-cubed kebab meat, but then you won't be able to make stock from the trim.

You can see that I got a lot of trim. In fact, from a 2.4-pound lamb shoulder, I only got a pound and a quarter of lamb cubes to stew.

Browning Trim for Stock
To make the stock, brown the trim well, to the point where all the surfaces are caramelized as you can see in the photo above. When they are brown, pour off as much of the fat as you can and then add water. I added a quart of water and brought the stock down to a cup and a half. And then I added another quart of water and did it again.

Stock, Ready to Refrigerate
Once the stock has reduced, I like to refrigerate it overnight so that I can pop the layer of fat right off the top and discard it. There are lots of ways to degrease a stock, but for a dish that takes two days to make, you might as well let the refrigerator do the hard work.

Estouffade Almost Ready for Oven

When you cook the lamb, you have two options. You can separate the lamb from the marinade, pat it dry with paper towels, and brown it. Or, you can just dump it in a pan and start cooking. You get slightly different flavors: a rich caramelized lamb flavor versus a lighter, fresher lamb flavor.

In my house, browning the lamb isn't an option. Because the lamb has been marinated and is full of liquid, it takes a very high flame to brown it, even after it has been patted dry. That is absolutely guaranteed to set off my smoke detector, so browning is out for me. Moreover, I did not want any added fat from browning the meat.

Some people would separate the lamb from the marinade and then cook the marinade to reduce the liquid in it. I didn't feel like going this extra step. It would have resulted in a thicker, darker sauce, but I was aiming for a lighter, less heavy dish.

This is the point at which you would add any ingredients that were not in the marinade. For my part, I added a couple dozen black olives as would be typically done in Provence. I also fished out the rosemary sprigs and, as you can see above, I put the lamb stock in the pan. Some people would also add some tomatoes at this point, but that's not the flavor that I wanted.

The pan went into a moderate oven (about 350F) covered for about three hours and uncovered for a final half hour to help concentrate the braising juices slightly.

Once the lamb was done and cooling, I made a batch of celery root purée and then served dinner. Because I was careful to limit the fat (carefully prepping the lamb, defatting the stock, no added olive oil, no thickening of the sauce with beurre manié, and no butter or cream in the celery root), we ended up with a pretty light and fairly healthy dinner.

Estouffade d'Agneau à la Provençale

The following recipe will feed four people easily and six if necessary. Allow two days to make this stew.

2-1/2 pound lamb shoulder, or 1-1/4 pounds of lamb cubes
10-12 medium carrots, in chunks
2 large leeks, in centimeter-wide rings
8 sprigs rosemary
1 teaspoon Kosher salt
1/2 teaspoon black pepper
8 cloves garlic, minced
zest of one orange
half a bottle of red wine
1-1/2 cups lamb stock
24 Nyons or other black olives

Follow the detailed procedure above. To recap, mix the lamb, carrots, leeks, rosemary, salt, pepper, garlic, orange zest, and red wine. Refrigerate at least overnight, stirring from time to time. Place the marinated lamb in a baking dish and remove the rosemary. Add the olives and lamb stock. Cover the dish and bake until the lamb is almost done. Uncover and cook another half an hour.

Saturday, October 3, 2020

Celery Root Purée

It's fall now in the Willamette Valley and that's exciting for me because we're starting to see the return of the root vegetables to the farmers markets. This week marked the return of the celery root, nice fresh smallish ones. And it so happened that I was shopping for something to serve with a lamb stew. Celery root would be perfect.

I had it in mind to cut the celery root into large chunks and braise it in the stew, but I changed my mind. Instead, it ended up as a purée under the stew. Celery root has a very mellow and mild celery flavor and it makes a wonderful purée that is a fairly healthy stand-in for mashed potatoes. Of the root vegetable purées, parsnip is my favorite with celery root not far behind. We served a lot of each at the restaurant where the servers would get the invariable question, "What did you put in these mashed potatoes?"

Celery Root Puré
I was aiming for low-cal celery root purée, so I thinned it with a dribble or two of the cooking water while blitzing it somewhat successfully in my wife's mother's antique first-generation Cuisinart. It knocks things down, but it doesn't give the ultrasmooth purées we served at the restaurant.

At the restaurant, I would have put the celery root in the big commercial two-horsepower robot coupe, then passed it through a very fine chinois to remove any fibers, and then I would have respun it in the robot coupe with heavy cream to make a decadent mousse. Or rather, I would have been off doing executive chef things such as payroll while one of the cooks made the mousse. ;) Yeah, that chef life rocks!

Celery Roots
These celery roots are just in from the farmers market and are trimmed much closer than I have ever seen them before. The bottoms have a mass of crazy roots which you can see on the left, while the tops have celery stalks and leaves sprouting out. You can see where the top was trimmed on the celery root on the right.

If you're new to celery root, a word of advice. The medium size roots such as these (they're about softball size) are preferable to the larger ones. When you start getting roots as large as pomelos and larger, you'll find that they are often soft and pithy in the center and sometimes stringy to the point of being useless.

Trimmed Celery Roots
Trimming celery root is not rocket science.  All the fuzzy brown skin has to come off. A vegetable peeler is not going to be of much use: use a knife to slice off the skin until you expose bright white flesh.

Cubed Celery Root Ready to Cook

Once the celery root is cleaned, you can do whatever you want with it. It is good raw in slaws, salads, and in that quintessential French bistro appetizer celeri rémoulade, fine julienne of celery root dressed in a mustardy rémoulade sauce. Some people shred the celery root for that dish, but I don't care for the shredded texture. I only shred celery root for latkes and it makes fine latkes. Celery root can do anything a potato can do (baked, boiled, steamed, braised) and it makes outstanding French fries.

But today, we're making a purée and that starts by cutting the raw celery root into roughly even cubes so that they all cook at the same rate. The biggest fail in making a purée is to have hard chunks in it because most but not all of the vegetable was cooked through.

Cover the cubes with water, stock, milk, or cream. Although cream is decadent as hell, I have lactose issues and currently, COVID-induced waistline issues, so I opted for water. Simmer until tender then transfer the cubes to the food processor. Pulse, adding cooking liquid or other liquid as needed, to yield the texture purée you're seeking. Season to taste with salt and white pepper. You may want to add a pat of butter, but I did not.

Friday, October 2, 2020

Ginger-Miso-Green Onion Meatloaf with Soy-Lime Sauce

Ann is pretty good about surfing the internet looking for food that she wants to eat. One afternoon a couple of recipes showed up in my inbox courtesy of her, one for chicken meatballs flavored with ginger and miso and the other for a soy-lime dipping sauce that looks very suspiciously like a classic Vietnamese sauce, nuoc tuong.

I don't need or really even use recipes. All I need is the basic gist of an idea and I am off to the races. Ann sends me recipes for ideas and I really appreciate that: coming up with what to cook for dinner is a universal struggle among cooks.

Ginger-Miso-Green Onion Meatloaf with Soy-Lime Sauce
For a quick dinner, I don't really want to roll out and cook meatballs, so I opted for a meatloaf flavored similar to a filling for pot stickers along with broccoli that would roast at the same time as the meatloaf was baking. You could make meatballs out of this very same mix, but I was feeling lazy.

Mise en Place
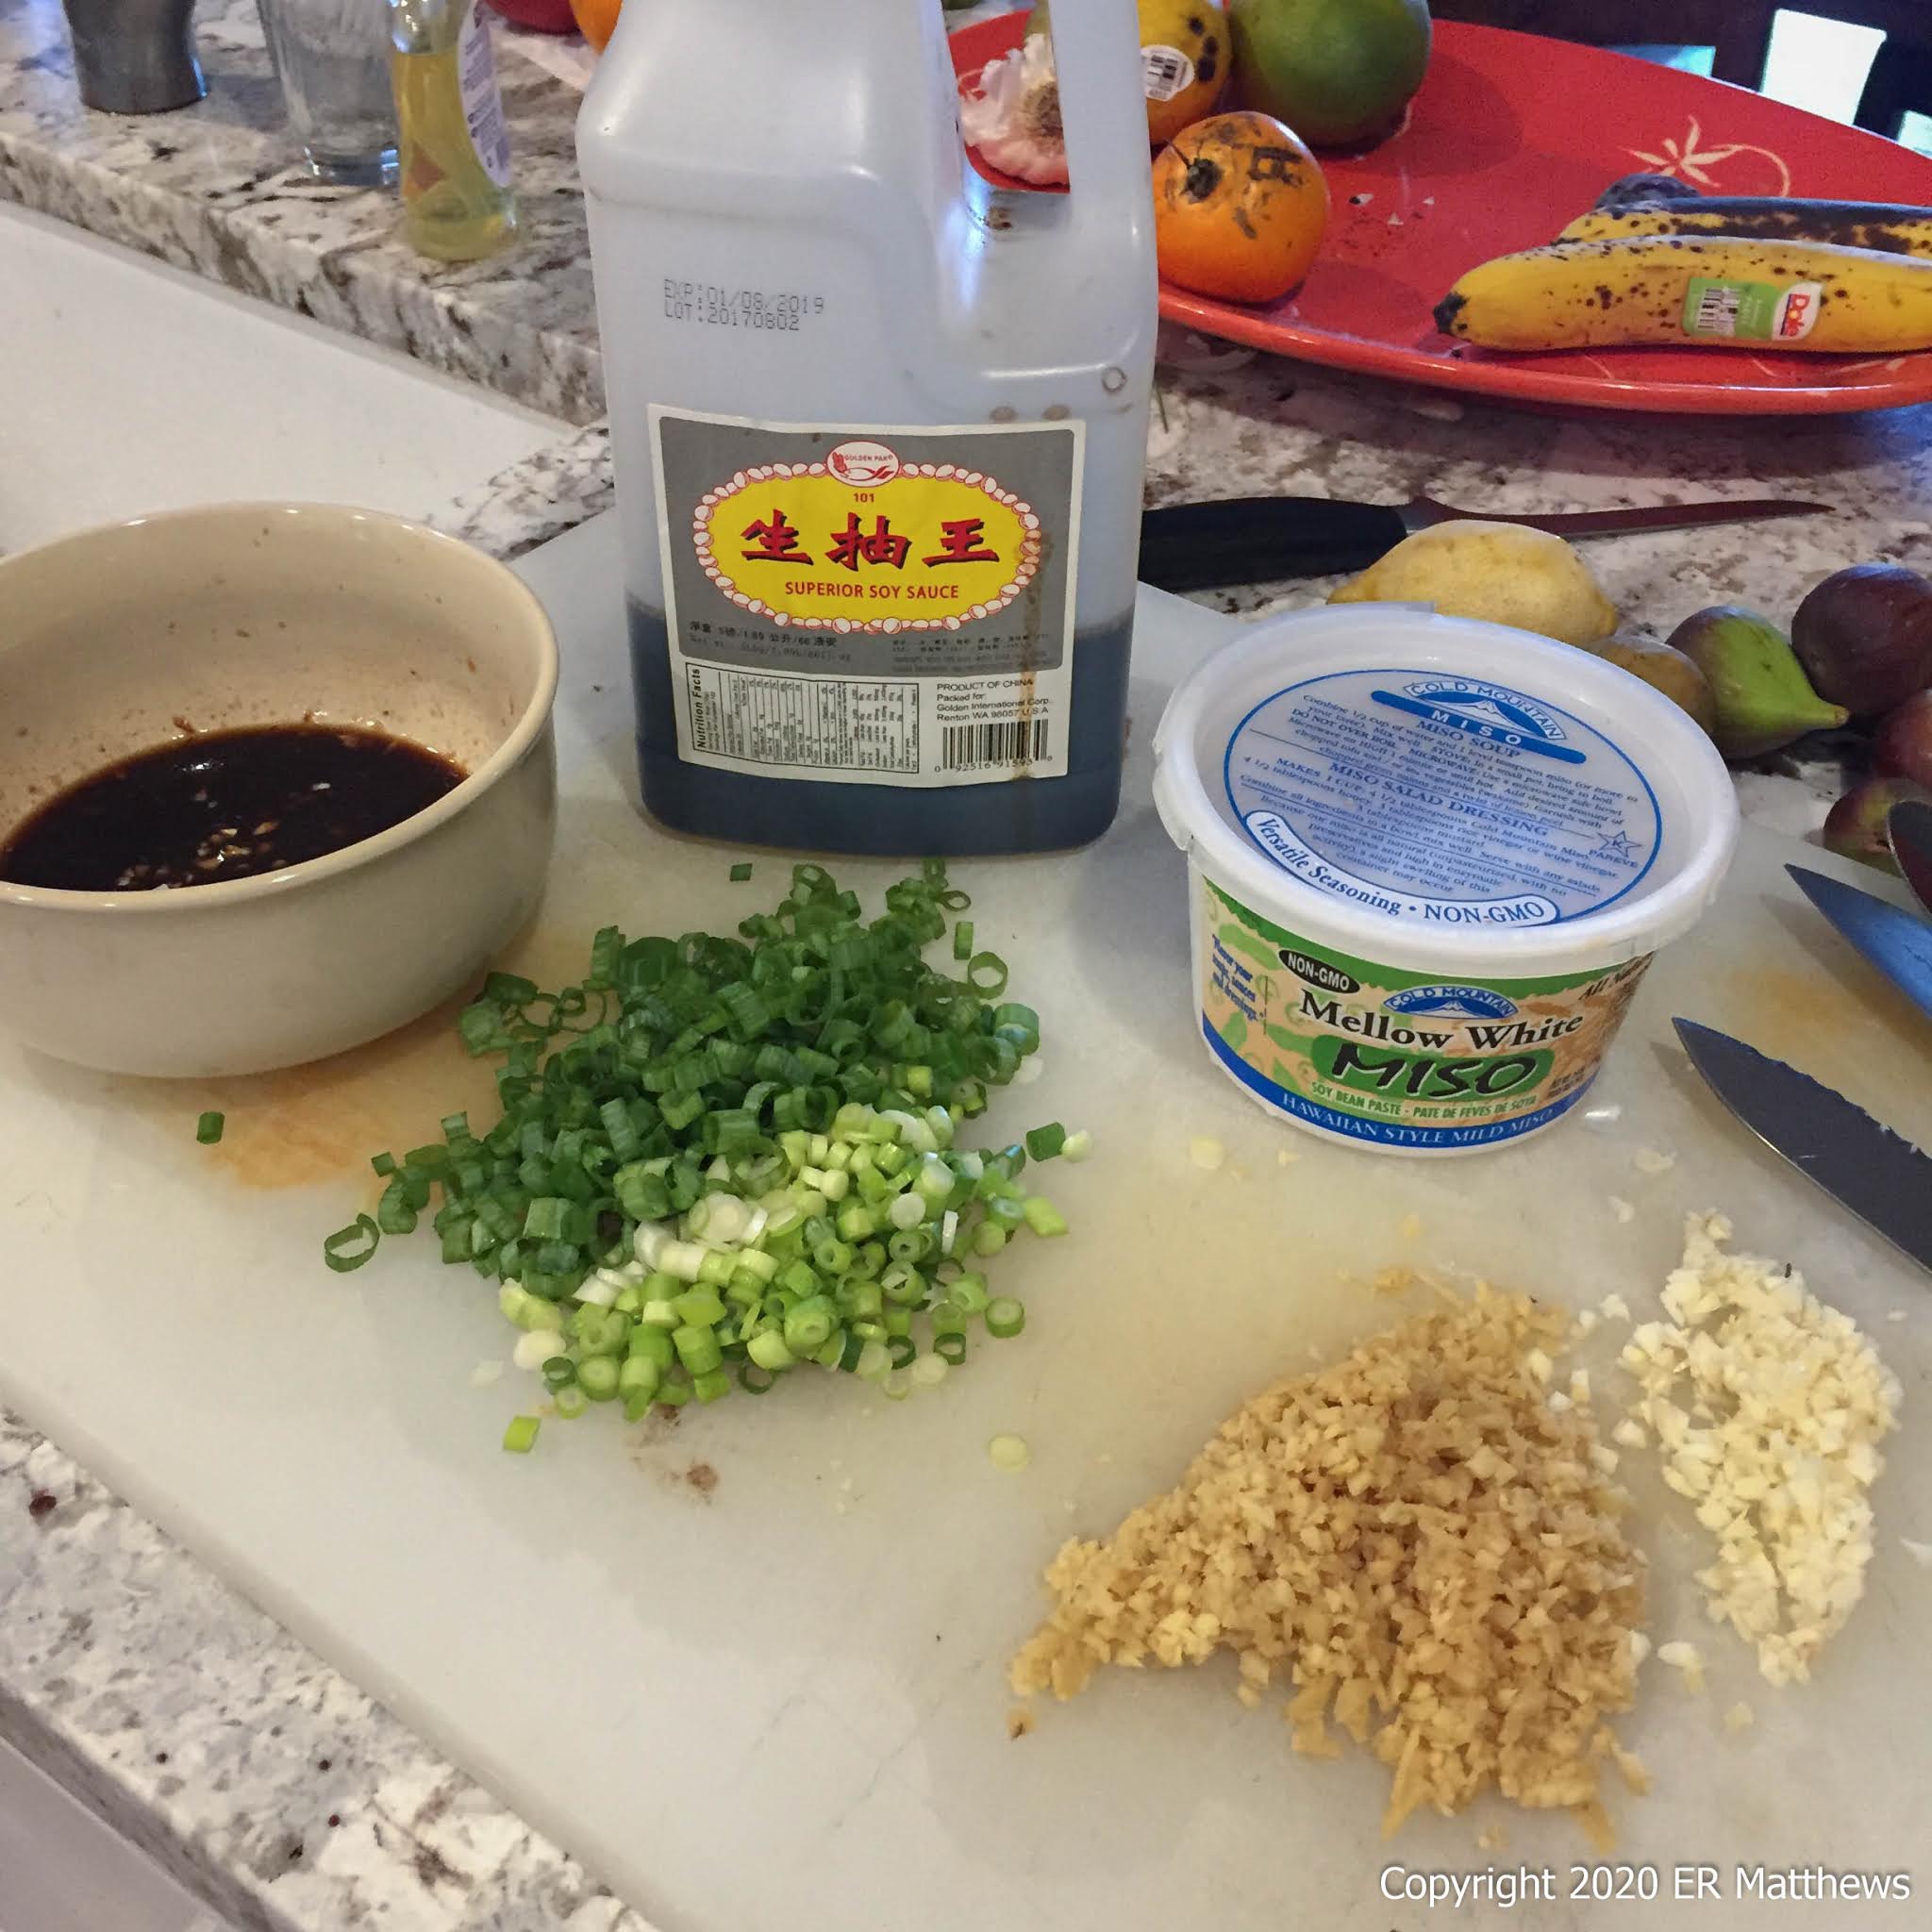
Here are all my seasonings and the finished soy-lime sauce to spoon over both the meatloaf and the roasted broccoli. The seasonings for the meatloaf are soy sauce, shiromiso (white miso), garlic, ginger, and green onions.

I have been loyal to one brand of soy sauce since I was a kid: superior soy sauce from Pearl River Bridge, a lighter 100% soy Chinese-style soy versus the heavier and darker 50% soy, 50% wheat Japanese-style (tamari) embodied in Kikkoman or San-J, a fine sauce made in Virginia. 

Soy-Lime Sauce


For the sauce, I mixed in a small bowl:

one quarter cup soy
one quarter cup lime juice (juice of one large lime)
one clove garlic, minced
one teaspoon minced spicy chile (my stand-in for a fresh Thai bird chile)
one teaspoon agave syrup

I use agave as a sweetener in sauces because as a liquid, it mixes in to the sauce better than a granulated sugar. Adjust this sauce to your taste. If you find it too acidic, you can add more sweetener to balance the acid and/or some water to dilute it a touch. After you've made a couple of similar sauces, you'll get the hang of it for your palate.

Ginger-Miso-Green Onion Meatloaf 


Meat Loaf Ready for the Oven
Mixing up a meatloaf is child's play. First, you mix the liquid and seasoning ingredients in a bowl. Then you add the meat and binder and mix well, but gently, until all the ingredients come together. Then you drop the meatloaf on a sheet tray and shape it. After a quick bake and a brief cool-off period, dinner's done.

1 tablespoon soy sauce
2 tablespoons white miso
1/4 cup chicken stock 
4 green onions, sliced
1/3 cup minced fresh ginger
3 cloves garlic, minced
1 pound ground turkey
1 cup rolled oats

Mix the soy, miso, and chicken stock well until the miso is dissolved. Then add the green onions, ginger, and garlic and mix well. Finally, add the turkey and rolled oats and mix gently, but well.

Mound the forcemeat on a sheet tray in an even rectangle. The thicker the rectangle, the longer it will take to cook. This one took about 25 minutes, maybe 30.

Bake in a moderate oven at 350F until a meat thermometer registers 160F in the center of the loaf. Remove from the oven and let stand for 5-10 minutes. As the meatloaf cools, it will continue to cook in the center and will finish at 165F or higher.

As a chef, I don't always follow USDA Food Code guidelines about temperatures (they often want you to char your meat in the name of safety), but with poultry, I don't fool around. They say ground poultry must be cooked to 165F to kill any pathogens and I am with them in this regard. If you don't have a thermometer, go buy one and learn how to use and calibrate it before you embark on this recipe.

I use rolled oats in preference to other binders (such as panko or other breadcrumbs) because oats are relatively healthy for you.

You'll notice that there's no salt in this recipe. The soy and miso have plenty of salt to compensate.

This dinner was delicious, like eating a plate full of pot stickers without the pastry. I know that the pastry around those dumplings is awesome, but not when you're trying to lose your accumulated COVID gut!

Baked Chicken, Artichoke Hearts, and Cannellini

During the course of COVID quarantine, I have come up with and refined a baked cannellini, artichoke, and chicken dish that pleases the both of us greatly. The flavors are delicious and the preparation is easy. I went through several iterations, a half dozen at least, before reducing the dish to what I think is its essence, by paring away unnecessary ingredients.

Gone from the various versions of the dish are white wine, chicken stock, onions, leeks,olives, fennel, and various spices such as cumin and coriander: they were good but not essential. One of the biggest lessons a chef can learn is how to pare a dish back to its essence and to wow diners with the quality of a few ingredients instead of awing them with a lot of ingredients. It takes a discipline born of years in the kitchen.

There are three different ways to make this dish, depending on the amount of effort that you want to expend and how calorie conscious you are. The pictures below are of the lowest fat version, which tastes really good, but not nearly as good as the higher fat versions. But no matter how you make it, at its heart, the dish is a layer of chicken thighs covered in a layer of cannellini mixed with artichoke hearts, lots of herbs, garlic, and lemon zest.

Baked Chicken Thigh on Herbed Cannellini
Garlic and Herbs From the Garden
Each time I make this dish, the amount and mix of herbs varies depending on my mood and what's growing outside. The idea is to have a lot of fresh herbs in the beans, not necessarily any particular mix of herbs. This version as you can see has a lot of parsley and more moderate amounts of rosemary, thyme, and sage. I often include oregano; I'm not sure why I did not this time other than my oregano plant is pretty beat right now from the brutal summer sun.

Chop the Parsley Fine; Mince the Harder Herbs
I chop the parsley finely, while the woodier herbs﹘thyme, rosemary, and sage﹘I mince just as finely as I can. I use no shortage of minced garlic in the dish; you see probably six cloves minced on the cutting board. One of the keys to this dish is lemon. The first incarnation of the dish included lemon slices and lemon juice, the next lemon slices only, and the final version has been refined to just the zest of lemon.

You see my microplane in the photo above. If you don't have one, get one today. I have worn out dozens of them over the past 20 years. They are indispensable for grating hard spices such as nutmeg, hard chocolate, hard cheeses, and for zesting all manner of citrus. Microplane zesters are not expensive and they are indispensable. It's not often that I recommend a piece of kitchen equipment; this one is a no-brainer.

Layer of Seasoned Bone-In Chicken Thighs
Spray a baking dish with pan spray and layer in your chicken thighs. For roasting chicken, you'll be much happier if you roast the thighs bone-in. I never recommend roasting breasts. Your three options are lowest fat, skin off and trimmed as above; intermediate fat, skin on and browned; and most fat, skin on and raw. I could also have seared the skin thighs before roasting them, but I don't see that as adding a lot of flavor, not enough to justify dirtying another pan.

Each dish is slightly different in its own way. The low-fat version is the least tasty, but the best for you if you're watching your calories as we are. The browned skin version leaves behind much of the skin fat while bringing a delightful caramelized fried chicken flavor to the dish. The raw skin version lets all of the skin fat cook into the beans yielding the tastiest and most unctuous dish at the expense of extra calories.

If you skin your chicken thighs, save the skins to make stock at a later date. If you're not going to use them right away, or you don't have enough to make a pot of stock, you can put them in a bag in the freezer. I also collect all the bones after dinner to add to my next batch of stock.

Chicken Covered by Cannellini and Artichokes
One thing that appeals to me about this dish is that it uses canned cannellini and canned quartered artichoke hearts from my pantry. Would it be awesome to cook your own cannellini from dried and pare down and cook artichoke hearts? It would. But I don't want to invest that much labor into an easy weeknight dinner.

For baking this dish, I use a very old (lets call it 40 years old) half hotel pan, my favorite half pan from the restaurant. It is very heavy duty and of a quality that you can no longer find at any restaurant supply house. By all means, use any baking dish you like, be it glass, ceramic, terra cotta, enameled cast iron, raw cast iron, lined copper, lined aluminum, or stainless. The pan doesn't really matter. You just need to size the recipe to your pan. The recipe at the end of this post is sized to a commercial half pan.

In a large bowl, mix the white beans, artichokes, herbs, lemon zest, and garlic. Season to taste with salt and pepper. For a full-on luxurious high fat dish, drizzle in a couple tablespoons of olive oil as well, though I did not for this dish.

Put the bean mixture over the chicken thighs and then cover the pan. Roast in a moderate oven (350F) until the chicken is tender and ready to fall off the bone. A fully packed pan like this took every bit of three hours to cook. I've cooked the same dish in the same pan with only four thighs instead of eight and it brought the cook time down by half an hour, forty-five minutes because the chicken pieces were not packed in tightly together.

While Dinner is in the Oven, Ed and Ann Will Play
Three hours of cook time gave us plenty of time to relax by the fire pit on the front porch with a bottle of local Pinot Noir Blanc aka White Pinot Noir, a still white wine made from not totally ripe red Pinot Noir grapes by pressing the juice right off the skins. After settling for a few days, the juice is then inoculated and transferred to French oak barrels to ferment and then to age. The rose gold color of the resulting wine is pretty unique and a great indicator if you are tasting blind. The yeasty, beery nose with overtones of stone fruit is also fairly indicative.

Because we're just going into our rainy season which will last until next May, we have relocated our front patio furniture from under the open pergola to under the cover of the front porch, around the fire pit. Doesn't everyone have a fire pit on their front porch? It makes a great place to have a glass of wine when the weather is not too cold or too rainy.

Baked Chicken, Artichoke Hearts, and Cannellini


8 bone-in chicken thighs
salt and pepper, to taste
1 bunch of Italian parsley, destemmed and minced
3-4 sprigs thyme, destemmed and minced
1 large sprig of rosemary, destemmed and minced
1 sprig oregano, destemmed and minced
8-12 sage leaves, minced
6-8 cloves garlic, minced
zest of one lemon
2 8-ounce drained weight cans of quartered artichoke hearts
3 15- to 16-ounce cans of cannellini beans

Decide how you're going to prepare your chicken thighs. Skin, season, and/or brown as appropriate.

Place the chicken in the bottom of a greased baking pan.

Rinse and drain the artichokes and white beans.

Mix the herbs, garlic, lemon zest, artichokes, and beans. Season to taste.

Layer the beans over the chicken.

Cover the pan and roast in a moderate oven (350F) until the chicken is ready to fall off the bone, two and a half to three hours.

Fourth of July 2026

And so, here we are, at the 250th anniversary of the signing of the Declaration of Independence. When I was a teenager, I found the 200th to...