Monday, August 31, 2020

Cole Slaw

It's been a very long time since I made cole slaw. This is most likely because it is something that I made or handled every day at the restaurant. We always served a big pile of tangy slaw with our exceedingly rich crab cakes, as a foil to the fat and as a palate cleanser. More importantly, making slaw daily let us use whatever vegetables our farmers were bringing to us, no matter the season. It always seemed important to give our loyal farmers a market for their fruits and vegetables.

Cole Slaw
My wife was scared of my slaw long ago when we met because she had known slaws only with gloppy mayonnaise-based dressings. I'm not a fan of this creamy slaw myself, so I always dress my slaw quite simply with rice vinegar and granulated sugar, with a bit of salt to taste. I can't give you a recipe for the dressing for I literally scatter a handful of sugar and a bit of salt on the vegetables and pour over a bit of vinegar. I mix it well and taste. If it needs more acidic bite, in goes more vinegar. If it is too acidic, a bit more sugar will balance it.

It's best to make your slaw early in the day to give the dressing time to wilt the vegetables a bit before dinner. Though it is delicious right away, it gets better with age, to a point. It helps to turn a new batch of slaw every couple of hours to redistribute the dressing. Although you can slice your vegetables with a food processor, I always use a knife. It takes work, but the texture is better and you can work on your knife skills at the same time.

While cole slaw derives from words meaning cabbage salad and while cabbage is the principal component, you should not hesitate to be creative with your slaws. Any fruit or vegetable that is firm enough to slice and that is edible raw is fair game. I made this one from white cabbage, cucumber, carrot, radishes, and an apple.

Here is a non-exhaustive list of the things that I remember having put in slaw, each one I made being a function of the season and what was on hand.

Cabbage: white, red, napa, Savoy, brussels sprouts

Firm Leafy Greens: cavolo nero (Tuscan black kale), kale, collards, gai lan (Chinese broccoli), bok choy, choy sum, endive, chicory, Swiss chard

Other Brassicas: broccoli, cauliflower, broccolini, stem broccoli, rapini, stem mustard. Broccoli and cauliflower stems are great in slaw, peeled and thinly sliced.

Root Vegetables: turnips, rutabagas, kohlrabi, carrots, horseradish, radishes (red, breakfast, daikon, Korean), hard winter radishes (watermelon, black, etc), sunchokes, crosnes, beets, celery root, sweet potatoes, parsnips

Other: asparagus, cucumber, cucamelon, fennel, celery, green beans, pole beans, shaved corn, peas, sugar snaps, snow peas, rhubarb, artichoke hearts and stems

Herbs: lovage, parsley, cilantro, chives

Squashes: summer squash, winter squash (butternut slices really well)

Peppers: I don't like the flavor of raw peppers in my slaw, but many people do. They are all fair game, spicy and mild alike.

Onions: yellow, white, red, torpedo, green, cipollini, leeks, green garlic, chives. Onions can dominate, so I only use little bits for complexity, typically red and/or leeks.

Hard Fruits: apples, pears, Asian pears

How off the wall can you get? I once did a slaw including napa cabbage, beets, fennel, and orange segments that I served with fennel pollen-dusted grilled trout. I tend, when using beets, to keep them sliced separately from the rest of the slaw and mix them in just at service, to keep them from turning the slaw entirely beet red, unless I am aiming for a red slaw for presentation purposes.

The things that I avoid for slaw form a much shorter list: tender greens (salad greens, mustards, spinach, etc.) that will not stand up to the dressing, really starchy things that are not great raw (potatoes, eggplant), watery fruits (tomatoes, berries, melons), peppers (out of personal preference, though a bit of habanero in a slaw can be awesome), okra, mushrooms, and shell beans.

Sunday, August 30, 2020

Roasted Garlic-Chipotle Salsa

I've made a lot of salsas in my life, with nary a recipe. Most of my salsas are chunky and tend to follow the basic formula of a fruit (yes, tomatoes are fruits), an onion, cilantro, salt, a source of heat, and lime juice. It's a bit more unusual for me to make a smooth salsa such as this one with roasted garlic and chipotle. It's extremely versatile, as you will see below, and worth keeping in the refrigerator.

Roasted Garlic-Chipotle Salsa
This salsa that I recently made is so easy and so delicious that I decided to record it here. I will forget it otherwise.

1 28-ounce can of diced tomatoes
1 chipotle, or to taste (I also added a tablespoon of the adobo for more spice)
1 head of garlic, roasted
salt to taste

Put all the ingredients in the blender and blend until smooth. Adjust seasoning to your taste. 

Ready for Avocado Tacos

Avocado Tacos
We decided to have vegetarian tacos last week to take advantage of the inexpensive and ripe avocados on the counter. When serving tacos, I like to put out all the ingredients and let each person assemble tacos to his or her (call me a dinosaur: I cannot bear to use "their" as a singular pronoun) liking. For these tacos, I put out all the ingredients that I would use for guacamole (avocado, tomato and cilantro mixed, jalapeños en escabeche) plus roasted garlic-chipotle salsa and cotija cheese.

Scrambled Eggs with Padrón Peppers and Tortilla Strips
And for brunch one day last week, I made us some scrambled eggs with Padrón peppers, avocado, tomato, cilantro, roasted garlic-chipotle salsa, cotija, and fried strips of tortillas left from dinner the night before.

As you can see, this salsa is extraordinarily easy to make, delicious, and versatile.

Kitchen Basics: Roasting Garlic

Roasted garlic is one of those kitchen staples that anyone should be able to make. Not only is it great spread on toasted bread instead of butter or mixed with cream cheese for a sandwich spread, you can blend it in to sauces to thicken them slightly. 

The uses for roasted garlic are nearly infinite. Yes, you can make ice cream from it: I have. Ask me some day about the éclairs with roasted garlic pastry cream and black garlic chocolate ganache that I made for a dessert course for a garlic dinner.

Slice the Top off the Garlic
Slice the top off of each bulb. This will facilitate getting the garlic out of the husk once roasted.

Wrap the Garlic in Foil
Wrap the garlic and the tops in aluminum foil. Some people advocate pouring a little oil on the garlic before sealing the packet. This is not necessary: it just adds calories that you may or may not want and has no effect on roasting the garlic.

Roast Until Soft, 30-45 Minutes
Place the garlic in a moderate oven (say 350F, though temperature is not critical) until it is soft. You can squeeze the packet with your tongs (or your chef fingers if you've been doing this for a lifetime and can no longer feel heat!).

Squeeze the Garlic out of the Husks
Open the packet and let the garlic cool to touch, then squeeze the cloves right out of the husks. The garlic will pop right out, leaving the husk for the compost pile.

Roasted Garlic Ready to Use
You can roast as little or as much as you need. We would typically roast ten pounds at a time at the restaurant. For longer term storage, I would purée the garlic, put it in a sterilized container, and top it with a bit of olive oil to seal out the air.

Saturday, August 29, 2020

Sweet and Salty Chicken and Rice Soup

I love Asian broth-based noodle soups of all kinds: ramen, pho, Thai roasted duck noodle soup. Sadly, living here in wine country (aka farmland), access to the ingredients I need to make those soups is tough. We have got to bite the bullet and drive in to Portland (or Beaverton, more likely) for a supply mission. I love living out here in the country, but....

The other day, I wanted such a soup so badly that I decided to improvise with what I had on hand.

Caramelizing Shallots and Ginger
From classic pho technique, I wanted to get color in the soup by caramelizing some shallots. In Vietnamese technique, you would char an onion and some garlic to get color. After the shallots colored darker than you see above, I added a quart or so of chicken stock.

While I wanted noodles in my soup, there's no source for them here and none in the pantry, so I added rice and let it cook until soft, about 20 minutes.

Similar to Thai roasted duck noodle soup, I wanted a sweet-salty component that I would normally get from balancing fish sauce and palm sugar. Having no palm sugar, I used agave syrup with fish sauce. It worked really well as a substitute.

I love soft-boiled eggs in ramen, so at the last minute, I poached a couple of eggs right in the soup. 

Sweet and Salty Chicken and Rice Soup
with Poached Egg, Green Onion, and Cilantro
This turned out to be a really great soup with all the flavors I wanted, even though I had almost none of the ingredients that I wanted. Necessity, as they say, provided us with a soup that I want to remember.

Friday, August 28, 2020

Pickled Shrimp

As an American chef, I could naturally have been expected to have learned how to pickle shrimp in my self-studies of regional American cuisines, including South Carolina Lowcountry cuisine in which this dish is an heirloom. But I came to it from another route, from studying Spanish cuisine, in which pickled shrimp is called escabeche de camarón. The Jamaican equivalent goes by the name of escovitch. I'm not really sure how pickled shrimp found their way to South Carolina and while I know these dishes are all related, I don't know the family history. I wish I did.

Pickled Shrimp on Greens
By whatever name, the dish starts with shrimp, raw or cooked, "pickled" in an acidic sauce, usually oil and vinegar. Many domestic versions include typical pickling spices: allspice, coriander, mustard seed, cloves, and black peppercorns. Hispanic versions tend to cumin and oregano. I've had Jamaican versions that are fiery with Scotch bonnet peppers. I like mine fairly plain, aiming for a nuanced herbal flavor from lovage, parsley, and bay leaves. Everyone's version is different and they are all delicious.

Pickled Shrimp Mise en Place
Before getting started with any dish, I gather everything that I will need to make the dish. This is what chefs call mise en place, French for putting everything in its place. It's a really good habit to get into, no matter what you are cooking. Once you start the actual cooking, your food will have your undivided attention because you won't be searching for things.

Before every dinner shift at the restaurant, I would go though my station and the evening's menu, cooking each dish in my head, making sure that I knew where every ingredient and every piece of equipment was. Then when it was show time, no matter how busy we got, I had only to worry about cooking the food and getting it to the dining room. I spent routinely 20 to 35 minutes a night getting set, down to making sure that my mixing bowls, tongs, and tasting spoons were in the exact same location from shift to shift so that I could grab them without looking. It takes a lot to be a professional cook and it all starts with organization.

Court Bouillon
I start my version of pickled shrimp by poaching the shrimp in a court bouillon, a flavored broth which will give its flavor to the shrimp. This court bouillon I made with water, a splash of rice vinegar, a teaspoon of salt, lemon slices, parsley stems, a bay leaf, and pinch of red pepper flakes. I brought the court bouillon up to a boil for three minutes or thereabouts, then turned off the flame and added the shrimp, letting them poach slowly in the hot court bouillon.

Sweating Carrots and Onions
I always pickle carrots and onions along with the shrimp. Besides being a traditional component of the dish, they are a wonderful bonus. I love the pickled vegetables almost as much as the shrimp. The carrots, I slice on the bias into oval-shaped coins. The onions, I cut in half, and then into slices yielding half rings. I slice them this way for presentation: I think the shapes are all complementary. I sweat them a bit over medium heat just until the carrots soften and the onions turn translucent.

Shrimp Ready for the Refrigerator

I mix the shrimp, the solid ingredients from the court bouillon, and the onions and carrots in a bowl. Then I add some lovage leaves, fresh lemon slices, more bay leaves, salt, and a fair amount of ground black pepper. For longer storage, I would pack this mix into a sterilized jar or other container, then top it with a vinaigrette of red wine vinegar (1/3) and olive oil (2/3) to isolate the shrimp from the air and bacteria. Pickled shrimp will keep up to a week in the refrigerator, though I think they're at their best between 24 and 72 hours.

For this dish, I made the shrimp first thing in the morning with the intent to eat it at dinner that evening, so there was no need to submerge it in dressing. I mixed a half a cup or so of vinaigrette and tossed it with the shrimp before refrigerating it.

At dinner time, I picked out and discarded the lovage leaves, bay leaves, and lemon slices. Then, after draining the shrimp, I used the drained oil and vinegar to dress a big bowl of salad greens. As you see in the top photo, I mounded the shrimp, carrots, and onions on top of the greens.

Ann had never had pickled shrimp before and she loved it. I know that she's looking forward to the next time.

Wednesday, August 26, 2020

Huevos con Chorizo

In my book, there's almost no better quick meal than huevos con chorizo, whose name is its recipe. Here's your recipe: fry up some Mexican chorizo, add some beaten eggs, and cook until the eggs are set. Done. It does not get simpler than that.

Huevos con Chorizo

For me, while I love it any time, I find that huevos con chorizo works really well as hangover brunch food à la menudo and posole. Speaking of hangover brunch food, I should post on huevos rotos sometime, but that's more Spanish than Mexican.

In the case of the huevos in the photo above, it was dinner time and Ann and I were really hungry. I had no plan, but I had a pound of ground turkey in the refrigerator. While I would rather have ground pork, my cardiologist is happy with the turkey. It would be nearly impossible for most people to tell that the meat in my chorizo is turkey, rather than pork.

As for chorizo, I don't buy and pay exorbitant prices for something that I can make so easily. Just to be clear, we are talking about loose Mexican chorizo, not the incredibly delicious hard sausages from Spain. I don't have an exact recipe, but for a pound of ground meat (pork or turkey), I will start by sautéeing a finely diced poblano pepper and a half a large yellow onion until the onion turns translucent. At this point, I will add a pound of ground meat and break it up.

Next, I add seasonings: an ounce of ground mild Numex chile, a couple tablespoons of freshly ground cumin, 4-6 cloves of finely minced garlic, and a couple of pinches of Mexican oregano finely crumbled by rolling between my palms. At this point, if I want spice, I'll add something spicy, typically a couple of tablespoons of sambal oelek (crushed red jalapeños). There was no spice in this batch.

And then, I splash a couple of glugs of red wine vinegar in the pan, because chorizo without vinegar tastes weird to me. Adding vinegar is very traditional. Along with the vinegar, I'll generally add a small amount of water and let everything cook and meld together until the water is evaporated.

An Aside on Spices. If you're serious about cooking, consider buying a good spice grinder. I really do like my Waring Professional, but at $175-200, it is a splurge. For chorizo, I always grind cumin to order. I rarely grind my own chile, though. Ground chile is something that is best left to industrial equipment.

Also, Mexican oregano (Lippia graveolens) is not Greek oregano (Origanum vulgare). They taste very different. Go easy when using Mexican oregano; it seems much stronger to me. Also, it's typically not going to be labeled Mexican oregano. If you buy a Latino brand such as El Guapo, it will be labeled simply orégano, but it will be Mexican.

I buy a lot of El Guapo spices from the Latino aisle of my grocery store. This brand of spices is way less expensive than the traditional American brands three aisles over in the grocery store. As much cumin/comino seed as I use, I'd be broke if I had to pay what they're asking for it in the spice aisle.

Next come the eggs. Sometimes, I want more eggs than chorizo, sometimes more chorizo than eggs. It's a feeling thing. But generally, I will do about 8 extra large eggs to a pound of chorizo. The photo above is 6 eggs to a pound of chorizo, because I was feeling the chorizo more than the eggs, probably because we ate this for dinner rather than brunch. This being retired stuff is a bit weird in that we pretty much eat only two meals a day, a departure from work days of breakfast, lunch, and dinner.

In a departure from tradition and now that it is summer and we have a counter full of ripe tomatoes, I felt like serving this batch of huevos on slabs of fresh tomatoes, with tortillas on the side, because what's better with eggs than fresh tomatoes and how many months a year do we have perfectly ripe tomatoes?

Anyway, that's your huevos con chorizo. It's a great, simple meal. And if you venture so far as to make your own Mexican-style chorizo, you might not buy pre-made chorizo again. ¡Buen provecho!

PS. I like huevos con chorizo so much that I have blogged about them before 8 years ago and totally forgot about it.

Tuesday, August 25, 2020

Beachcombing and Birds: Nestucca Spit, Bob Straub State Park, OR

For our trip to the coast this week, we chose Bob Straub State Park at the south end of Pacific City, looking for a bit of solitude and a long walk on the beach. The park has one of the closest beaches to our house. Sandwiched between the Pacific Ocean and Nestucca Bay/River which runs almost parallel to the ocean for about three miles, the thin sliver of land making up the park is also known as Nestucca Spit. The park is named for the former Governor of Oregon who was instrumental in keeping Highway 101 from being routed down the spit.

Coming into Pacific City off of the Pacific Coast Highway along the Nestucca River and Bay, it was impossible to see Haystack Rock for the fog which we struck just at the highway as we came down out of the Coast Range following the Little Nestucca River. In Pacific City, we crossed the Nestucca River bridge and instead of turning right to head north the mile to Cape Kiwanda, we went straight across and immediately left to head south down the spit, past the camel- and horse-ride vendors. We had to stop for about ten seconds to let a Blacktail doe mosey across the street on our way down to the parking lot.

Parking Lot at Bob Straub State Park
As soon as we left the last set of dwellings beyond the boat launch, we entered a low coastal pine scrub, which after passing through town, felt eerily all alone. The low hanging fog and 300-yard visibility added to the atmosphere. It had been sunny, as usual for this time of year, right up to a couple of miles off the beach. The very cold water coming down from Alaska meeting the warm air at the coast often fogs in the beach and today, it was pretty foggy.

Haystack Rock at Bob Straub State Park?
We headed a few yards west out of the parking lot and climbed the dunes separating the parking area from the ocean. At the top, we could just barely see the top of Haystack Rock, about a mile north of us. Dead center in the photo, if you expand it, you can just see the ghost of the rock. The little bit of sunshine that you see on the dune in front of the camera is as much sun as we had all day.

Annie and a Fogbow
With the sun just coming up over the Coast Range to our east, there were pretty consistent fogbows for an hour or so, just off the ocean to the west. I don't recall ever having seen a fogbow before. The temperature never really got too much above 60F on the beach and visibility most of the time was perhaps a quarter mile, often dropping down to 100 yards or less. Bob Straub Park is relatively unvisited and we had the beach nearly to ourselves for the three miles of oceanfront down to the mouth of the river. With no real sites to see, we contented ourselves with beachcombing. The tide was out and would be starting to come back in on our return.

Holy Mother of Mussels!
I've seen some mussels in my life, but never anything this big! These California surf mussels (Mytilus californianus) are huge, longer than my cellphone. We saw several big ones washed up on the beach. My cellphone, for reference, is 5-3/4" (14.5cm) long. This mussel easily went 7 inches (18cm).

Driftwood. Not!
We came across a few random chunks of kelp and pieces of driftwood, including one that looked like it had been gnawed on by beavers. This piece fooled us from a distance, proving to be a very heavy piece of petrified wood.

Eccentric or Western Sand Dollar

Frilled Dogwinkle
Among the washed up clam, mussel, and crab shells, we found a very few Frilled Dogwinkles, which besides a couple of intact sand dollars were the only really interesting shells of the day. The very few razor clam shells we saw reminded me of exactly how wonderful those most-delicious clams are, and also how different their shells are to those of the eastern razor clams. Those eastern clams look like straight razors, though their official name is Eastern Jackknife Clam.

Western Sandpipers Feeding on Sand Fleas
The further away from the parking lot we got, the more birds we saw, including a few small flocks of Western Sandpipers working the surf, grabbing sand fleas left and right. For a mile or more, one group of about 50 birds kept just ahead of us. We stopped to examine what they were feeding on and saw dozens of tiny sand fleas bouncing around the sand. We also a couple different kinds of larger amphipods along the beach.

Western Gulls, High Tide Line
Evocative of the day is this photo of two Western gulls standing at the high tide line just up the beach from us. That was pretty much our view all day, except for a couple of times when the fog thinned.

Non-Breeding Western Gull
I'm starting to try to figure out gulls out here in Oregon, many of which are very different from East Coast gulls. Of particular confusion is the group of gray-/black-backed gulls with pink legs. I wasn't sure what this gull was because it seems to have a black band at the tip of its bill, a bit similar to, but less distinct than a Ring-billed Gull. I'm really familiar with Ringers as they are probably the most common winter gull on central Atlantic beaches and noted for hanging out at inland garbage dumps. They have yellow-green legs, however, unlike this bird which has decidedly pink legs.

Also, the adult pink-legged gulls have red dots on their lower bills, rather than a black band across both bills. Moreover, the neck and head feathers are not completely white on this bird, making me think that this is not a fully mature bird. It turns out that the common Western Gull takes three years to grow in its adult plumage and get the red spot on its lower bill in place of the dark band seen above.

Brown Pelicans
The most common bird just offshore and on sandbars down the beach was the Brown Pelican. Pelican Brewing in Pacific City is aptly named. Down just before the Nestucca River meets the ocean, we came across a couple hundred pelicans roosting on the beach. For most of our walk, small groups of 5-10 pelicans were patrolling the ocean, flying parallel to the beach, perhaps 100 yards offshore.

Adult and Juvenile Pelicans

Fog at Mouth of Nestucca Bay/River
At the southern end of the beach, we bent left inland around the point and started walking back along the Nestucca River side of the spit. Even just a few yards off the ocean, it became very quiet in the absence of the roaring breakers. It was so quiet that we could hear the crabbers talking in their boats as they pulled in their crab traps in the river.

Great Blue Heron
In just a short stretch along the river, we encountered many Great Blue Herons hunting in the shallows. The more brackish and stiller water of the river must suit them.

Going Back to the Beach
Following the riverbank was a tough barefoot slog through very soft sand, unlike walking along the hard sand at the waterline along the ocean. Moreover, behind the dunes, we lost the cool breeze and it was getting to be warm going, dressed as we were for the ocean breezes. We could have followed the river back to the tree line and then taken a trail through the woods, but Annie was ready to get back to the easy breezy walking of the beach. We climbed back across the dunes to the beach. This bit of time off-trail brought us in contact with the very few flowers blooming in the dune grasses.

Searocket (Cakile spp.)
The most common blooming plant looked for all the world like a Brassica with light pink to lavender cross-shaped four-petaled blooms. I saw what looked to be two different species with different leaves, structures, and blossoms. Some looked very like arugula blooms, elongated like papery ceiling fan paddles, some as you see above with nicely rounded petals.

It turns out that there are two species of this plant called Searocket (rocket as in arugula) and the key to distinguishing them is in their seed pods. None of the pods in my photos are mature enough yet to make a definitive identification. I'm happy enough to know that they were searockets.

Yellow Sand-verbena, Abronia latifolia
In crossing the dunes, I walked right by a big mat of Yellow Sand-verbena whose brilliant yellow blooms cheered up the gloomy morning. Two interesting things about this plant: first, it lives on salt water rather than fresh, and second, as you can see in the photo, it attracts sand as a defense mechanism, making it unpalatable to most animals. The only other yellow in the dunes were a Tansy Ragwort and Coast Goldenrod here and there. For white flowers, we saw widely scattered Yarrow and Pearly Everlasting. Mainly though, we were walking through a veritable sea of grass.

Pearly Everlasting (Anaphalis margaritacea)
Once back on the beach, we headed back north towards the truck, the tide coming back in and washing up on our feet fairly often as we sought to stay in the firmer sand near the water. Back near the truck, the coastal fog had lifted just slightly off the ground to the point where the base of Haystock Rock was visible. Despite this, the sun would never cut through the fog while we were there. All day, the fog thickened and lightened, and at one point when it was really thick, we saw a group emerge slowly  coming towards us, vague shadows morphing into people on horses, perhaps ten strong.

After a 5- to 6-mile walk, we found our landmark and recrossed the dunes to the truck. Whenever I go out on a beach, I find a landmark so that I know how to find my way back. That was super imperative in all the fog. We could still be searching for the truck!

Haystack Rock, Pacific City

Crossing the Dunes Back to the Truck

Post Walk Libations

We were pretty thirsty after our walk the length of Nestucca Spit and back, so we headed two minutes north up the beach to Pelican Brewing for lunch before heading back home to McMinnville. Bottom line on Bob Straub State Park: easy parking, less populated, long walk with a lot of birds, not much in the way of scenery along the beach. Next time, I think a return trip through the trees is in order.


Sunday, August 23, 2020

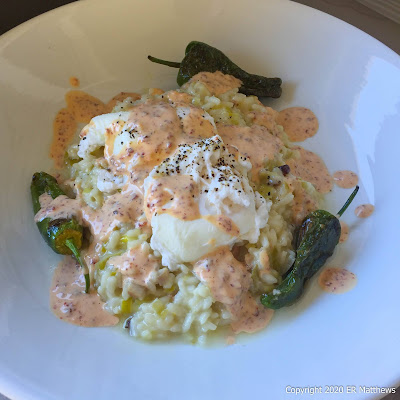
Leek, Guanciale, and Goat Cheese Risotto

I've expressed before that when I want comfort food, I want rice. It features often on the blog: fried rice, arroz con pollo, jook, and paella. But of all the rice dishes, risotto for me is the ultimate in rich comfort, something that we sorely need right now.

On top of our concerns about our kids and their safety during this pandemic, Ann's mother is in the ICU and not likely to survive. Our inability to travel to the East Coast and visit with her has turned us inside out. We want comfort food now more than ever.

That was the genesis of this risotto: coping with our depressing world by making something comforting out of whatever was in the refrigerator.

This is a post on risotto technique. I diverge only from classic technique at the end during the mantecatura by adding goat cheese rather than butter and Pecorino or Parmigiano. My stomach cannot tolerate a lot of cow's milk products, so I use goat cheese instead. The technique remains the same.

Isn't it wonderful that the Italians have a verb, mantecare, for the final stage in making a dish unctuous and creamy by stirring in butter, cheese, or both?

Leek, Guanciale, and Goat Cheese Risotto
with Poached Eggs, Padrón Peppers, and Chipotle Aïoli
I scrounged the refrigerator and found a couple of leeks, a piece of guanciale, a bit of goat cheese, an open can of chipotles, and a few padrón peppers.

Guanciale is cured hog jowl, one of the best bits on the hog and similar in many respects to pancetta, which is made from pork belly. I used to cure both at the restaurant. Now I can buy guanciale at the grocery store where it is labelled jowl bacon.

For this risotto, I was looking for maximum comfort and in my culinary lexicon, that often means including poached eggs in dishes. There is something über-sexy about breaking open a just-poached egg and stirring the yolk into a dish. I topped each plate of rice with two poached eggs. I should do a post on how to poach eggs; they're so simple to do and so rewarding.

To finish gilding this lily, I made a quick chipotle aïoli (mayo, garlic, chipotle, salt, water) and blistered a few Padrón peppers for garnish.

Comfort mission accomplished!

Risotto Technique


No matter how risotti are flavored, the basic technique is the same. The photos below illustrate the various steps.

Rendering the Guanciale
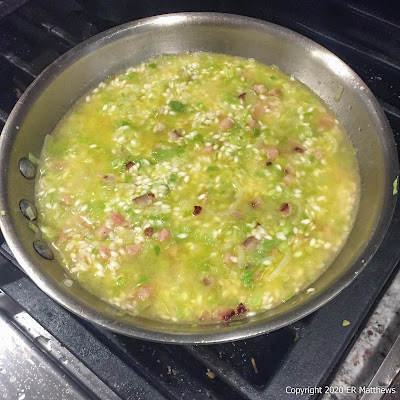
The first step is almost every risotto is to cook finely diced onion (say a medium onion for this pan of risotto) in olive oil. I opted instead to use leeks, so I started the guanciale to render some fat in which to cook the leeks. It is not necessary to cook the leeks fully at this point because they will cook for another 20 minutes or so in the rice. Onions should be translucent, but have no color.
 
Coat the Rice in Fat Until the Edges Go Translucent
When the onions or leeks are done, add the rice and stir while coating it in fat. Use the best Arborio or other Italian short grain rice that you can find. There are several kinds that are as good or better than Arborio. Quality matters and good rice is relatively expensive. This 10" pan holds 250 grams of rice, comfortably. I buy Arborio in vacuum-sealed kilo bricks. A brick makes four nice pans of risotto.

Once the rice is coated in fat and its edges go translucent, add a glass of dry white wine and stir the rice. Adjust the heat so that the liquid just bubbles: risotto is not a dish to cook over high heat. Stir frequently. Once the wine has nearly evaporated, add stock or broth to cover the rice as you see in the picture just below. This is the only time that you will add this much stock to the pan at once. I used chicken stock that I made from the bones and skin after boning out chicken thighs.

For a red-wine based risotto, such as risotto al barolo, you'll want to use red wine and perhaps a darker stock, such as beef stock. Still, the technique is identical.

First Broth Addition
Stir every little while as the first addition of broth is absorbed into the rice. Stirring knocks the rice about and knocks little bits into the broth, helping to thicken it. Moderate the flame so that you are not boiling off the broth rapidly. When the liquid level drops below the surface of the rice, add more broth in small quantities such as 2-4 ounces for each addition. I find it helpful to use a professional 2-ounce ladle, available at any restaurant supply house.

Second and Subsequent Broth Additions
After you have added your two ounces or so of broth, the rice will resemble that above. That's how little additional broth you are adding. Keep adding broth in these tiny quantities, stirring frequently, until the rice is cooked. In my experience, it's going to take on the order of 20 minutes for the rice to cook, but that will vary with the freshness, dryness, and variety of the rice.

You'll want to taste the rice to assess whether it is done. Different people have different ideas about how done risotto rice should be cooked. Some like a distinct bite in the rice, some like it softer. I fall in the middle, but my full-blooded Italian wife likes it a bit softer than do I.

I have found that I can actively cook the rice until it just has the tiniest bite in the center, then turn off the flame and let the rice rest for two or three minutes. It will continue cooking to perfection.

Rice, Just Done
When you're happy with the rice, it needs to be finished and served immediately. Traditionally, you would stir in a couple tablespoons of butter and say 3/4 of a cup of grated cheese (Pecorino or similar). My stomach isn't happy with butter, so I stirred in roughly two, maybe three, ounces of fresh goat cheese.

Adjust the consistency if you need to with a splash of broth. Risotto shouldn't be runny or stiff, but pleasantly creamy.

Saturday, August 22, 2020

Kitchen Basics: Prepping Leeks

Leeks don't seem to be all that popular in the US, but they are without a doubt my favorite onion. It may be because my Matthews family has Welsh origins. I also love daffodils, what can I say? Most prep cooks who came through my restaurant kitchen had never worked with them, which is a shame, because they are so delicious. I also noticed when I would perform demos for the general public, many of the attendees would voice trepidation about working with leeks. And that fear was preventing them from trying one of the most delicious vegetables on the planet.

There is nothing to fear about working with leeks. There are just two simple issues to contend with. First, the white part of leeks grows completely below the ground and therefore leeks are susceptible to being dirty. It doesn't help that to promote the growth of long, straight leeks, they are often grown in sandy soil. The second issue is that the green part of the leek can be tough and fibrous and while delicious and flavorful, not all that pleasant to eat.

This is a case when a series of pictures is so much more useful than a raft of words. Below is a step-by-step tutorial for one method of prepping leeks. There are many other ways, but I find this method the easiest for most people for most uses of leeks. If you want whole leeks for braising, raw disks for salads, or want to fry your leeks, this post is not for you.

One other caveat. Many people would have you cut off and use just the white part of the leek. I believe that this is a remnant from classic French cuisine in which chefs did not want any green coloration to a white sauce including leeks. I don't know this for sure, but in any case, the notion that only the white part is useful is outdated. As you will read, the entire leek is useful.

Let's get our prep on.

A Leek from the Farmers Market

Peel the Tough Outer Layer

Tear off Any Tough Parts

Split the Leek Leaving the Root End Intact

Chop the Leek and Wash Well in a Bowl of Water

Recap


The outer layer of the leek, including the white part is likely to be tough. Peel it down and remove it. In smaller leeks, the outer layer may be OK. If you can rip it with your fingers, it is tender enough. 

Peel each consecutive leaf layer down towards the root end. At the point where the leaf becomes tender, tear it off. Each successive layer will become tender higher up on the leek. The center leaves will probably be tender all the way to the end.

Wash the discarded leek leaves and save them in the freezer for the next time you make stock. They are a wonderful addition to stock and deserve to be used before composting.

Working from the root end, slice the leek vertically from about a centimeter from the bottom all the way to the top. Rotate the leek and slice again as many times as you need to. A small leek can be quartered. Medium leeks, I slice into sixths, and giant leeks into eigths.

At this point, give the leek a quick rinse in running water, holding the root end up such that any dirt is washed out and not down into the leek.

Slice the leek horizontally and put the sliced pieces in a bowl of cold water. They will float. Agitate them well with your hands and leave them to stand long enough for any dirt and grit to fall to the bottom.

Scoop the clean leek pieces off the top of the water. They're ready to use.

Polenta with Mushroom Ragoût

It's been a quiet few weeks at home since we got back from Santa Fe in early December, weeks in which we have uncharacteristically not d...